background image

2

PLS Basic Air Curtains Water

GB

0

1

2

3

4

5

6

7

8

9

0

1

2

3

4

5

6

7

8

9

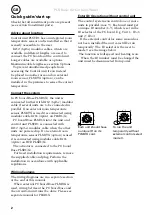
To run the unit 
temporarily without 
external control select 
mode 0.

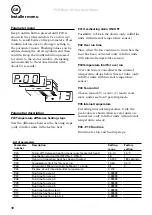
Each unit should have 
a unique ID on its 
PLSB1X card.

Quick guide/start up

Check that all constituent parts are present 
(see section Constituent parts).
 

Advice about location 

Control unit PLSUB1 has an integrated room 
temperature sensor and is installed so that it 
is easily accessible to the user.

RJ12 (6p/6c) modular cables, which are 

available in different lengths, are used to 
connect the PC board and the control unit. 
Longer cables are available as options. 
Maximum cable lengths see section Options.

To prevent unauthorised people from 

accessing the Control unit it can instead 
be placed in another area and an external 
room sensor, PLSRTX (option), can be 
installed  in the premises to sense the correct 
temperature.


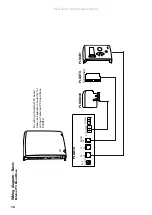
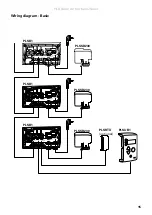
Connect the system 

In PC board Base PLSB1(X) the unit is 
connected further with RJ12 (6p/6c) modular 
cable if several units are to be connected in 
parallel. If an external room temperature 
sensor PLSRTX is used it is connected using 
modular cable RJ11 (4p/4c) on PLSB1(X). 

PC board Base PLSB1X in/at the unit and 

control unit PLSUB1 is connected with 
RJ12 (6p/6c) modular cable when the other 
units are powered up. If an external room 
temperature sensor PLSRTX (option) is used 
it is connected using modular cable RJ11 
(4p/4c) on HUB PLSB1(X). 

The actuator is connected to the PC board 

Base PLSB1(X).

 For fixed installation requirements, remove 

the supplied cable and plug. Perform the 
installation in accordance with applicable 
regulations.


Wiring diagrams

The wiring diagrams are in a separate section 
at the end of this manual.

 When external PC board Base PLSB1X is 

used, wiring between the PC board base and 
the air curtain unit must be done. Please see 
separate manual for PLSB1X. 


Enter ID/Operation without control unit

The control system can control one or more 
units in parallel (max 9). Each unit must get 
a unique ID number (1-9) which is set in the 
ID selector of the PC board. E.g. Unit 1: ID=1, 
unit 2: ID=3

If the external control for some reason has 

not been installed the unit can still be run 
temporarily. The ID selector is then set to 
mode 0 see the image below.
 The function is half speed and heating is on. 

 When the ID number must be changed the 

unit must be disconnected from power.


Summary of Contents for PLSB

Page 1: ...PLS Basic Air Curtains Water With quick guide PLSB C For wiring diagram please see last pages GB ...

Page 2: ...it is connected using modular cable RJ11 4p 4c on PLSB1 X PC board Base PLSB1X in at the unit and control unit PLSUB1 is connected with RJ12 6p 6c modular cable when the other units are powered up If an external room temperature sensor PLSRTX option is used it is connected using modular cable RJ11 4p 4c on HUB PLSB1 X The actuator is connected to the PC board Base PLSB1 X For fixed installation re...

Page 3: ...ree horizontal lines After about 30 seconds the prevailing room temperature is then shown in the status window Use arrow up down and set the desired room temperature fan speed step and heating step To change a setting push the round button confirm the setting will start to flash and can be adjusted by using the arrow up down Factory settings gives manual control of fan and heating controlled by th...

Page 4: ...t parts PLSB 5 Option 6 Max cable lengths 6 Water control valve kit 7 Operating modes Operating modes 8 Auto mode 8 Fan over run 8 Set values 8 System on off 8 Control unit PLSUB1 Overview 9 Explanations 9 Installer menu Parameter menu 10 Parametrar description 10 Alarm and error codes Overheat protection 11 Displaying alarm and error codes 11 Reset alarm 11 Wiring diagrams see last pages ...

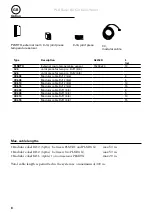
Page 5: ...PLSlT Internal temperature sensor 1 CC605 Modular cable RJ12 6 6 5 X5 C2 X4 C1 X3 ROOM PE N L SUPPLY 230V ACTUATOR 230V C Integrated in the air curtain Constituent parts Wall unit cover PLSB1 integrated PC Board Base PLSIT internal temperature sensor PLSUB1 control unit Basic Dimensions constituent parts PLSB CC modular cable ...

Page 6: ...cable RJ12 6 6 15 CC403 Modular cable RJ11 4 4 3 CC405 Modular cable RJ11 4 4 5 CC410 Modular cable RJ11 4 4 10 CC415 Modular cable RJ11 4 4 15 Option PLSRTX external room temperature sensor CJ4 joint piece CJ6 joint piece Max cable lengths Modular cabel RJ12 6p 6c between PLSUB1 and PLSB1 X max 50 m Modular cabel RJ12 6p 6c between two PLSB1 X max 50 m Modular cabel RJ11 4p 4c to room sensor PLSR...

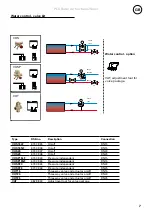
Page 7: ... 09 43 Pressure independent DN15 VOSP15NF 673 09 44 Pressure independent DN15 VOSP20 673 09 45 Pressure independent DN20 VOSP25 673 09 46 Pressure independent DN25 VOT15 Three way valve and actuator on off DN15 VOT20 Three way valve and actuator on off DN20 VOT25 Three way valve and actuator on off DN25 VAT 482 98 30 Adjustment tool for valve package Water control valve kit Water control option VA...

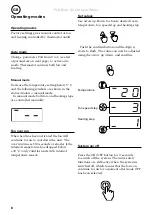
Page 8: ...ired room temperature fan speed step and heating step Push the confirm button and the digit s starts to flash The value can now be adjusted using the arrow up down and confirm Heating step Temperature Operating modes Factory settings gives manual control of fan and heating controlled by thermostat on off Auto mode Change parameter P04 from 0 to 1 see list of parameters on next page to active auto ...

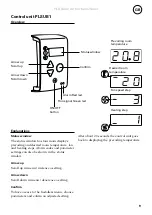
Page 9: ...window Arrow up Scroll up in menu increase a setting Arrow down Scroll down in menu deacrease a setting Confirm To have access to the Installers menu choose parameters and cofirm an adjusted setting After about 20 seconds the control unit goes back to displaying the prevailing temperature Alarm Red led Arrow down Scroll down Arrow up Scroll up Run signal Green led Statuswindow ON OFF button Desire...

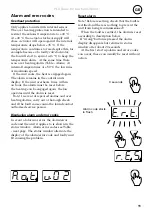
Page 10: ...rm button once to change a setting in the parameter menu Flashing values can be adjusted using the arrow up down and then confirm Keep the Confirm button pressed to return to the status window Returning automatically to the status window after about 50 seconds P 01 Overheating alarm ON OFF Possibility to block the alarm only valdid for units with internal temperature sensor P 02 Over run time Time...

Page 11: ...s twice within an hour the alarm must be reset before the heating can be engaged again the fan operates until the alarm is reset Note In event of repeated alarms and over heating alarms carry out a thorough check and if the fault cause cannot be found contact authorised service person Displaying alarm and error codes In event of alarm or error the alarm error code and the unit it applies to is sho...

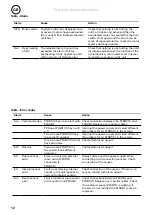
Page 12: ...X has no ID 0 Interrupt the power supply and select different ID numbers for all PLSB1 X in the system Two or more PLSB1 X have the same ID number Interrupt the power supply and select different ID numbers for all PLSB1 X in the system One or more PLSB1 X do not have programs Contact technical support E cF ID error Two or more PLSB1 X in the system have different programs Contact technical support...

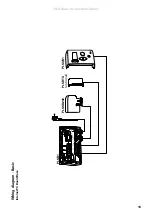
Page 13: ...PLS Basic Air Curtains Water 13 X5 C2 X4 C1 X3 ROOM PE N L SUPPLY 230V ACTUATO R 230V C PLSB1 PLSSD230 PLSRTX optional PLSUB1 Wiring diagram Basic Internal PC Board Base ...

Page 14: ...iagram Basic External PC Board Base C PLSSD230 PLSRTX optional PLSUB1 PLSB1X C2 X5 C1 X4 ROOM X3 Pot Unit ID N L L N L PE ACTUATOR SUPPLY For wiring of external PC board base see separate manual for for wiring of external PC board base PLSB1X ...

Page 15: ...4 C1 X3 ROOM PE N L SUPPLY 230V ACTUATOR 230V PLSB1 PLSSD230 PLSRTX optional PLSUB1 X5 C2 X4 C1 X3 ROOM PE N L SUPPLY 230V ACTUATOR 230V PLSB1 PLSSD230 X5 C2 X4 C1 X3 ROOM PE N L SUPPLY 230V ACTUATOR 230V PLSB1 PLSSD230 Wiring diagram Basic ...

Page 16: ......

Reviews: