Automist Smartscan
®
Handbook v1.2.3
Plumis Ltd Copyright © 2017. All Rights Reserved.
Page 47 of 64
S MA RT SC AN
®
17.
Check that there are no leaks behind the head, at the pump or along the hoses.
18.
In the event that commissioning has been unsuccessful, the pump will beep and the amber
‘
FAULT
’ LED will flash twice. If
this occurs, the system will require recommissioning. This can be
done by pressing the STOP button and then restarting the commissioning process.
19.
Once you have successfully commissioned your unit, complete the online commissioning form
and attach a layout diagram and photos.
20.
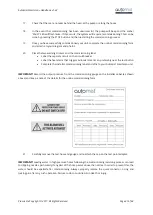
Place the two warning stickers and the commissioning label:
•
Label the separate circuit on the circuit breaker
•
Label the heat alarm that triggers Automist Smartscan, preferably near the test button
•
Complete the installer commissioning label and affix to your Automist Smartscan unit
IMPORTANT!
Record the output pressure from the commissioning gauge on the Installer Label (as shown
above) and keep a note of the details for the online commissioning form.
21.
Carefully remove the test hose and gauge and re-attach the cap on the test point adapter.
IMPORTANT!
Leaving water in high pressure hoses following the commissioning/servicing process can lead
to dripping nozzles, particularly if any part of the hose passes above the nozzles. In order to prevent this, the
water should be expelled after commissioning. Always properly replace the quick connector, o-ring and
locking pin after any such operation. Failure to do so could result in death or injury.

