background image

Installing


SilverFast


Software


1.


Insert


the


Setup


/


Application


USB


stick


into


your


computer.


2.


Install


the


SilverFast


software


by


the


following


path:


Windows


OS:


OPTICFILM


Windows


SilverFast


SF

Installer.exe


Mac


OS


X:


OPTICFILM


Mac


SilverFast


SF

Installer.dmg


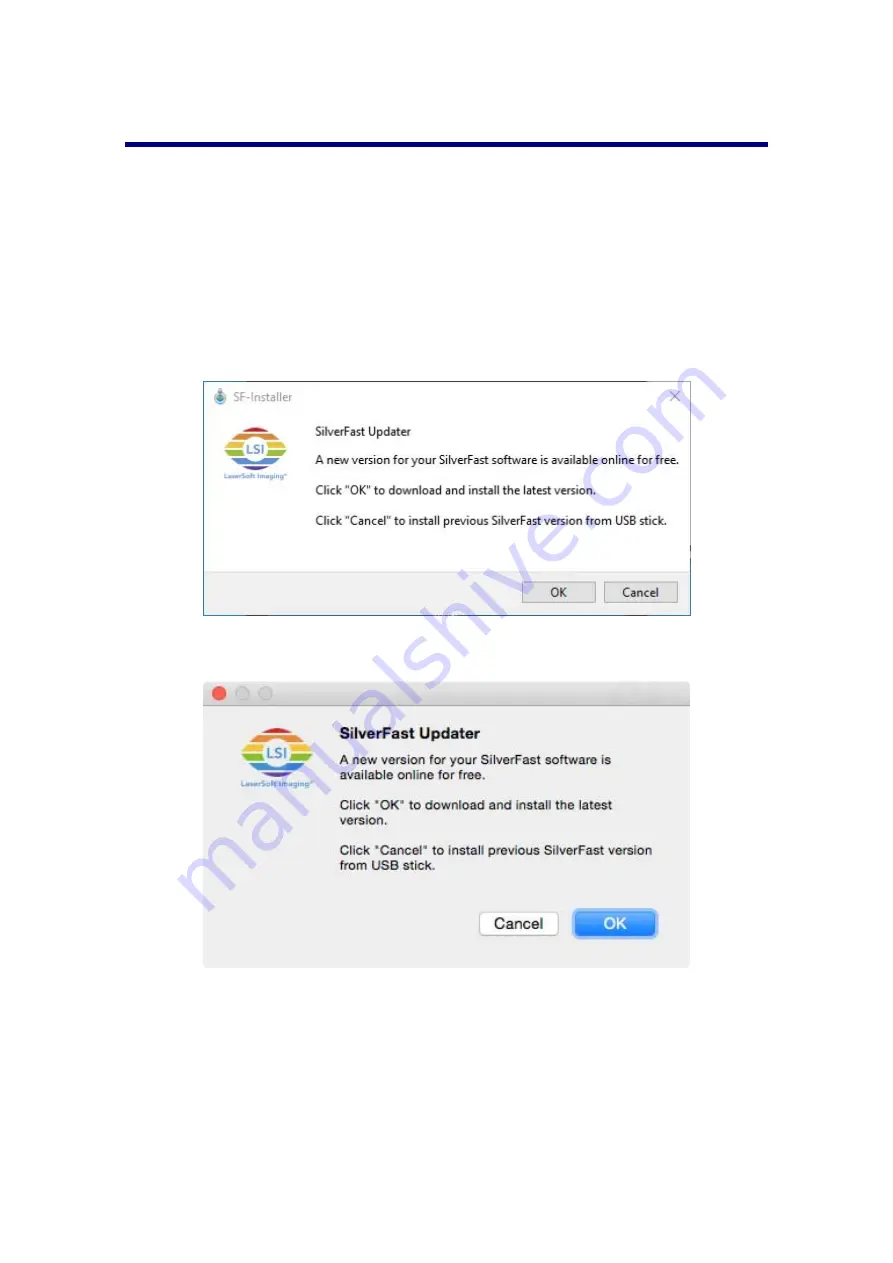
If


a


more


recent


SilverFast


version


is


available


online,


the


following


dialog


will


be


displayed.


Windows


OS


Mac


OS


X


Click


[OK]


to


download


and


install


the


latest


SilverFast


version


from


the


internet


or


click


[Cancel]


to


install


the


out

of

date


version


from


the


USB


stick.


8


Summary of Contents for OpticFilm 120 Pro

Page 1: ...Installation Usage Maintenance Troubleshooting ...

Page 2: ...nts may be prohibited by law and or subject to criminal prosecution We recommend you to be responsible and respectful of the copyrights laws when you are scanning books magazines journals and other materials Environmental Information Recycle or disposal at end of life information please ask local distributors or suppliers for recycle and disposal information The product is designed and produced to...

Page 3: ...UEST FOR SILVERFAST SERIAL NUMBER 12 SILVERFAST SOFTWARE SERIALIZATION 13 SCAN WITH THE SILVERFAST APPLICATION 15 FILM HOLDERS 16 USING MOUNTED SLIDE HOLDER 16 USING 35MM FILMSTRIP HOLDER 16 USING 120 220 FILMSTRIP HOLDER 17 INSERT THE FILM HOLDER 18 LENS CALIBRATION TOOL 19 APPENDIX A TROUBLESHOOTING 24 SCANNER CONNECTION 24 SCANNING PROBLEMS 25 APPENDIX B SPECIFICATIONS 27 APPENDIX C CUSTOMER SE...

Page 4: ...ction Thank you for choosing us as your scanner supplier We hope you will continue to turn to us for additional quality products as your computing needs and interests grow A Note about Icons This guide uses the following icons to point out information that deserves special attention Danger Danger A procedure that must be followed carefully to prevent injury or accidents Caution Caution Information...

Page 5: ...amaged wire could cause fire or electrical shock Keep the power cord straight and without being twisted bended or scraped 5 Unplug this device if you don t need to use for a certain period of time such as during night or long weekend to avoid any risks of causing fire 6 Do not attempt to disassemble the scanner There is danger of an electrical shock and opening your scanner will void your warranty...

Page 6: ...keep the scanner covered Dust particles and other foreign objects may damage the unit Do not attempt to disassemble the scanner There is danger of an electrical shock and opening your scanner will void your warranty Do not subject the scanner to excessive vibration It may damage the internal components Your scanner operates best in temperatures between 10 C to 40 C 50 F to 104 F 3 ...

Page 7: ...trips For 6 x 6 6 x 7 E For scanning 120 220 filmstrips For 6 x 8 6 x 9 6 x 12 USB 3 0 Cable Power Adapter Quick Guide Setup Application USB stick Activation card 6x7 IT 8 Target Attention You may find the scanner hardware serial number on the activation card please keep the card in a safe place 1 Save the box and packing materials in case you need to transport this scanner in the future Box conte...

Page 8: ...cause the AC adapter is not properly plugged into an AC power outlet Eject Button Use this to eject the currently inserted film holder Front Film Holder Slot Insert the film holder into the scanner through dust cover Rear Film Holder Slot Manually remove the Film Holder through the Rear Film Holder Slot if it does not eject through the front automatically Protection Cover Protects the Rear Film Ho...

Page 9: ...ceptor Plug the other end of the power adapter into a standard AC power outlet Plug the square end of the included USB cable to the USB port at the rear of the scanner Plug the rectangular end of the USB cable to the USB port on the back of your computer Note If there is another USB device connected to the computer connect the scanner to an available USB port Attention Please DO NOT power on the s...

Page 10: ...lling Scanner Driver Windows Attention For Mac OS X user it s not necessary to install the driver you just need to install the SilverFast software 1 Insert the Setup Application USB stick into your computer 2 Click Setup exe under OPTICFILM Windows Plustek OpticFilm 120 Pro to install the scanner driver 3 After the software is installed close all open applications and click on the Finish button to...

Page 11: ...TICFILM Windows SilverFast SF Installer exe Mac OS X OPTICFILM Mac SilverFast SF Installer dmg If a more recent SilverFast version is available online the following dialog will be displayed Windows OS Mac OS X Click OK to download and install the latest SilverFast version from the internet or click Cancel to install the out of date version from the USB stick 8 ...

Page 12: ...3 Follow the on screen instructions Windows OS Mac OS X 9 ...

Page 13: ...4 After the installation finishes click on Finish Close to exit the installer Windows OS Mac OS X 10 ...

Page 14: ...er on the Scanner Press and hold the button for 2 seconds then release the button to turn the scanner ON Attention Press and hold the button for 2 seconds then release the button to turn the scanner OFF 11 ...

Page 15: ...lverfast com activation plustek and follow the instructions You will need your scanner hardware serial number 2 Enter your scanner hardware serial number your name and your email address The SilverFast serial number will be sent to your registered email address 12 ...

Page 16: ...Software Serialization 1 Launch the SilverFast program using the SilverFast shortcut on your Desktop Verify your Image Source and Language selection then click on Start to launch the program Windows OS Mac OS X 13 ...

Page 17: ...st name Last name and Serial number then click on Unlock to unlock SilverFast Windows OS Mac OS X Attention Visit the website www silverfast com activation plustek to request SilverFast serial number You will need your scanner hardware serial number 14 ...

Page 18: ... application Launch the SilverFast launcher using the SilverFast shortcut on your Desktop Adjust the scan settings Please refer to the SilverFast manual for more information about available scan settings Windows OS Mac OS X 15 ...

Page 19: ...ons to insert the mounted slides Using 35mm Filmstrip Holder Open the film holder and place the filmstrip in the film holder with the emulsion non glossy side down Always align the film towards the direction of insertion The direction of insertion is indicated by a white square and an arrow When scanning a single filmstrip or filmstrips of different lengths please use the included masking sheets t...

Page 20: ...ide down Always align the film towards the direction of insertion The direction of insertion is indicated by a white square and an arrow Direction of insertion Arrow Attention Adjust the individual frames to fit the size of the images on your film then close the film holder cover 6 x 4 5 6 x 6 6 x 7 6 x 8 6 x 9 6 x 12 17 ...

Page 21: ... remove the film holder Attention Please DO NOT press any scan buttons until the film holder is completely inserted It takes about 30 seconds to locate the film position and detect the film type Attention The film holder should be able to be inserted into the scanner smoothly Do not push the film holder hard On the top side of the film holder you can see 35 mm Mounted Film Holder or 35 mm Strip Fi...

Page 22: ...resolution and the film size you ve selected For Windows user Click Start All Programs Your scanner model name Lens Calibration Tool For Windows 8 1 users Point your mouse cursor to the upper or lower right corner of your screen to open the Charm bar Click on the Start charm then click on the downwards arrow button in the lower left corner of the screen The Apps screen will be shown Move your curs...

Page 23: ...he following dialog pops up Select the film type and desired frame that you want to take as the standard then click OK button You may tick the checkbox of Max Res to scan image with the maximum resolution Attention The Max Res is 5300 dpi while the default resolution setting is 2650 dpi 20 ...

Page 24: ...click OK button You may tick the checkbox of Max Res to scan image with the maximum resolution If you insert the 120 film strip holder the following dialog pops up Select the film type film size and desired frame that you want to take as the standard then click OK button You may tick the checkbox of Max Res to scan image with the maximum resolution 21 ...

Page 25: ...e with 11 focus modes Double click on the image to enlarge and see the details You may use the hand tool to move the image around To zoom in and out just click the button Attention indicates that you have selected the 4th images out of 11 that is 2 focus mode 22 ...

Page 26: ... image and click Apply button to apply the focus mode to the following scans Attention You may click Reset to factory default button to reset the value to default setting at any time while any film holder is inserted 23 ...

Page 27: ... select Update Driver Software from the pop up menu 2 Click Browse my computer for driver software in the window that appears and click the Browse button In the Browse For Folder window select the folder that contains this scanner s driver and click the OK button to return to the previous screen Click the Next button and click Install this driver software anyway if the Windows Security window appe...

Page 28: ... properly listed under Imaging Devices If it is not listed there or the device icon has an exclamation mark please refer to Manually Installing the Software to install the device drivers The scanned film appears abnormal There is an offset in the scanned picture The scanner or the surface it is placed on was bumped into during the scanning process Please press the Eject button on your scanner to e...

Page 29: ...holder is not pulled into the scanner The scanner and computer are not connected via USB cable Please make sure the scanner and your computer are connected via USB cable The scanner will not pull in the film holder if the USB cable is disconnected There is a grinding or rattling noise at the beginning of each scan The scanner engages the gears and it initializes itself before scanning This noise i...

Page 30: ... bit input 24 48 bit output Grayscale 16 bit input 8 16 bit output Dynamic Range N A Infrared Built in Scanning Area W x L 60 mm x 120 mm IT8 Target Included 6x7 IT 8 slide for color accuracy Power Supply 24 Vdc 0 75 A Interface USB 3 0 Net Weight Approx 6 2 Kgs Dimensions W x D x H 210 x 374 x 189 mm 2 Hardware specifications may change at any time without prior notice 27 ...

Page 31: ... or release number and manufacturer of the software Other USB devices installed Service Support Information For EU country only Where appropriate the period of availability of spare parts and the possibilities of upgrading products information Please ask local distributors and suppliers for spare parts information and product upgrade information Information requested by relevant Implementing Measu...

Page 32: ... and software will be replaced without guides and software This Limited Warranty service does not provide for carry in exchange when the problem results from accident disaster vandalism misuse abuse unsuitable environment programme modification another machine or non vendor modification for this product If this product is an optional feature this Limited Warranty applies only when the feature is u...

Page 33: ... frequency energy and if not installed and used in accordance with the instructions may cause harmful interference to radio communications However there is no guarantee that interference will not occur in a particular television reception which can be determined by turning the equipment off and on the user is encouraged to try to correct the interference by one or more of the following measures Re...

Reviews: