background image

Scanner


Overview


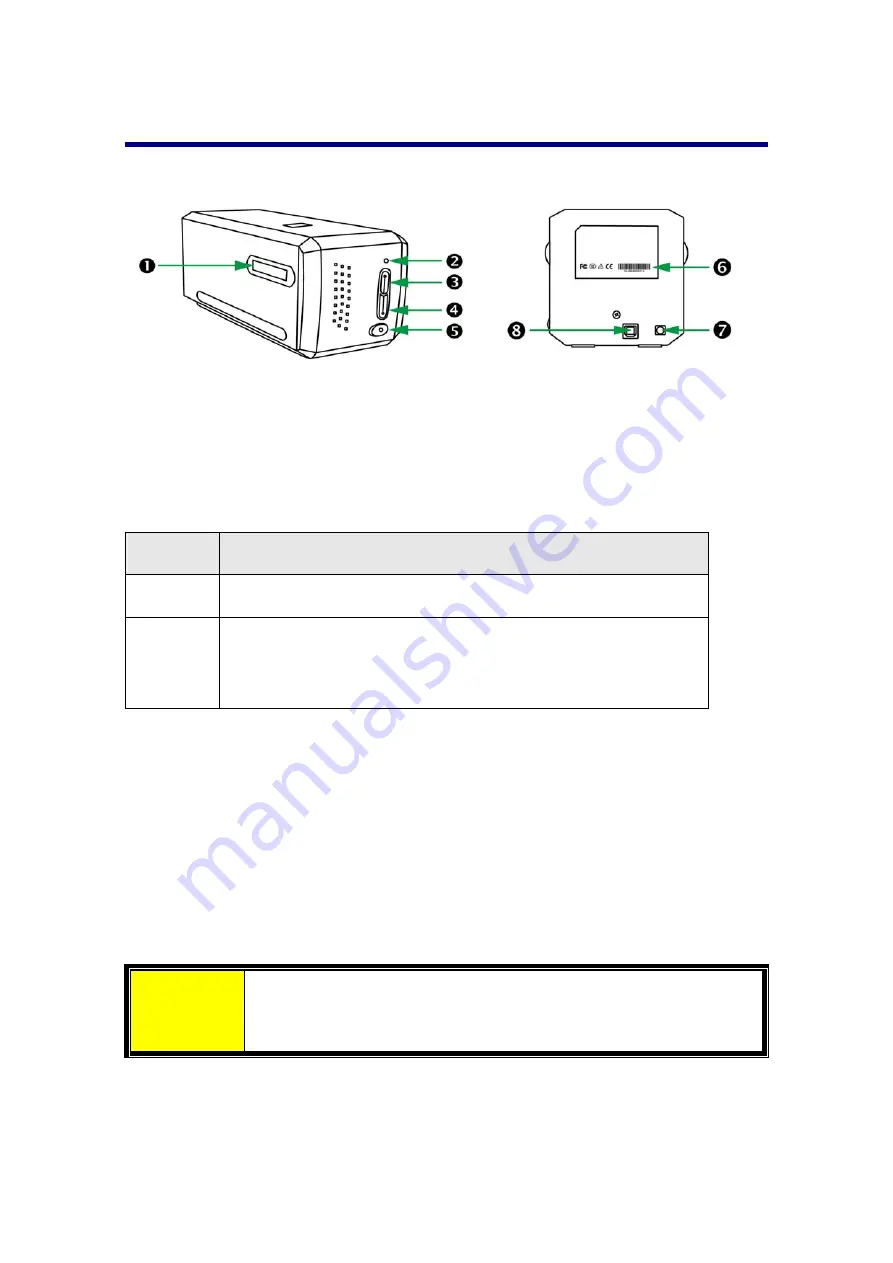
Film


Holder


Slot:


Insert


the


film


holder


into


the


scanner


through


dust


cover.


The


film


holder


can


be


inserted


from


either


side.


The


film


holder


will


index


at


each


frame


using


the


notches


on


its


side


rails.


Power


LED

:


It


indicates


the


scanner


status.


Light


Status


On


The


scanner


is


turned


on,


ready


to


scan


images.


Off


The


scanner


is


off,


either


because


the


power


is


not


turned


on,


or


because


the


power


cord


is


not


properly


plugged


into


an


AC


power


outlet.


IntelliScan


Button

:


You


may


press


the


button


to


launch


the


SilverFast


application.


QuickScan


Button

:


You


may


press


the


button


to


launch


the


QuickScan


Plus


application.


Power


Button

:


Use


this


to


turn


the


scanner


ON


or


OFF.


Serial


Number


Sticker

:


Located


at


the


rear


of


the


scanner.


Power


Receptor


USB


Port


Attention


You


will


need


the


12


digits


Serial


Number


for


SilverFast


software

activation

.


You


will


also


need


it


when


you


contact


your


dealer


or


our

service


center


in


the


future.


5


Summary of Contents for OpticFilm 8300i Ai

Page 1: ...Scanner User s Guide OpticFlim 8300i ...

Page 2: ...ents may be prohibited by law and or subject to criminal prosecution We recommend you to be responsible and respectful of the copyrights laws when you are scanning books magazines journals and other materials Environmental Information Recycle or disposal at end of life information please ask local distributors or suppliers for recycle and disposal information The product is designed and produced t...

Page 3: ...CKSCAN PLUS APPLICATION 14 THE MAIN SCREEN 15 THE SCAN SCREEN 16 THE VIEW SCREEN 18 THE EDIT SCREEN 20 PREFERENCE SETTINGS 22 SILVERFAST SOFTWARE 25 REQUEST FOR SILVERFAST LICENSE 26 INSTALLING SILVERFAST SOFTWARE 29 SCAN WITH THE SILVERFAST APPLICATION 31 OPERATING THE SCANNER 32 USING INTELLISCAN BUTTON 33 USING QUICKSCAN BUTTON 34 APPENDIX A TROUBLESHOOTING 35 SCANNER CONNECTION 35 SCANNING PRO...

Page 4: ...ction Thank you for choosing us as your scanner supplier We hope you will continue to turn to us for additional quality products as your computing needs and interests grow A Note about Icons This guide uses the following icons to point out information that deserves special attention Danger Danger A procedure that must be followed carefully to prevent injury or accidents Caution Caution Information...

Page 5: ...amaged wire could cause fire or electrical shock Keep the power cord straight and without being twisted bended or scraped 5 Unplug this device if you don t need to use for a certain period of time such as during night or long weekend to avoid any risks of causing fire 6 Do not attempt to disassemble the scanner There is danger of an electrical shock and opening your scanner will void your warranty...

Page 6: ...keep the scanner covered Dust particles and other foreign objects may damage the unit Do not attempt to disassemble the scanner There is danger of an electrical shock and opening your scanner will void your warranty Do not subject the scanner to excessive vibration It may damage the internal components Your scanner operates best in temperatures between 10 C to 40 C 50 F to 104 F 3 ...

Page 7: ...ck Activation card 35 mm IT 8 Target 35 mm IT 8 Target is not included in all scanner models Attention You may find the scanner hardware serial number on the activation card please keep the card in a safe place 1 Save the box and packing materials in case you need to transport this scanner in the future Box contents may change at any time without prior notice 4 ...

Page 8: ...ower is not turned on or because the power cord is not properly plugged into an AC power outlet IntelliScan Button You may press the button to launch the SilverFast application QuickScan Button You may press the button to launch the QuickScan Plus application Power Button Use this to turn the scanner ON or OFF Serial Number Sticker Located at the rear of the scanner Power Receptor USB Port Attenti...

Page 9: ...r into a standard AC power outlet Plug the square end of the included USB cable to the USB port at the rear of the scanner Plug the rectangular end of the USB cable to the USB port on the back of your computer Note If there is another USB device connected to the computer connect the scanner to an available USB port Attention Please DO NOT power on the scanner now 6 ...

Page 10: ...llow the step by step procedures described below to install the USB scanner You may find the latest driver on our official website www plustek com Support Download Drivers and Downloads Installing Scanner Driver Power on the Scanner 7 ...

Page 11: ...iver by the following path Mac OS X OPTICFILM Mac Plustek OpticFilm 8300i Setup dmg Windows OS OPTICFILM Windows Plustek OpticFilm 8300i Setup exe 3 Follow the on screen instructions to complete the installation Attention You may download the latest version driver from our official website plustek com of8300i 8 ...

Page 12: ...Power on the Scanner Press the Power button to turn the scanner ON Attention Press the Power button again to turn the scanner OFF 9 ...

Page 13: ...included in the package They guarantee correct scanning results A B A For scanning 35mm mounted slides max 4 slides B For scanning 35mm filmstrips max 6 frames Using Mounted Slide Holder Using filmstrip holder Insert the Film Holder 10 ...

Page 14: ...unted Slide Holder Insert mounted slides into slots with emulsion non glossy side down There are arrows and illustrations on the frame of each slot Please follow illustrations to insert mounted slides 11 ...

Page 15: ...film with the top of the image facing towards the back of the scanner where power cord and USB cord are located and keep emulsion non glossy side down There is text on the top and bottom of the film such as manufacturer frame numbers film codes batch numbers etc With the film oriented correctly as described above this text should be read clearly i e not backwards or up side down 12 ...

Page 16: ... to insert and remove the film holder Attention You can feel the film holder stop in its index position However before performing scan please gently push and pull the film holder to make sure the film holder is in correct position On up side of the film holder you can see Mounted Slide Holder or Filmstrip Holder Always keep this side up for correct scan results The film holder should be able to be...

Page 17: ...plication Launch QuickScan Plus using the QuickScan Plus shortcut on your Desktop Adjust the scan settings Please refer to the QuickScan Plus on line help for more information about available scan settings Mac OS X Windows OS 14 ...

Page 18: ...ollowing components The Scan screen The Scan screen is where you set your scanning parameters The View screen The View screen is where you select one or multiple images to edit share or delete The Edit screen The Edit screen is where you can apply various filter effects and make more detailed adjustments to your images 15 ...

Page 19: ...one for negatives and one for either positives or negatives Attention You may click Restore button to reset all settings to default Click on button to access online help and adjust Preference settings Scan settings Resolution Select a desired resolution from the drop down list The higher the resolution the more detailed the scan and the resulting file will be Resolution Windows Mac 7200 dpi Approx...

Page 20: ...ent QuickScanPlus_Doc Windows OS Users Public Pictures Plustek Photo Format Select the desired bit rate and file format you wish to use from the drop down lists The higher the bit rate the more detailed the scan and the larger the resulting file will be Available format options are JPEG TIFF PNG Windows Bitmap If you select 48 bit the output format can only be TIFF Film Custom mode only Select the...

Page 21: ...ou may click Scan button to scan more images Attention You may select one or multiple images to delete rotate or share at the same time Selected images will be highlighted with a gray rectangle around the images Simply click an image to remove a picture from your selection 18 ...

Page 22: ...ebook Click this button to launch the Facebook website in a dialog within QuickScan Plus Share to flickr Click this button to launch the flickr website in a dialog within QuickScan Plus Share to Google Drive Click this button to launch the Google Drive website in a dialog within QuickScan Plus Share to Twitter Click this button to launch the Twitter website in a dialog within QuickScan Plus Help T...

Page 23: ...any changes you have made to the selected images Reset Click on this button to reset the selected image to their original state Undo Click on this button to undo the last effect or adjustment Redo Click on this button to redo the last effect or adjustment Share to Facebook Click this button to launch the Facebook website in a dialog within QuickScan Plus Share to flickr Click this button to launch...

Page 24: ...nformation dialog Zoom out Click this button to zoom out of the currently selected image You can also use mouse wheel down to perform the same action Zoom in Click this button to zoom in on the currently selected image You can also use mouse wheel up to perform the same action Edit multiple Click on this button to switch to the multi view mode Edit single Click on this button to switch to the sing...

Page 25: ... Preference Settings Click on button and select Preference to open the Preference settings dialog Attention You may also find this button on View screen and Edit screen View screen Edit screen 22 ...

Page 26: ...the Film type setting before scanning Export to third party image editing software Activate this checkbox to export the scanned images to third party image editing software for further editing The scanned images will be opened directly on third party image editing software Note The negative film scanned images will be exported to third party image editing software without any image processing 23 ...

Page 27: ...s field blank if you will not use or are unsure of the command line Power Saving Activate this checkbox and select a value from the drop down list to set when the scanner will enter power saving mode Simply press on any of the scanner s physical buttons to wake it ICC Profile Activate this checkbox and select a profile from the drop down list to set device output color standard Auto Exposure Activ...

Page 28: ...iliar first with your OF 8300i then choose to install the SilverFast software Attention It takes about 10 mins to install SilverFast software You have to create and login with a MySilverFast account Please make sure there is internet connection while you re installing SilverFast software Request for SilverFast License Installing SilverFast Software Scan with the SilverFast application 25 ...

Page 29: ...t com activation plustek and follow the instructions You will need your scanner 12 digit hardware serial number The webpage content may subject to change without prior notifications Select your scanner model Enter the scanner serial number Click the Check button 26 ...

Page 30: ...e necessary information to create a MySilverFast account You have to login to the SilverFast software with this MySilverFast account later The webpage content may subject to change without prior notifications 27 ...

Page 31: ...3 If the registration is completed you will receive an email to inform you that the license has already been added to your MySilverFast account 28 ...

Page 32: ... the Setup Application USB stick into your computer 2 Install the SilverFast software by the following path Mac OS X OPTICFILM Mac SilverFast SF Installer dmg Windows OS OPTICFILM Windows SilverFast SF Installer exe 3 Follow the on screen instructions 4 After the installation finishes click on Done to exit the installer 29 ...

Page 33: ...1 Log in to your MySilverFast portal and click Manage licenses 2 Click Download button to download the SilverFast software 3 When the download is completed run the installer and follow the on screen instructions After the installation finishes click on Done to exit the installer y 30 ...

Page 34: ...ogin to the SilverFast software with your MySilverFast account then click on Start to launch the program Attention Please make sure there is internet connection while login to the SilverFast software Adjust the scan settings Please refer to the SilverFast manual for more information about available scan settings 31 ...

Page 35: ... This stand alone program allows you to perform advanced scanning features For further information please refer to SilverFast User s Manual Using QuickScan Plus Launcher by pressing QuickScan button The QuickScan Plus program is automatically installed as your scanner software Using IntelliScan Button Using QuickScan Button 32 ...

Page 36: ...s advanced scan features such as Dust and Scratch Removal Grain and Noise Elimination Negative Optimization etc Attention This button is only available when the SilverFast software is installed on your computer For detailed settings and features about SilverFast please refer to SilverFast User s Manual 33 ...

Page 37: ...m automatically to the album Simply press the QuickScan button on the front of your scanner and the scanner will start scanning your transparencies or negatives with Custom scan mode Before performing your first scan via the QuickScan button you are recommended to configure the QuickScan Plus settings to your needs and preferences first Attention Please refer to the QuickScan Plus on line help for...

Page 38: ...d select Update Driver Software from the pop up menu 2 Click Browse my computer for driver software in the window that appears and click the Browse button In the Browse For Folder window select the folder that contains this scanner s driver and click the OK button to return to the previous screen Click the Next button and click Install this driver software anyway if the Windows Security window app...

Page 39: ... to the proper port The USB cable might be too long Please use the USB cable that comes with your scanner The scanner s power cord is not connected properly Make sure that the AC adapter is connected to an outlet If the scanner is connected to a Surge Protector make sure that the Surge Protector is turned on The scanner is not power on Press the Power button to turn the scanner ON Windows didn t d...

Page 40: ... the Monitor Gamma settings in either of the programs so that they match Please consult the help files for each program to find out how to adjust the Monitor Gamma The image looks good on screen but very dark when printed The Monitor Gamma Settings or the scanner brightness settings are not set properly 1 Change the Monitor Gamma to a value between 1 0 and 1 5 Please consult your help file for inf...

Page 41: ...tion A Disk I O error message is displayed This error is caused if the hard disk drive does not have enough space available to process the image Make some space available in the hard disk drive by deleting any programs or files that you do not need Your hard disk drive might be heavily fragmented or it might contain some bad sectors Run the Scan Disk utility that came with your Windows computer Pl...

Page 42: ...ing Scanning Area W x L 36 8 mm x 25 4 mm 1 45 x 1 Remark 35mm film IT8 Target Bundled Action Button IntelliScan QuickScan Power Supply 15 Vdc 1 2 A Interface USB 2 0 Net Weight 1 6 Kgs 3 5 Lbs Dimensions W x D x H 120 x 272 x 119 mm 4 73 x 10 7 x 4 7 OS Windows 7 X64 8 X64 10 X64 Mac 10 13 x and later Hardware Requirements Windows PC Mac Intel i5 CPU or faster 4 GB RAM main memory 8 GB RAM recomm...

Page 43: ...ox 40 sec 120 sec with IR scanning Scanning Area W x L 36 8 mm x 25 4 mm 1 45 x 1 Remark 35mm film Action Button IntelliScan QuickScan Power Supply 15 Vdc 1 2 A Interface USB 2 0 Net Weight 1 6 Kgs 3 5 Lbs Dimensions W x D x H 120 x 272 x 119 mm 4 73 x 10 7 x 4 7 OS Windows 7 X64 8 X64 10 X64 Mac 10 13 x and later Hardware Requirements Windows PC Mac Intel i5 CPU or faster 4 GB RAM main memory 8 G...

Page 44: ... suppliers for spare parts information and product upgrade information Information requested by relevant Implementing Measure Please ask local distributors and suppliers for the related information of Implementing Measure test report Do not dispose anything of products before you ask local distributors and suppliers to get correct information for decreases of environmental impact with right method...

Page 45: ...or this product If this product is an optional feature this Limited Warranty applies only when the feature is used in a machine for which it was designed If you have any questions about your Limited Warranty contact the approved retailer from whom you bought the product or the manufacturer THIS LIMITED WARRANTY REPLACES ALL OTHER WARRANTIES EXPRESS OR IMPLIED INCLUDING BUT NOT LIMITED TO THE IMPLI...

Page 46: ...t interference will not occur in a particular television reception which can be determined by turning the equipment off and on the user is encouraged to try to correct the interference by one or more of the following measures Reorient or relocate the receiving antenna Increase the separation between the equipment and receiver Connect the equipment to an outlet on a circuit different from that whic...

Reviews: