background image

Appendix A

31

Symptom Possible Solutions

During printing
only garbage
prints

Purchase a shorter printer cable and try it.
Sometimes when information has to travel a long
distance it becomes distorted. Shortening the printer

 cable can decrease the possibility of

information becoming damaged.

Unable to find
scanner

Check your computer

 parallel port to see if it

 an EPP by entering computer

 BIOS. If the

parallel port mode is set at ECP or SPP, change to
EPP. Save and exit BIOS and run Windows. Enter
the Scanner Utility and click the proper address and
EPP. Choose Verify Port. If your computer does not
support EPP, please purchase an EPP port.

• 

Make sure the printer

 power is on if it is

connected to the rear of scanner.

The computer

 mouse,

keyboard, or
floppy drive do not
work

Upgrade printer port, or controller card to an EPP
interface.

Enter BIOS and change the printer port to EPP and
its address to 278, or 378.

If the above steps do not solve your problem, add the
following statement to the SYSTEM.INI file below
the heading "[386Enh]:"
PORT_CHIPCONTROL=1

Action Manager
does not pop-up
after selecting the
scanner
button

If you have a printer connected to the scanner, it can
cause the Action Manager access button not to work.
Disconnect printer cable from scanner and press
blue button.

Make sure Action Manager is open. To open Action
Manager, enter the Scanner Program Group and
click on the Action Manager icon.

Cannot scan to
application
software

Look at the Scanner Setup option inside of the
application and make sure the correct scanner is
chosen.

Check all connections and make sure they

e

secure and correct.

Summary of Contents for OpticPro

Page 1: ...asy to use guide to help you get the most from your scanner All trademarks and brand names mentioned in this publication are property of their respective owners 1997 All rights reserved No portion of this document may be reproduced ...

Page 2: ... scanner has been thoroughly tested and is backed by our reputation for unsurpassed dependability and customer satisfaction Please remember to fill out and return the provided registration card As a registered customer you will receive customer support new product information and software upgrades Thank you for choosing us as your scanner supplier We hope you will continue to turn to us for additi...

Page 3: ... Icons vii Scanner Features viii Package Contents ix CHAPTER I HARDWARE INSTALLATION 1 Hardware Requirements 2 Installing the Scanner Hardware 3 CHAPTER II SOFTWARE SETUP 7 Software Installation 8 Software Setup Troubleshooting Guide 8 Installing Additional Software 9 CHAPTER III USAGE AND MAINTENANCE 11 ...

Page 4: ...4 Maintenance 14 Cleaning your Scanner 15 CHAPTER IV USING TWAIN 17 Scanning Using TWAIN 18 Choosing TWAIN 19 Control Panel Scan Mode 19 TWAIN Menu Options 22 Scanning Hints 28 APPENDIX A TROUBLESHOOTING 29 APPENDIX B CUSTOMER SERVICE AND WARRANTY 33 APPENDIX C INDEX 35 ...

Page 5: ...erformance Chapter II describes how to install the scanner software We suggest that you do not install the software before installing the hardware After you complete installing the scanner software Chapter III describes how to use the TWAIN interface TWAIN is a scanning standard and one of the most widely used technologies in the scanner industry today Please carefully read through Chapter III to ...

Page 6: ...vi ...

Page 7: ...Icons This guide uses the following icons to point out information that deserves special attention Danger A procedure that must be followed carefully to prevent injury or accidents Caution Information that if not followed may result in data loss or damage to the product Pay Special Attention Instructions that will ease installation and prevent mistakes Caution Attention Danger ...

Page 8: ...ng operation OpticPro 4830 300 by 600 dots per inch 4800 x 4800 software interpolated OpticPro 9630 600 by 600 dots per inch 9600 x 9600 software interpolated RGB Color Grayscale Line Art TWAIN compliance Printer Port Pass Through Enhanced Parallel Port EPP LED Access Button ...

Page 9: ...D ROM a Scanner Setup disk Action Manager software b Optical character recognition OCR software c Image editing software d This user guide e Action Manager user guide f Registration form g OCR image editing quick guide 1 3 5 Floppy Disks Available Call us for details 1 2 3 4 ...

Page 10: ......

Page 11: ...Chapter I Chapter I Hardware Installation ...

Page 12: ...wever because there is no single set of parallel port standard in the computer field there are some parallel port or multi I O adapters parallel port peripherals and software dongles that are not fully compatible with the scanner EPP interface and may cause unpredictable results when used on the same parallel port connection as the scanner EPP interface If you are experiencing problems with your s...

Page 13: ...Installing the Scanner Hardware If you have already installed your scanner please skip this section The following section describes how to connect the scanner to your computer and printer Please carefully follow along to ensure proper installation 1 Turn OFF your computer its related peripherals and disconnect all related power cables 2 Please take a moment to study Figure 1 Figure 1 Connecting th...

Page 14: ... your computer information book and locate the section about the printer port connector 6 Next plug the disconnected printer cable into the rear of the scanner see Figure 1 and number 2 7 After plugging the scanner and printer cables into their respective locations plug the power adapter into its power receptor see Figure 1 and number 3 8 Plug the power adapter into a standard AC outlet see Figure...

Page 15: ...Chapter I 5 10 Install the scanner software see Chapter II Software Setup page 7 ...

Page 16: ......

Page 17: ...Chapter II Chapter II Software Setup ...

Page 18: ...iate disk drive If you received the CD ROM version of the scanner set up please enter the CD ROM into its disk drive Attention Floppy disks only failure to install the bundled software in the order outlined in the Software Setup will result in failure to properly operate your scanner 2 From the Windows Program Manager choose FILE and RUN If Windows 95 choose START and RUN 3 In the Command Line fie...

Page 19: ... compatible scanning software When purchasing new software for your scanner please make sure that it conforms to the TWAIN standard If you intend to use different programs with your scanner choose the scanning source as TWAIN within scanner Setup and the driver as Flatbed Scanner Attention The Action Manager software that comes with your scanner only functions with the provided OCR software Though...

Page 20: ......

Page 21: ...Chapter III Chapter III Usage and Maintenance ...

Page 22: ...unctioning with your computer and the scanning software To properly test your Flatbed Scanner please perform the following steps 1 Exit all open applications and hut Down your computer 2 After the computer has shut down turn it off and wait approximately 1 minute before turning it back on 3 Once your computer is running enter Windows 4 The Access Button located on top of the scanner see Figure 2 t...

Page 23: ... the scanning lamp is not on press the Access Button to enable it 7 If the Action Manager is not maximized locate its icon and maximize it now Within the Action Manager program double click the action called Scan Save 8 The scanner should start up and scan the document to your image editing program Check and make sure that the LED light emitting diode is blinking during scanning If it is then the ...

Page 24: ...canner does not respond when trying to scan To set the amount of time the scanner light source stays on the factory default is approximately 7 minutes click the tab that reads Lamp Control Under the heading Lamp Control click timer button urn Lamp off After button to set the lamp off You can also test the scanning lamp by clicking the urn Off Lamp and urn On Lamp buttons Figure 3 Scanner Utility a...

Page 25: ...ctrical shock If a problem occurs have the scanner serviced by an authorized dealer Do not subject the scanner to excessive vibration It may damage the internal components Your scanner operates best in temperatures between 10 C to 40 C 50 F to 104 F Cleaning your Scanner Clean the scanner by lightly spraying a nonabrasive glass cleaner on the scanning window Be sure to wipe up all excess liquid be...

Page 26: ......

Page 27: ...Chapter IV Chapter IV Using TWAIN ...

Page 28: ... describes the TWAIN interface which pops up whenever you click SCAN or ACQUIRE from within a TWAIN compatible scanning program see Figure 4 Figure 4 TWAIN Dialog Box Margin Frame Menu Items Scanning Control Panel Margin Selector Zoom Control Color Distribution Predefined Settings Image Preview Scan area margin frame position and margin frame size Prescan Window Image Size ...

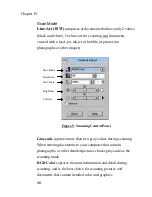
Page 29: ... big an image will be after you scan it in megabytes the scanning area and position of the margins Choosing TWAIN To select the TWAIN interface from your TWAIN compatible program locate SCANNER SETUP choose TWAIN SOURCE and FLATBED SCANNER Control Panel Scan Mode There are 3 modes that you can select for scanning documents RGB Color Grayscale and Line Art also called Black White To change the scan...

Page 30: ...5 Scanning Control Panel Grayscale captures more than two gray values during scanning When entering documents to your computer that contain photographs or other detailed pictures choose grayscale as the scanning mode RGB Color captures the most information and detail during scanning and is the best choice for scanning pictures and documents that contain detailed color and graphics Scan Mode Resolu...

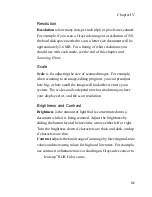
Page 31: ...big or how small the image will look after it enters your system The scale can also depend on what resolution you have your display set at and the scan resolution Brightness and Contrast Brightness is the amount of light that is concentrated onto a document while it is being scanned Adjust the brightness by sliding the button located between the arrows either left or right Turn the brightness down...

Page 32: ...r images you can begin experimenting with the advance features of the TWAIN dialog box File Menu Item There are 5 choices located under the File menu item Please read through the following descriptions to learn how to use the file menu options If you have any further questions about any of the items located inside the file menu click on Help located inside the TWAIN dialog box to see more informat...

Page 33: ...cans by allowing you to sharpen images and remove excessive dots and distortion Please read through the following explanations and examples to learn how to properly use filtration In many cases you might find that experimentation is an excellent way of determining which filter will work Average determines the medium depth of an image and averages adjacent pixels to make images appear softer Blur l...

Page 34: ... scan then we strongly recommend not using these features until you become familiar with your scanner and its terminology Enhance Enhance pops up TWAIN color correction options Histogram Tone Map and Gamma Data Many image editing programs already have these features However if the need arises to adjust the color level of your scanned images then enter preferences and perform the following adjustme...

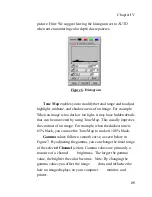
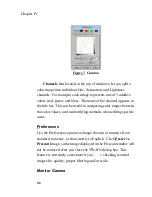
Page 35: ...sing Tone Map This usually improves the contrast of an image For example when the darkest tone is 65 black you can use the Tone Map to make it 100 black Gamma values follow a smooth curve as seen below in Figure 7 By adjusting the gamma you can change the tonal range of the selected Channel color Gamma values are primarily a measure of a channel brightness The larger the gamma value the brighter t...

Page 36: ... be useful in comparing color ranges between the color values and in identifying methods when editing specific areas Preferences Use the Preferences option to change the unit of measure from standard to metric or from metric to English Click Preserve Prescan Image so the image displayed in the Prescan windowwill not be removed after you close the TWAIN dialog box This feature is extremely convenie...

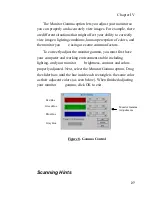
Page 37: ...factors To correctly adjust the monitor gamma you must first have your computer and working environment stable including lighting and your monitor brightness contrast and colors properly adjusted Next select the Monitor Gamma option Drag the slider bars until the hue inside each rectangle is the same color as their adjacent colors as seen below When finished adjusting your monitor gamma click OK t...

Page 38: ...W but rather Grayscale we find that a resolution of 150 works extremely well Note Sometimes increasing the brightness and contrast can help improve and lighten the grayscale image quality Color Scanning When scanning in color remember that 24 to 30 bits of information take up a lot of disk space If you e going to scan a color image and then print it out scan at 200 dpi If you are going to scan a c...

Page 39: ...Appendix Appendix A Troubleshooting ...

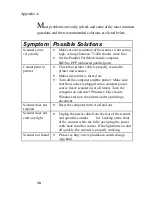
Page 40: ...ter is turned on Turn off the computer and the printer Make sure that the scanner is plugged into a constant power source leave scanner on at all times Turn the computer on and enter Windows Once inside Windows turn on the printer and try printing a document Scanner does not respond Reset the computer turn it off and on Scanner does not emit any light Unplug the power cable from the rear of the sc...

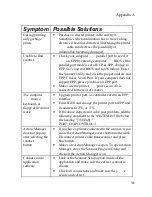
Page 41: ...r of scanner The computer mouse keyboard or floppydrive do not work Upgrade printer port or controller card to an EPP interface Enter BIOS and change the printer port to EPP and its address to 278 or 378 If the above steps do not solve your problem add the following statement to the SYSTEM INI file below the heading 386Enh PORT_CHIPCONTROL 1 Action Manager does not pop up after selecting the scann...

Page 42: ......

Page 43: ...Appendix B Appendix B Customer Service and Warranty ...

Page 44: ...void any delays please have the following information available before calling Product name and model number A detailed description of the problem This guide Your computer manufacturer and its model number The speed of your CPU Pentium 486 etc Your current operating system and BIOS optional Other interface cards in your system including I O address settings and IRQ settings Name of software packag...

Page 45: ...Appendix C Appendix C Index ...

Page 46: ...ontrol Panel 15 D Danger iii Descreen 20 E Enhance 20 Enhanced Parallel Port ii iv 2 4 EPP ii iv 2 4 36 37 F FBIII iv Floppy Disks v G Gamma 21 H Histogram 21 I Inverse 18 L LED iv 10 M Monitor Gamma 23 O OCR v 7 OP4830 iv OP9630 iv R Resolution 17 S Scale 17 Scan Mode 16 Scanner Utility 11 36 37 Sharpen 19 T Testing 9 Tone Map 21 TWAIN ii iv 7 13 14 15 18 19 20 22 ...

Page 47: ......

Page 48: ...nt program modification another machine or non vendor modification for this product If this product is an optional feature this Limited Warranty applies only when the feature is used in a machine for which it was designed If you have any questions about your Limited Warranty contact the approved retailer from whom you bought the product or the manufacturer THIS LIMITED WARRANTY REPLACES ALL OTHER ...

Page 49: ...ed by turning the equipment off and on the user is encouraged to try to correct the interference by one or more of the following measures Reorient or relocate the receiving antenna Increase the separation between the equipment and receiver Connect the equipment to an outlet on a circuit different from that which the receiver is connected Shielded interconnect cables and shielded power cord which a...

Page 50: ...me Monday through Friday Plustek Electronics GmbH Europe Bröd ermannsweg 17 22453 Hamburg Germany Tel 49 40 5143160 5110446 Fax 49 40 543638 BBS 49 40 5133487 Login Password GAST E mail 101623 1756 compuserve com Web site www plustekeurope com Plustek Inc Asia 4F No 1 Lane 50 Sec 3 Nan Kang Rd Taipei Taiwan Fax 886 2 651 5310 E mail tplustek ms2 hinet net Web site www plustek com ...

Reviews: