background image

0507291010/260411/A T-Flex/CW

EN - 10


Installation

- The installation of this product is exclusively reserved to well 

authorised, trained and qualified engineers. 

- During installation, always use Personal Protective Equipment 

(PPE) to avoid injury. This also applies for persons who enter 
the work area during installation.

- Use sufficient climbing gear and safety guards when working 

on a higher level than 2 meter (local restrictions may apply). 

- Never install the product in front of entrances and exits which 

must be used for emerency services. 

- Mind any gas and water pipes and electric cables.
- Make sure the wall, ceiling or support system are strong 

enough to carry the product.

- Ensure the workspace is well illuminated. 
- Use common sense. Stay alert and keep your attention to your 

work. Do not install the product when you are under the 
influence of drugs, alcohol or medicine. 

- Make sure that the workshop, in the vicinity of the product, 

contains sufficient approved fire extinguishers. 

- Air containing particles such as chromium, nickel, beryllium, 

cadmium, lead etc., which is a health hazard, should never be 
recycled. This air must always be brought outside the working 
area.

Use

- Inspect the product and check it for damage. Verify the 

functioning of the safety features. 

- During use, always use Personal Protective Equipment (PPE) 

to avoid injury. This also applies for persons who enter the 
work area.

- Check the working environment. Do not allow unauthorised 

persons to enter the working environment. 

- Protect the product against water and humidity.
- Make sure the room is always sufficiently ventilated; this 

applies especially to confined spaces.

Service, maintenance and repairs

- Observe the maintenance intervals given in this manual. 

Overdue maintenance can lead to high costs for repair and 
revisions and can render the guarantee null and void. 

- During service, maintenance and repair jobs, always use 

Personal Protective Equipment (PPE) to avoid injury. This also 
applies for persons who enter the work area.

- Always use tools, materials, lubricants and service techniques 

which have been approved by the manufacturer. Never use 
worn tools and do not leave any tools in or on the product. 

- Safety features which have been removed for service, 

maintenance or repairs, must be put back immediately after 
finishing these jobs and it must be checked that they still 
function properly. 

- Use sufficient climbing gear and safety guards when working 

on a higher level than 2 meter (local restrictions may apply). 

- Ensure the workspace is well illuminated. 


4.1

Installation height

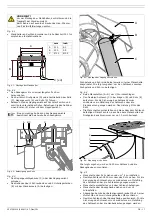
The recommended installation height of the wall mounting 
bracket is 3500 mm (11.5 ft.). However, if the extraction height 
is often lower than the standard workbench height (900 mm/3 
ft), it is recommended to mount the wall mounting bracket at 
3000-3250 mm (9.8-10.6 ft).

4.2

Tools and requirements

The following tools and requirements are needed to install and 
maintain the extraction arm:
- wall mounting material (depending on wall type) + 

appropriate installation tools

- wrench 17 (2)
- wrench 13 (2)
- box spanner 13

4.3

Unpacking

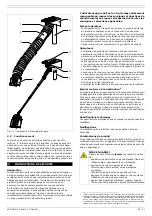
Check that the product is complete. The package should 
contain: 
- extraction arm including wall mounting bracket, tube, hose 

500 mm (20 in.), 2 bushes and rope

- rotatable hood RotaHood
- hose 1650 mm (65 in.)
- counter casing
- bush (2)
- mounting  material

If parts are missing or damaged, contact your supplier.

4.4

Mounting

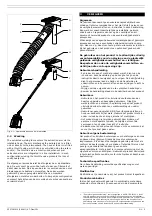
The package contains no mounting hardware for the wall 
mounting brackets, since the required mounting hardware 
depends on the wall type. The wall mounting brackets can be 
mounted on e.g.:
- a thin brick or concrete wall (min. thickness 100 mm), using 

four threaded rods M10;

- a thick brick or concrete wall, using four cotter bolts 

M10x120x60;

- a steel profile (e.g. H-profile), using four threaded rods M10. 

For this purpose two square tubes (30x30x3 mm) need to be 
mounted to prevent bending. 


WARNING!

Never

 use the product for:

- oil  mist
- paint  mist
- extraction of hot gases (more than 45°C/113°F 

continuously)

- explosive environments or explosive substances/

gases

Note: this list is not all-embracing. 

ATTENTION!

Service, maintenance and repairs should only be 
performed in accordance with directive TRGS 560 by 
authorised, qualified and trained persons (skilled) 
using appropriate work practices.

4

INSTALLATION

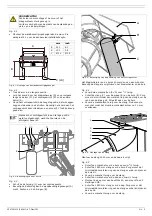
Refer to Fig. III on page 39 for detailed measurements 
and reach. 
A = total height; B = workbench height.

CAUTION!

Check that the wall composition is strong enough 
before mounting the wall brackets. 
Before drilling, verify locations of existing gas, water 
or electrical conduits.

Summary of Contents for T-FLEX/CW

Page 1: ...strucciones para el uso ES Brazo telecópico IT Manuale d uso IT Braccio telescopico FR Manuel opérateur FR Bras téléscopique DE Betriebsanleitung DE Teleskoparm EN User manual EN Telescopic arm NL Gebruikershandleiding NL Telescooparm ...

Page 2: ... is therefore subject at any time to change or amendment and the right to change or amend is hereby expressly reserved The instructions in this publication only serve as a guideline for installation use maintenance and repair of the product mentioned on the cover page of this document This publication is to be used for the standard model of the product of the type given on the cover page Thus the ...

Page 3: ...ebouwde draaischarnier 300 draaien De T Flex CW wordt vaak toegepast in lascabines 1 3 Productcombinaties De afzuigarm moet met een van de volgende producten worden gecompleteerd individuele ventilator type FAN 14 of individuele ventilator type FAN 28 of individuele ventilator type FAN 42 of centrale ventilator NCF flens 1 4 Opties en accessoires Voor de machine zijn de volgende opties en accessoi...

Page 4: ...en De bedrijfsleiding dient het personeel aan de hand van de handleiding te onderrichten en alle voorschriften en aanwijzingen in acht te nemen Wijzig nooit de volgorde van de te verrichten handelingen Bewaar de handleiding steeds in de nabijheid van het product Gebruikers Gebruik van het product is uitsluitend voorbehouden aan daartoe opgeleide en bevoegde gebruikers Tijdelijke werkkrachten en pe...

Page 5: ...paratie zijn verwijderd moeten na deze werkzaamheden onmiddellijk worden gemonteerd en op correct functioneren worden gecontroleerd Gebruik bij werkzaamheden hoger dan 2 meter goedgekeurd klimmateriaal voor werken op de desbetreffende hoogte houd rekening met eventuele lokale voorschriften Zorg voor voldoende verlichting 4 1 Installatiehoogte De aanbevolen installatiehoogte van de wandbevestigings...

Page 6: ...de kraag B en de buis E Zorg ervoor dat minimaal één metalen ring van de slang over de rand van de kraag zit Dit geldt ook voor de buis Vouw de manchetten terug over de slang De bovenste manchet moet het aluminium draaischarnier ca 10 mm overlappen Fig 4 4 Montage van de slang Monteer de slang 1650 mm en de kap als volgt Fig 4 5 Schuif een manchet over de buis en vouw 2 3 terug Schuif de 1650 mm s...

Page 7: ...t en regelmatig onderhoud uitvoert zullen eventuele problemen veelal ontdekt en gecorrigeerd kunnen worden voordat ze tot stilstand leiden De aangeven onderhoudsintervallen kunnen variëren afhankelijk van de specifieke arbeids en bedrijfsomstandigheden Daarom wordt aanbevolen naast het hier aangegeven periodieke onderhoud de machine jaarlijks aan een grondige algehele inspectie te onderwerpen Neem...

Page 8: ...obleem Veer te los Draai de veer aan Zie Fig V op pagina 39 A veer Te veel of te weinig frictie in afzuigarm Stel frictie af Zie Fig V op pagina 39 B frictie Arm blijft niet in ingetrokken positie staan Bewegings probleem Contragewicht blijft hangen Trek de arm uit en vervolgens langzaam weer in Koord gebroken Vervang koord Onvoldoende afzuig capaciteit Afzuigarm werkt niet naar behoren Smoorklep ...

Page 9: ... a column the arm can be turned through 300 due to the rotating hinge The T Flex CW is often used in welding cabins 1 3 Product combinations In order to operate the extraction arm selection of one of the following products is required single fan type FAN 14 or single fan type FAN 28 or single fan type FAN 42 or central fan NCF flange 1 4 Options and accessories The following products can be obtain...

Page 10: ...use the product when you are under the influence of drugs alcohol or medicine The product is not to be used by children or persons with reduced physical sensory or mental capabilities or lack of experience and knowledge unless they have been given supervision or instruction Children must be supervised not to play with the product Intended use1 The product has been designed exclusively for extracti...

Page 11: ...duct Safety features which have been removed for service maintenance or repairs must be put back immediately after finishing these jobs and it must be checked that they still function properly Use sufficient climbing gear and safety guards when working on a higher level than 2 meter local restrictions may apply Ensure the workspace is well illuminated 4 1 Installation height The recommended instal...

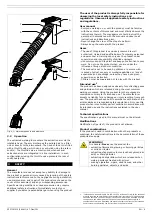
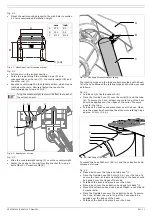
Page 12: ...he collar B and the tube E To secure the hose at least one metal ring of the hose should be applied over the ridges of the collar The same goes for the tube Fold back the bushes and place them over the hose Make sure the upper bush overlaps the aluminium rotating hinge approx 10 mm 0 4 in Fig 4 4 Mounting of the hose To mount the hose 1650 mm 65 in and the extraction hood proceed as follows Fig 4 ...

Page 13: ...ary caution and carry out the maintenance at regular intervals any problems occuring will be detected and corrected before they lead to a total breakdown The indicated maintenance intervals can vary depending on the specific working and ambient conditions Therefore it is recommended to thoroughly inspect the complete product once every year beside the indicated periodic maintenance For this purpos...

Page 14: ...n spring Refer to Fig V on page 39 A spring Too much or not enough friction in arm Adjust friction Refer to Fig V on page 39 B friction Arm does not stay in retracted position Movement problem Counterweight gets stuck Extend the arm and retract it again slowly Rope broken Replace rope Poor suction Extraction arm does not function properly Throttle valve closed Open throttle valve Flexible hose s t...

Page 15: ...n verstellt werden kann Bei Befestigung auf einem Säulenkörper lässt sich der Absaugarm dank seines Drehgelenks um 300 drehen Der T Flex CW wird zumeist in Schweißkabinen eingesetzt 1 3 Produktkombinationen Für den Betrieb des Absaugarms ist die Auswahl einer der folgenden Produkte erforderlich Einzelventilator Typ FAN 14 oder Einzelventilator Typ FAN 28 oder Einzelventilator Typ FAN 42 oder Zentr...

Page 16: ...odukts ist entsprechend geschulten und befugten Bedienern vorbehalten Vorübergehende Arbeitskräfte und Auszubildende dürfen das Produkt ausschließlich unter Aufsicht und Verantwortung von Fachkräften bedienen Seien Sie immer aufmerksam und bleiben Sie mit der Aufmerksamkeit bei der Arbeit Bedienen Sie das Produkt nie wenn Sie unter dem Einfluß von Drogen Alkohol oder Medikamenten stehen Das Produk...

Page 17: ...ug im oder auf dem Gerät zurück Schutzeinrichtungen die zu Service Wartungs oder Reparaturzwecken entfernt wurden müssen nach diesen Arbeiten unverzüglich wieder montiert und auf ihre ordnungsgemäße Funktion überprüft werden Bei Arbeiten auf Höhen größer als 2 Meter geeignete Kletterausrüstung und Schutzvorrichtungen verwenden möglicherweise gelten örtliche Einschränkungen Auf ausreichende Ausleuc...

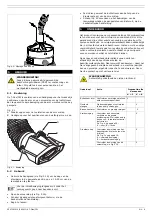
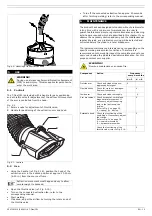
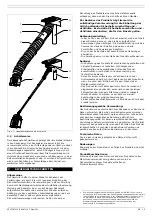
Page 18: ...agenkanten gezogen werden Das Gleiche gilt für das Rohr Die Manschetten zurückfalten und diese über dem Schlauch befestigen Darauf achten dass die obere Manschette das Drehgelenk aus Aluminium um ca 10 mm überlappt Fig 4 4 Mounting of the hose Wie folgt vorgehen um den 1650 mm Schlauch und die Absaughaube zu montieren Fig 4 5 Manschette über Rohr ziehen und um 2 3 zurückfalten Flexiblen Schlauch 1...

Page 19: ...gelmäßig durchführen werden mögliche Störungen meistens entdeckt und können sie beseitigt werden bevor sie zum Stillstand führen Die angegebenen Wartungsintervalle hängen von den jeweiligen Arbeits und Betriebsbedingungen ab Daher wird zusätzlich zu der in dieser Anleitung angegebenen regelmäßigen Wartung empfohlen das Produkt einmal pro Jahr einer gründlichen Gesamtinspektion zu unterziehen Wende...

Page 20: ...t Feder ist lose Feder spannen Siehe Fig V auf Seite 39 A Feder Absaugarm mit zu viel oder zu wenig Reibung Reibung verstellen Siehe Fig V auf Seite 39 B Reibung Absaugarm verbleibt nicht in Rückführ position Bewegungs problem Gegengewicht ist verklemmt Absaugarm hervorziehen und wieder langsam zurückführen Seil ist gerissen Seil austauschen Unzureichen de Absaug leistung Absaugarm funktioniert ni...

Page 21: ...ne rotation de 300 Le T Flex CW est souvent utilisé dans les cabines de soudure 1 3 Combinaisons des produits Pour faire fonctionner le bras d aspiration il est nécessaire de sélectionner l un des produits suivants ventilateur unitaire type FAN 14 ou ventilateur unitaire type FAN 28 ou ventilateur unitaire type FAN 42 ou ventilateur centralisé NCF bride 1 4 Options et accessoires Les produits suiv...

Page 22: ...ur votre travail N utilisez pas le produit si vous êtes fatigués ou sous l influence de drogues d alcool ou de médicaments La machine n est pas conçue pour être utilisée par des enfants ou des personnes ayant des capacités physiques sensorielles ou mentales réduites ou un manque d expérience et de connaissance si ces personnes ne sont pas surveillées ou n ont pas reçu des instructions Surveiller l...

Page 23: ...uvés par le fabricant Évitez l usage des outils usés et veillez à ne laisser traîner aucun outil dans ou sur le produit Les dispositifs de sécurité retirés à fins de service d entretien ou de réparation doivent être remis en place immédiatement après l achèvement des travaux concernés après quoi leur fonctionnement doit être contrôlé Utiliser du matériel de grimpe et des dispositifs de protection ...

Page 24: ... Pour fixer solidement le tuyau vous devez appliquer au moins l une des bagues métalliques sur les bords du collet Procédez de même pour le tube Repliez les manchons et rabattez les sur le tuyau Assurez vous que le manchon supérieur recouvre le joint tournant en aluminium d environ 10 mm Fig 4 4 Montage du tuyau Procédez comme suit pour installer le tuyau de 1650 mm et la hotte rotative Fig 4 5 Pl...

Page 25: ...décelés et corrigés avant qu ils n occasionnent une panne Le calendrier d entretien indiqué peut varier en fonction des conditions de travail et d exploitation C est pourquoi outre le calendrier d entretien périodique indiqué dans ce manuel il est recommandé de soumettre chaque année la machine à une inspection générale et minutieuse Pour cela contactez votre fournisseur 5 UTILISATION MISE EN GARD...

Page 26: ...de balancier Ressort détendu Serrez le ressort Voir la Fig V sur la page 39 A ressort Trop ou trop peu de friction dans le bras Réglez la friction Voir Fig V sur la page 39 B friction Le bras ne reste pas en position rétractée Problème de mouvement Le contrepoids est bloqué Étirez le bras puis rétractez le lentement de nouveau Rupture de corde Remplacez la corde Capacité d extraction insuffisante ...

Page 27: ...n un semplice movimento Se montato su una colonna il braccio può essere ruotato di 300 grazie al perno di rotazione T Flex CW è utilizzato spesso nelle cabine di saldatura 1 3 Combinazioni di prodotti Per azionare il braccio aspirante è necessario selezionare uno dei seguenti prodotti aspiratore individuale tipo FAN 14 o aspiratore individuale tipo FAN 28 o aspiratore individuale tipo FAN 42 o asp...

Page 28: ...e attenzione al Vs lavoro Non usate il prodotto quando siete stanchi o sotto l influenza di droghe alcool o medicinali La macchina non deve essere utilizzata da bambini o persone con capacità fisiche sensoriali o mentali ridotte senza esperienza e conoscenza a meno che non abbiano ricevuto istruzione o sotto supervisione Controllare che i bambini non giochino con la macchina Impiego conforme alla ...

Page 29: ...e non lasciate mai alcun attrezzo nel o sul prodotto I dispositivi di sicurezza che sono stati rimossi per servizio manutenzione o riparazione devono essere reinstallati immediatamente dopo aver terminato detti interventi e dovete accertarvi del loro buon funzionamento Quando si lavora ad un altezza superiore a 2 metri utilizzare l attrezzatura da arrampicata e le protezioni opportune potrebbero e...

Page 30: ...l tubo flessibile deve essere applicato sopra ai bordi del colletto Ripetere la stessa procedura per il tubo Ripiegare i manicotti e collocarli sopra il tubo flessibile Assicurarsi che il manicotto superiore si sovrapponga al perno di rotazione di alluminio di circa 10 mm Fig 4 4 Montaggio del tubo flessibile Per montare il tubo flessibile di 1 650 mm e la bocchetta di aspirazione procedere come s...

Page 31: ...vato prima che possa determinare eventuali guasti alal macchina Gli intervalli di manutenzione indicati possono variare a seconda delle condizioni ambientali e di utilizzo Pertanto si raccomanda di ispezionare minuziosamente e completamente il prodotto una volta all anno oltre a quanto indicato per la manutenzione periodica Per questo contattare il Vs fornitore 5 USO AVVERTIMENTO Durante l uso uti...

Page 32: ...mento Molla allentata Serrare la molla Fare riferimento alla Fig V sulla pagina 39 A molla Frizione eccessiva o insufficiente nel braccio Regolare la frizione Fare riferimento alla Fig V sulla pagina 39 B frizione Il braccio non rimane nella posizione di arretramento Problema di movimento Il contrappesso si blocca Allungare il braccio e ritrarlo di nuovo lentamente Corda spezzata Sostituire la cor...

Page 33: ...0º gracias a su bisagra giratoria El T Flex CW se usa a menudo en cabinas de soldadura 1 3 Combinaciónes del producto Para usar el brazo de aspiración es preceptivo seleccionar uno de los productos siguientes ventilador individual tipo FAN 14 o ventilador individual tipo FAN 28 o ventilador individual tipo FAN 42 o ventilador central NCF brida 1 4 Opciones y accesorios Los productos siguientes pue...

Page 34: ...instrucciones se deben guardar siempre en las proximidades del producto Operarios El manejo del equipo que aquí se describe queda reservado al personal debidamente cualificado y autorizado Los empleados temporales así como los aprendices u otras personas en formación sólo pueden manejar el equipo bajo la supervisión y responsabilidad de personal experto Utilice su sentido común Esté atento y prest...

Page 35: ...tareas de servicio mantenimiento y reparación deben montarse de nuevo una vez terminadas dichas tareas y tienen que comprobarse respecto a su perfecto funcionamiento Use equipo de ascenso y protecciones de seguridad suficientes cuando trabaje a una altura superior a 2 metros puede que se apliquen restricciones locales Asegúrese de que la zona de trabajo esté bien iluminada 4 1 Altura de la instala...

Page 36: ... aplicable para el tubo Pliegue los manguitos y colóquelos sobre la manguera Asegúrese de que el manguito superior se monte unos 10 mm sobre la bisagra giratoria de aluminio Fig 4 4 Montaje de la manguera Para montar la manguera de 1650 mm y la campana de aspiración proceda de la siguiente manera Fig 4 5 Coloque un manguito sobre el tubo y pliéguelo 2 3 Coloque la manguera de 1650 mm sobre el tubo...

Page 37: ...s resulta posible detectar y corregir los posibles fallos antes de que éstos conduzcan a una paralización del equipo Los intervalos de mantenimiento que se indican a continuación dependen de las condiciones de trabajo y servicio Por esta razón y de forma adicional a las tareas de mantenimiento regulares que se describen en este manual se recomienda someter al equipo anualmente a una revisión compl...

Page 38: ...ase Fig V en la página 39 A resorte Fricción excesiva o insuficiente en el brazo Ajuste la fricción Véase Fig V en la página 39 B fricción El brazo no se mantiene en la posición retraída Problema de movimiento El contrapeso se atasca Extienda el brazo y vuelva a retraerlo lentamente Cuerda rota Sustituya la cuerda El rendimiento de la aspiración es insuficiente El brazo de aspiración no funciona c...

Page 39: ...0507291010 260411 A T Flex CW 38 Fig I Fig II 8 6 4 2 0 0 250 500 750 1000 D CFM C in WG 0 400 800 1200 1600 A Pa 0 400 800 1200 1600 B m3 h 2000 A B 1 2 3 A B A B mm inch A 1550 61 B 2500 98 ...

Page 40: ...291010 260411 A T Flex CW 39 Fig III Fig IV Fig V 30 45 G E C B A D F mm inch feet A 3500 138 8 11 5 B 900 35 4 3 C 450 17 7 1 5 D 1250 49 2 4 1 E 100 4 0 0 3 F 1800 70 9 5 9 G 800 31 5 2 6 13 A B 17 13 A B ...

Page 41: ...0507291010 260411 A T Flex CW 40 Fig VI 0840101030 x4 9823000100 9823000990 9823000000 9823003000 0000000000 9880020010 9824000010 9824000100 0692000000 ...

Page 42: ...www plymovent com 0507291010 260411 A T Flex CW ...

Reviews: