19
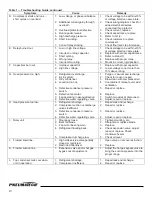
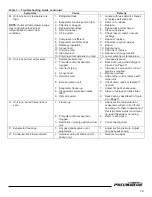
Table 1 — Troubleshooting Guide, continued
Symptoms Cause Remedy
D. Compressor starts and runs –
short cycles on overload.
1. Low voltage, or phase unbalance.
2. Additional current going through
overload.
3. Overload protectors defective.
4. Run
capacitor
weak.
5. High discharge pressure.
6. Short in winding.
7. Current relay sticking.
1. Check voltage to be within ±10%
of voltage listed on name plate.
2. Check wiring diagram, check for
added electrical devices
connected thru protector.
3. Check current, replace.
4. Check capacitance, replace.
5. Refer to G 1-8.
6. Check resistance, replace
compressor.
7. Check floor level, tap & release.
E. Relay burned out.
1. Low or high line voltage.
2. Incorrect running capacitor.
3. Short
cycling.
4. Wrong
relay.
5. Incorrect
mounting.
1. Check voltage to be within ±10%
of voltage listed on name plate.
2. Replace with proper capacitance.
3. Refer to B and C.
4. Replace with proper relay.
5. Mount in correct, rigid position.
F. Capacitors burn out.
1. Improper
capacitor.
2. High line voltage.
1. Replace with proper capacitor.
2. Lower voltage to not more than
10% above rating.
G. Head pressure too high.
1. Refrigerant
overcharge.
2. Air in system.
3. Dirty
condenser.
4. Location
too
hot.
5. Defective condenser pressure
switch.
6. Defective fan motor.
7. Fan operating in wrong direction.
8. Defective water regulating valve.
1. Purge or vacuum and recharge.
2. Check for reason, repair.
3. Blow clean with compressed air.
4. Cool ambient, relocate unit, add
ventilation.
5. Repair or replace.
6. Replace.
7. Switch two wires at disconnect.
8. Adjust, repair or replace.
H. Head pressure too low.
1. Refrigerant
shortage.
2. Compressor suction or discharge
valves
inefficient.
3. Defective condenser pressure
switch.
4. Defective water regulating valve.
1. Repair leak and recharge.
2. Repair or replace.
3. Repair or replace.
4. Adjust, repair or replace.
I. Noisy
unit.
1. Mountings
loose.
2. Bent fan blade.
3. Fan motor bearing worn.
4. Refrigerant flooding back.
5. Compressor oil charge low.
1. Tighten mounting, etc.
2. Straighten or replace blade.
3. Replace.
4. Check expansion valve, adjust,
repair or replace. Check
crankcase heater.
5. Check oil level.
J. Frosted liquid line.
1. High side service valve partially
closed or restricted.
2. Restricted
filter/dryer.
1. Open valve or remove restriction.
2. Replace.
K. Frosted suction line.
1. Expansion valve and/or hot gas
bypass out of adjustment.
1. Adjust the hot gas bypass valve to
bring the suction pressure into the
proper range.
L. Top condenser coils cool when
unit in operation.
1. Refrigerant
shortage.
2. Compressor
inefficient.
1. Repair leak and recharge.
2. Repair or replace.
Summary of Contents for AD Series
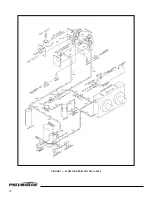
Page 15: ...14 FIGURE 6 FLOW DIAGRAM AD 750 to 1000 ...
Page 16: ...15 FIGURE 7 FLOW DIAGRAM AD 1200 to 2000 ...
Page 17: ...FIGURE 8 FLOW DIAGRAM AD 2500 to 4000 16 ...
Page 22: ...21 ...
Page 23: ...22 ...

