background image

12

Technische Spezifikationen

• Versorgungsspannung: 5V

• Betriebsstrom: 1A

• Konnektor: Mikro USB

• Frequenz: 868Mhz

• Dimensionen: 

Ø

 65 x 15mm

• Temperatur: +5°C ~ +50°C

• Schutzklasse Wasser: IP30

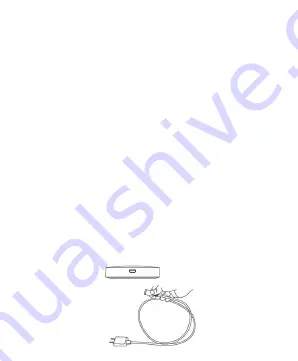
Versorgung 

Stecken Sie den Konnektor Mikro USB des 

Versorgungskabels im Hub Port. Verbinden Sie das 

Kabelende mit dem Adapter 230V-5V. Stecken Sie 

den Adapter in der Steckdose ein.

Summary of Contents for CT25WIFI

Page 1: ...I CT25WIFI User manual p 2 Benutzerhandbuch p 11 Manual de usuario p 21 Manuel de l utilisateur p 31 Használati utasítás p 41 Manuale dell utente p 51 Handleiding p 61 Instrukcja obsługi p 71 Manual de utilizare p 81 ...

Page 2: ...uency 868Mhz Dimensions Ø 65 x 15mm Working temperature 5 C 50 C Water resistance class IP30 Power the device Insert the micro USB connector of the included power cord into the dedicated port on the hub Connect the other end of the cable to the 230V 5V adapter Plug the adapter into an outlet ...

Page 3: ...hat the GPS location is enabled 1 Connect your phone to the WiFi network 2 Download the Tuya Smart application Android iOS 3 Open Tuya Smart create an account and log in 4 Power the hub to a 230V power source 5 Add the hub to the application by clicking the icon in the upper right corner of the screen or by clicking the Add device button this button appears ...

Page 4: ...o connect to and add the password Click Next 9 In the next interface select the EZ Mode option in the upper right corner 10 Then tick Confirm the indicator is blinking rapidly Click Next Note If the LED on the hub does not flash often press and hold the button on the hub 11 The application will start scanning nearby devices 12 After it identifies your device you will receive the Added Successfully...

Page 5: ...5 ...

Page 6: ...ed gateway then click on Add subdevice 2 Then select Heater 3 Switch off the thermostatic head by pressing the button Only the time and day of the week will be displayed on the screen of the thermostatic head 4 Long press the M key on the thermostatic head Icons will be displayed on the screen as in the image below ...

Page 7: ...king rapidly 7 The application will search for nearby devices 8 After identifying your device the thermostatic head the message 1 device has been successfully added will appear 9 Click on Done 10 The signal indicator will appear on the thermostatic head screen 11 The message Added successfully will appear in the application Click on Done again Note PNI CT25WIFI hub supports pairing a maximum of 8 ...

Page 8: ...8 ...

Page 9: ... of the room where the thermostatic head is installed and the set temperature will be displayed in the main interface Press or to set the desired temperature level 3 From the application you can turn the thermostatic head on and off you can change the operation mode of the thermostat Manual ECO Auto or you can set the daily program ...

Page 10: ...INESHOP SRL declares that the PNI CT25WIFI Internet Hub is in accordance with the RED Directive 2014 53 EU The full text of the EU Declaration of Conformity is available at the following website https www mypni eu products 7681 download certifications ...

Page 11: ...Hub Internet PNI CT25WIFI Handbuch ...

Page 12: ...ktor Mikro USB Frequenz 868Mhz Dimensionen Ø 65 x 15mm Temperatur 5 C 50 C Schutzklasse Wasser IP30 Versorgung Stecken Sie den Konnektor Mikro USB des Versorgungskabels im Hub Port Verbinden Sie das Kabelende mit dem Adapter 230V 5V Stecken Sie den Adapter in der Steckdose ein ...

Page 13: ...ktivierte GPS angeschlossen ist 1 Verbinden Sie das Telefon mit dem WiFi Netzwerk 2 Laden Sie die App Tuya Smart herunter Android iOS 3 Öffnen Sie die App erstellen Sie ein Account und melden Sie sich an 4 Versorgen Sie den Hub an der Stromquelle 230V 5 Fügen Sie den Hub in der App hinzu indem Sie rechts oben im Bildschirm drücken oder drücken ...

Page 14: ...d fügen Sie das Passwort hinzu Klicken Sie Next 9 Im nächsten Interface wählen Sie rechts oben die Option EZ Mode 10 Dann hacken Sie Confirm the indicator is blinking rapidly Klicken Sie Next Hinweis wenn die LED auf dem Hub nicht oft blinkt drücken Sie lang die Taste auf dem Hub 11 Die App beginnt die Geräte zu scannen 12 Nachdem Ihr Gerät identifiziert wurde erhalten Sie eine Bestätigung Added S...

Page 15: ...15 ...

Page 16: ...klicken Sie Add subdevice 2 Aus der angezeigten Liste wählen Sie Heater 3 Schalten Sie den thermostatischen Kopf aus indem Sie drücken Auf dem thermostatischen Kopf werden die Uhr und den Wochentag angezeigt 4 Drücken Sie lang die Taste M auf dem thermostatischen Kopf Auf dem Bildschirm werden folgende Piktogramme angezeigt ...

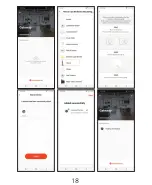
Page 17: ...ng rapidly 7 Die App sucht die Geräte in der Nähe 8 Nach der Identifizierung Ihres Gerätes der thermostatische Kopf erscheint die Nachricht 1 device has been successfully added 9 Klicken Sie Done 10 Auf dem Bildschirm des thermostatischen Kopfes erscheint das Symbol 11 In der App erscheint die Nachricht Added successfully Klicken Sie erneut Done Hinweis Hub PNI CT25WIFI unterstützt eine Paarung mi...

Page 18: ...18 ...

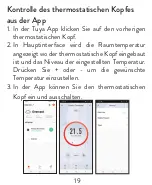
Page 19: ...erigen thermostatischen Kopf 2 In Hauptinterface wird die Raumtemperatur angezeigt wo der thermostatische Kopf eingebaut ist und das Niveau der eingestellten Temperatur Drücken Sie oder um die gewünschte Temperatur einzustellen 3 In der App können Sie den thermostatischen Kopf ein und ausschalten ...

Page 20: ...formitätserklärung SC ONLINESHOP SRL erklärt dass Hub Internet PNI CT25WIFI der Richtlinie RED 2014 53 UE entspricht Sie finden den ganzen Text auf der folgenden Link https www mypni eu products 7681 download certifications ...

Page 21: ...Internet Hub PNI CT25WIFI Manual de usuario ...

Page 22: ...hz Dimensiones Ø 65 x 15 mm Temperatura de trabajo 5 C 50 C Clase de resistencia al agua IP30 Enciende el dispositivo Inserte el conector micro USB del cable de alimentación incluido en el puerto dedicado del concentrador Conecte el otro extremo del cable al adaptador 230V 5V Enchufe el adaptador en una toma de corriente ...

Page 23: ...2 4 GHz y que la ubicación GPS esté habilitada 1 Conecte su teléfono a la red WiFi 2 Descarga la aplicación Tuya Smart Android iOS 3 Abra Tuya Smart cree una cuenta e inicie sesión 4 Alimente el concentrador a una fuente de alimentación de 230 V 5 Agregue el hub a la aplicación haciendo clic en el icono en la esquina superior derecha de la ...

Page 24: ... WiFi a la que desea conectarse y agregue la contraseña Hacer clic en Next 9 En la siguiente interfaz seleccione la opción EZ Mode en la esquina superior derecha 10 Entonces marque Confirm the indicator is blinking rapidly Hacer clic en Next Nota Si el LED del gateway no parpadea con frecuencia mantenga presionado el botón del gateway 11 La aplicación comenzará a escanear los dispositivos cercanos...

Page 25: ...25 ...

Page 26: ...ecientemente luego haga clic en Add subdevice 2 Luego seleccione Heater 3 Apague el cabezal termostático presionando el botón En la pantalla del cabezal termostático solo se mostrarán la hora y el día de la semana 4 Mantenga presionada la tecla M en el cabezal termostático Los iconos se mostrarán en la pantalla como en la siguiente imagen ...

Page 27: ...idly 7 La aplicación buscará dispositivos cercanos Después de identificar su dispositivo el cabezal termostático el mensaje 1 device has been successfully added aparecerá 8 Hacer clic en Done 9 El indicador de señal aparecerá en la pantalla del cabezal termostático 10 El mensaje Added successfully aparecerá en la aplicación Hacer clic otra vez en Done Nota El concentrador PNI CT25WIFI admite el em...

Page 28: ...28 ...

Page 29: ...ación donde está instalado el cabezal termostático y la temperatura establecida se mostrarán en la interfaz principal Presione o para configurar el nivel de temperatura deseado 3 Desde la aplicación puede encender y apagar el cabezal termostático puede cambiar el modo de funcionamiento del termostato Manual ECO Auto o puede configurar el programa diario ...

Page 30: ...C ONLINESHOP SRL declara que el PNI CT25WIFI Internet Hub cumple con la Directiva RED 2014 53 EU El texto completo de la Declaración de conformidad de la UE está disponible en el siguiente sitio web https www mypni eu products 7681 download certifications ...

Page 31: ...Internet Hub PNI CT25WIFI Manuel de l utilisateur ...

Page 32: ...ce 868 Mhz Dimensions Ø 65 x 15 mm Température de fonctionnement 5 C 50 C Classe de résistance à l eau IP30 Alimentez l appareil Insérez le connecteur micro USB du cordon d alimentation fourni dans le port dédié du hub Connectez l autre extrémité du câble à l adaptateur 230V 5V Branchez l adaptateur dans une prise ...

Page 33: ...sation GPS est activée 1 Connectez votre téléphone au réseau WiFi 2 Téléchargez l application Tuya Smart Android iOS 3 Ouvrez Tuya Smart créez un compte et connectez vous 4 Alimentez le hub sur une source d alimentation 230V 5 Ajoutez le hub à l application en cliquant sur l icône dans le coin supérieur droit de l écran ou en cliquant sur le bouton Add device ce bouton ...

Page 34: ...e mot de passe Cliquez sur Next 9 Dans l interface suivante sélectionnez l option EZ Mode dans le coin supérieur droit 10 Puis cochez Confirm the indicator is blinking rapidly Cliquez sur Next Remarque si le voyant du concentrateur ne clignote pas souvent appuyez sur le bouton du concentrateur et maintenez le enfoncé 11 L application commencera à scanner les appareils à proximité 12 Après avoir id...

Page 35: ...35 ...

Page 36: ... cliquez sur Add subdevice 2 Puis sélectionnez Heater 3 Éteignez la tête thermostatique en appuyant sur le bouton Seuls l heure et le jour de la semaine seront affichés sur l écran de la tête thermostatique 4 Appuyez longuement sur la touche M de la tête thermostatique Les icônes seront affichées à l écran comme dans l image ci dessous ...

Page 37: ...L applicationrechercheralesappareilsàproximité 8 Après avoir identifié votre appareil la tête thermostatique le message 1 device has been successfully added will appear 9 Cliquer sur Done 10 L indicateur de signal apparaîtra sur l écran de la tête thermostatique 11 Le message Added successfully apparaîtra dans l application Cliquer de nouveau sur Done Remarque le hub PNI CT25WIFI prend en charge l...

Page 38: ...38 ...

Page 39: ... tête thermostatique est installée et la température de consigne seront affichées dans l interface principale Appuyez sur ou pour régler le niveau de température souhaité 3 Depuis l app vous pouvez allumer et éteindre la tête thermostatique vous pouvez changer le mode de fonctionnement du thermostat Manuel ECO Auto ou vous pouvez régler le programme quotidien ...

Page 40: ...ONLINESHOP SRL déclare que le hub Internet PNI CT25WIFI est conforme à la directive RED 2014 53 EU Le texte intégral de la déclaration de conformité UE est disponible sur le site Web suivant https www mypni eu products 7681 download certifications ...

Page 41: ...Internet Hub PNI CT25WIFI Használati utasítás ...

Page 42: ...868Mhz Méretek Ø 65 x 15mm Működési hőmérséklet 5 C 50 C Vízállósági osztály IP30 A készülék áramellátása Helyezze a mellékelt tápkábel micro USB csatlakozóját az elosztó dedikált portjába Csatlakoztassa a kábel másik végét a 230 V 5 V adapterhez Dugja be az adaptert egy konnektorba ...

Page 43: ...hoz és hogy engedélyezve van e a GPS helymeghatározás 1 Csatlakoztassa telefonját a WiFi hálózathoz 2 Töltse le a Tuya Smart alkalmazást Android iOS 3 Nyissa meg a Tuya Smart szoftvert hozzon létre egy fiókot és jelentkezzen be 4 Az elosztót 230 V os áramforrásra táplálja 5 Adja hozzá a hubot az alkalmazáshoz a képernyő jobb felső sarkában található ikonra kattintva ...

Page 44: ...i kívánt WiFi hálózatot és adja meg a jelszót Kattintson a gombra Next 9 A következő felületen válassza ki az opciót EZ Mode a jobb felső sarokban 10 Akkor pipáld Confirm the indicator is blinking rapidly Kattintson a gombra Next Megjegyzés Ha az elosztón lévő LED nem villog gyakran nyomja meg és tartsa lenyomva az agy gombját 11 Azalkalmazáselkezdivizsgálniaközelieszközöket 12 Miután azonosította...

Page 45: ...45 ...

Page 46: ...tt átjárón majd kattintson a gombra Add subdevice 2 Ezután válassza ki Heater 3 A gomb megnyomásával kapcsolja ki a termosztátfejet Csak a hét időpontja és napja jelenik meg a termosztatikus fej képernyőjén 4 Hosszan nyomja meg a termosztatikus fej M gombját Az ikonok úgy jelennek meg a képernyőn mint az alábbi képen ...

Page 47: ...or is blinking rapidly 7 Az alkalmazás megkeresi a közeli eszközöket 8 A készülék a termosztatikus fej azonosítása után az üzenet 1 device has been successfully added meg fog jelenni 9 Kattintson Done 10 A jelzőfény megjelenik a termosztatikus fej képernyőn 11 Az üzenet Added successfully megjelenik az alkalmazásban Kattintson Done újra Megjegyzés A PNI CT25WIFI hub maximum 8 termosztatikus fej pá...

Page 48: ...48 ...

Page 49: ...en megjelenik annak a helyiségnek a hőmérséklete ahol a termosztatikus fej van felszerelve és a beállított hőmérséklet A vagy gombbal állítsa be a kívánt hőmérsékleti szintet 3 Az alkalmazásból ki és bekapcsolhatja a termosztátfejet megváltoztathatja a termosztát üzemmódját kézi ECO automatikus vagy beállíthatja a napi programot ...

Page 50: ...ozat Az SC ONLINESHOP SRL kijelenti hogy a PNI CT25WIFI Internet Hub megfelel a 2014 53 EU RED irányelvnek Az EU megfelelőségi nyilatkozat teljes szövege a következő weboldalon érhető el https www mypni eu products 7681 download certifications ...

Page 51: ...Internet Hub PNI CT25WIFI Manuale dell utente ...

Page 52: ... Mhz Dimensioni Ø 65 x 15 mm Temperatura di lavoro 5 C 50 C Classe di resistenza all acqua IP30 Allimentare il dispositivo Inserire il connettore micro USB del cavo di alimentazione incluso nella porta dedicata sull hub Collegare l altra estremità del cavo all adattatore 230V 5V Collega l adattatore a una presa 230V ...

Page 53: ...te WiFi a 2 4 GHz e che la posizione GPS sia abilitata 1 Collega il tuo telefono alla rete WiFi 2 Scarica l applicazione Tuya Smart Android iOS 3 Apri Tuya Smart crea un account e accedi 4 Alimenta l hub a una fonte di alimentazione da 230 V 5 Aggiungere l hub all applicazione facendo clic sull icona nell angolo in alto a destra dello schermo ...

Page 54: ...e WiFi a cui desidera connettersi e aggiungi la password Fare clic su Next 9 Nella prossima interfaccia selezionare l opzione EZ Mode nel angolo destro superiore 10 Quindi clicca su Confirm the indicator is blinking rapidly Clicca su Next Nota Se il LED sull hub non lampeggia spesso tenere premuto il pulsante sull hub 11 L applicazione inizierà la scansione dei dispositivi nelle vicinanze 12 Dopo ...

Page 55: ...55 ...

Page 56: ...ndi fare clic su Add subdevice 2 Quindi selezionare Heater 3 Spegnere la testa termostatica premendo il pulsante Sullo schermo della testa termostatica verranno visualizzati solo l ora e il giorno della settimana 4 Premere a lungo il tasto M sulla testa termostatica Le icone verranno visualizzate sullo schermo come nell immagine seguente ...

Page 57: ... rapidly 7 L applicazionecercheràidispositivinellevicinanze 8 Dopo aver identificato il suo dispositivo la testa termostatica il messaggio 1 device has been successfully added verrà visualizzato 9 Clicca su Done 10 L indicatore di segnale apparirà sullo schermo della testa termostatica 11 Il messaggio Added successfully apparirà nell applicazione Fare di nuovo clic su Done Nota l hub PNI CT25WIFI ...

Page 58: ...58 ...

Page 59: ...nno visualizzate la temperatura della stanza in cui è installata la testa termostatica e la temperatura impostata Premere o per impostare il livello di temperatura desiderato 3 Dall applicazione è possibile accendere e spegnere la testa termostatica modificare la modalità di funzionamento del termostato Manuale ECO Auto oppure impostare il programma giornaliero ...

Page 60: ... SC ONLINESHOP SRL dichiara che l Internet Hub PNI CT25WIFI è conforme alla Direttiva RED 2014 53 UE Il testo completo della Dichiarazione di conformità UE è disponibile sul seguente sito Web https www mypni eu products 7681 download certifications ...

Page 61: ...Internet Hub PNI CT25WIFI Handleiding ...

Page 62: ...Afmetingen Ø 65 x 15 mm Werktemperatuur 5 C 50 C Waterbestendigheidsklasse IP30 Schakel het apparaat in Steek de micro USB connector van het meegeleverde netsnoer in de daarvoor bestemde poort op de hub Sluit het andere uiteinde van de kabel aan op de 230V 5V adapter Sluit de adapter aan op een stopcontact ...

Page 63: ... en dat de GPS locatie is ingeschakeld 1 Verbind je telefoon met het wifi netwerk 2 Download de Tuya Smart applicatie Android iOS 3 Open Tuya Smart maak een account aan en log in 4 Sluit de hub aan op een 230V voedingsbron 5 Voeg de hub toe aan de applicatie door op het pictogram in de rechterbovenhoek van het scherm te klikken of door op de knop Add device te klikken ...

Page 64: ...uverbinding wilt maken en voeg het wachtwoord toe Klik Next 9 Selecteer in de volgende interface de optie EZ Mode in de rechterbovenhoek 10 Vink vervolgens Confirm the indicator is blinking rapidly Klik Next Opmerking als de LED op de hub niet vaak knippert houdt u de knop op de hub ingedrukt 11 De applicatie begint met het scannen van apparaten in de buurt 12 Nadat het uw apparaat heeft geïdentif...

Page 65: ...65 ...

Page 66: ...vervolgens op Add subdevice 2 Selecteer vervolgens Heater 3 Schakel de thermostaatkop uit door op de knop te drukken Alleen de tijd en dag van de week worden op het scherm van de thermostaatkop weergegeven 4 Druk lang op de M toets op de thermostaatkop Pictogrammen worden op het scherm weergegeven zoals in de onderstaande afbeelding ...

Page 67: ...s blinking rapidly 7 De applicatie zoekt naar apparaten in de buurt 8 Na identificatie van uw apparaat de thermostaatkop verschijnt het bericht 1 device has been successfully added 9 Klik op Next 10 De signaalindicator verschijnt op het thermostaatkopscherm 11 Het bericht Added successfully verschijnt in de applicatie Klik nogmaals op Next Opmerking PNI CT25WIFI hub ondersteunt het koppelen van ma...

Page 68: ...68 ...

Page 69: ...waar de thermostaatkop is geïnstalleerd en de ingestelde temperatuur worden weergegeven in de hoofdinterface Druk op of om het gewenste temperatuurniveau in te stellen 3 Vanuit de applicatie kun je de thermostaatkop aan en uit zetten je kunt de werkingsmodus van de thermostaat wijzigen Manual ECO Auto of je kunt het dagprogramma instellen ...

Page 70: ...NESHOP SRL verklaart dat de PNI CT25WIFI internethub in overeenstemming is met de RED richtlijn 2014 53 EU De volledige tekst van de EU conformiteitsverklaring is beschikbaar op de volgende website https www mypni eu products 7681 download certifications ...

Page 71: ...Internet Hub PNI CT25WIFI Instrukcja obsługi ...

Page 72: ... Częstotliwość 868 Mhz Wymiary Ø 65 x 15 mm Temperatura pracy 5 C 50 C Klasa wodoodporności IP30 Włącz urządzenie Włóż złącze micro USB dołączonego przewodu zasilającego do dedykowanego portu w koncentratorze Podłącz drugi koniec kabla do adaptera 230V 5V Podłącz adapter do gniazdka ...

Page 73: ... funkcja lokalizacji GPS jest włączona 1 Podłącz telefon do sieci Wi Fi 2 Pobierz aplikację Tuya Smart Android iOS 3 Otwórz Tuya Smart załóż konto i zaloguj się 4 Zasil koncentrator do źródła zasilania 230 V 5 Dodaj hub do aplikacji klikając ikonę w prawym górnym rogu ekranu lub klikając przycisk Add device ten przycisk pojawia się gdy nie masz dodanego ...

Page 74: ...j hasło Kliknij Next 9 W następnym interfejsie wybierz opcję EZ Mode w prawym górnym rogu 10 Następnie zaznacz Confirm the indicator is blinking rapidly Kliknij Next Uwaga Jeśli dioda LEDnapiaścieniemigaczęsto naciśnijiprzytrzymaj przycisk na piaście 11 Aplikacja rozpocznie skanowanie pobliskich urządzeń 12 Po zidentyfikowaniu urządzenia otrzymasz potwierdzenie Added Successfully 13 Aby zakończyć ...

Page 75: ...75 ...

Page 76: ...ie a następnie kliknij Add subdevice 2 Następnie wybierz Heater 3 Wyłączyć głowicę termostatyczną naciskając przycisk Na ekranie głowicy termostatycznej zostanie wyświetlona tylko godzina i dzień tygodnia 4 Długo naciśnij klawisz M na głowicy termostatycznej Ikony zostaną wyświetlone na ekranie jak na poniższym obrazku ...

Page 77: ...dly 7 Aplikacja wyszuka pobliskie urządzenia 8 Po zidentyfikowaniu urządzenia głowicy termostatycznej pojawia się komunikat 1 device has been successfully added pojawi się 9 Kliknij Done 10 Wskaźnik sygnału pojawi się na ekranie głowicy termostatycznej 11 Wiadomość Added successfully pojawi się w aplikacji Kliknij Done jeszcze raz Uwaga koncentrator PNI CT25WIFI obsługuje parowanie maksymalnie 8 g...

Page 78: ...78 ...

Page 79: ...pomieszczeniu w którym zainstalowana jest głowica termostatyczna oraz ustawiona temperatura zostaną wyświetlone na głównym interfejsie Naciśnij lub aby ustawić żądany poziom temperatury 3 Z poziomu aplikacji można włączać i wyłączać głowicę termostatyczną zmieniać tryb pracy termostatu Ręczny ECO Auto lub ustawić program dzienny ...

Page 80: ...C ONLINESHOP SRL oświadcza że Hub internetowy PNI CT25WIFI jest zgodny z dyrektywą RED 2014 53 UE Pełny tekst deklaracji zgodności UE jest dostępny na następującej stronie internetowej https www mypni eu products 7681 download certifications ...

Page 81: ...Hub Internet PNI CT25WIFI Manual de utilizare ...

Page 82: ...nta 868Mhz Dimensiuni Ø 65 x 15mm Temperatura de lucru 5 C 50 C Clasa de rezistenta la apa IP30 Alimentare dispozitiv Introduceti conectorul micro USB al cablului de alimentare inclus in portul dedicat de pe hub Conectati celalalt capat al cablului in adaptorul 230V 5V Conectati adaptorul intr o priza ...

Page 83: ...ocatia GPS activata 1 Conectati telefonul la reteaua WiFi 2 Descarcati aplicatia Tuya Smart Android iOS 3 Deschideti aplicatia creati va cont si autentificati va 4 Alimentati hub ul la o sursa de curent 230V 5 Adaugati hub ul in aplicatie apasand pictograma din coltul dreapta sus al ecranului sau apasand butonul Add device acest buton apare atunci ...

Page 84: ...sa va conectati si adaugati parola Click Next 9 In interfata urmatoare selectati din coltul dreapta sus optiunea EZ Mode 10 Apoi bifati Confirm the indicator is blinking rapidly Click Next Nota Daca LED ul de pe hub nu clipeste des apasati lung butonul de pe hub 11 Aplicatia va incepe scanarea dispozitivelor din apropiere 12 Dupa ce va identifica dispozitivul dvs veti primi confirmarea Added Succe...

Page 85: ...85 ...

Page 86: ...y ul recent adaugat apoi click pe Add subdevice 2 Din lista afisata selectati Heater 3 Opriti capul termostatic apasand butonul Pe ecranul capului termostatic va fi afisata doar ora si ziua saptamanii 4 Apasati lung tasta M de pe capul termostatic Pe ecran vor fi afisate pictograme ca in imaginea de mai jos ...

Page 87: ... indicator is blinking rapidly 7 Aplicatia va cauta dispozitivele din apropiere 8 Dupa ce va identifica dispozitivul dvs capul termostatic va aparea mesajul 1 device has been successfully added 9 Click pe Done 10 Pe ecranul capului termostatic va aparea indicatorul de semnal 11 In aplicatie va aparea mesajul Added successfully Click din nou pe Done Nota Hub ul PNI CT25WIFI suporta imperecherea a m...

Page 88: ...88 ...

Page 89: ...ata principala va fi afisata temperatura din camera unde este instalat capul termostatic si nivelul de temperatura setat Apasati sau pentru a seta nivelul de temperatura dorit 3 Din aplicatie puteti opri si porni capul termostatic puteti schimba modul de functionare al termostatului Manual ECO Auto sau puteti seta programul saptamanal ...

Page 90: ...INESHOP SRL declara ca Hub Internet PNI CT25WIFI este in conformitate cu Directiva RED 2014 53 UE Textul integral al declaratiei UE de conformitate este disponibil la urmatoarea adresa de internet https www mypni eu products 7681 download certifications ...

Page 91: ......

Page 92: ......

Reviews: