background image


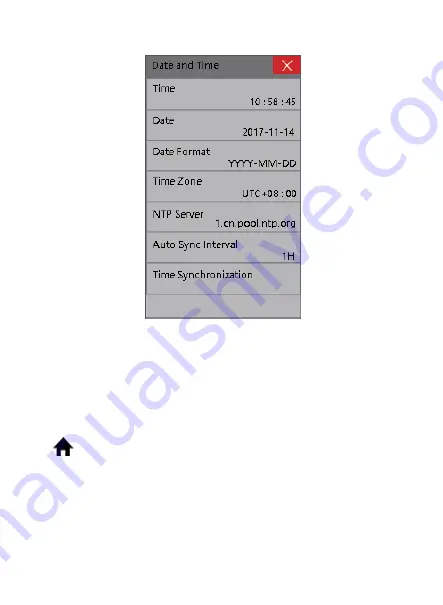
W tym menu można ustawić godzinę, datę, format i strefę czasową. Ustawienia " NTP 

 Serwer" 

pozwalają  wybrać  adres  serwera  Network  Time  Protocol.  Czas  urządzenia  zostanie 
zsynchronizowany  z  określonym  serwerem  automatycznej  synchronizacji  w  określonym 

przedziale czasu. 
Funkcja "


Time Synchronization " synchronizuje czas serwera po aktywacji.


B.


Ustawienia zdjęć

:


”→  Setting  →  Advanced  →  Photo  Setting→ 

Wybierz 

None/Enrolled Photo/Realtime Camera → 

Kliknij 

“OK”


273

Summary of Contents for Face 600

Page 1: ...nstrukcja obs ugi 253 RO Manual de utilizare 295 PNI Face 600 Time and attendance terminal Zeitterminal und Teilnahmeterminal Terminal de tiempo y asistencia Terminal de Gestion de Temps de Pr sence U...

Page 2: ...e to the exposure of its capabili ties our company has launched a series of products based on facial recognition technology This product is designed for the needs of enterprises and institutions for o...

Page 3: ...f the mounting frame then secure the device to the mounting bracket with the supplied screw The device defaults with no managers enrolled please register a manager or administrator level user Chapter...

Page 4: ...e recommend completing the forms properly Press OK to begin registering a user Now follow any sections below from 1 8 to finish registration for the respective parts 1 Face registration icon User Enro...

Page 5: ...istration will fail if the user is already registered 2 Fingerprint registration Proper Positioning of finger Position your finger flat at the center of the fingerprint sensor Below are the top view a...

Page 6: ...cording to the desired input finger input the number manually by pressing the box Press OK Capture fingerprint 3 times Press Continue for more fingers or Exit to finish 3 Proximity card registration i...

Page 7: ...icon User Enroll Enter Your info Choose password Enter the same 3 6 digit number combination for the two forms press OK 5 Photo registration icon User Enroll Enter Your info Choose photo When ready pr...

Page 8: ...Choose Verification Mode Choose verification method Press OK System default is the preferred verification mode set in Advanced settings Chapter5 7 User Timezone icon User Enroll Enter Your info User T...

Page 9: ...Alarm icon User Enroll Enter Your info Choose Fingerprint Alarm i Register allows you to enroll a new fingerprint while also setting it as a duress alarm trigger Press a number using the hand map as r...

Page 10: ...igger Press a previously enrolled finger and the device will automatically detect the finger number Press OK then Yes to confirm iii Remove and Remove all removes only the duress alarm trigger but kee...

Page 11: ...r icon User Delete input your User ID Press OK select the verification method you wish to delete or press Delete All Press Yes C Edit User icon User Edit Click on the desired row use the search functi...

Page 12: ...tion Terminal The search function can look up the proper record if you input the User ID Name Face Verify Be sure to press the OK button on the input pad if you chose Name as your search criteria Chap...

Page 13: ...cations C Volume Change the volume of the device choose a value between 0 10 D Auto Change of Time Mode Edit the shifts E Bell Setting Set the times of bell toggle on off and bell sounds F Bell Count...

Page 14: ...Face Fingerprint Recognition Terminal B Sound Setting icon Setting Basic Sound Select Yes or No 14...

Page 15: ...nition Terminal C Volume control icon Setting Basic Volume Enter the volume value between 0 10 Press OK D Auto Change of Time Mode icon Setting Basic Auto Change of Time Mode Click on a row to edit it...

Page 16: ...l accept during this time slot the default value is 9999 which stands for infinity To prevent records from exceeding the capacity E Bell setting icon Setting Basic Bell setting Click on a row to edit...

Page 17: ...Face Fingerprint Recognition Terminal G Part Departments icon Setting Basic Part Click on a row to edit its contents input department name Press OK 17...

Page 18: ...hoto Realtime Camera D Allowed of Managers Set the max allowed of managers E Calibrate Sensor Recalibrates the sensor F Upgrade Firmware Connect a USB flash drive with firmware file to upgrade G Facto...

Page 19: ...ion method The default FACE FP CD PWD settings requires any one of face fingerprint card OR password to pass verification The verification modes with means users have to pass all listed verification m...

Page 20: ...Face Fingerprint Recognition Terminal B Time setting icon Setting Advanced Date and Time 20...

Page 21: ...you to choose the Network Time Protocol server address The device s time will synchronize to the specified server at the Auto Sync Interval The Time Synchronization function will synchronize the clock...

Page 22: ...Face Fingerprint Recognition Terminal D Allowed of Managers icon Setting Advanced Allowed of Managers Choose the maximum allowed of managers Press OK 22...

Page 23: ...ware G Factory Reset It is highly recommended that you backup all data Chapter 11 USB Disk before you perform the factory reset icon Setting Advanced Factory Reset H Clear All Time Log icon Setting Ad...

Page 24: ...B Sleep After Set the time when device turns off display to only display time A Restart At icon Setting Power Restart At Enter the time you wish for restart Press OK B Sleep After icon Setting Power S...

Page 25: ...device can connect to WiFi these settings let you connect to a wifi access point and change the connection settings C Device ID If you use multiple devices you could set the Device ID to help keep tr...

Page 26: ...Face Fingerprint Recognition Terminal B WiFi icon Setting Communication WiFi For selected models only 26...

Page 27: ...IPv4 and TCP IPv6 For technically advanced users Link Information Shows status of the Wi Fi connection Auto Select Allows auto selection of Wi Fi hotspot press Auto Select Setting to add an access poi...

Page 28: ...CP Port The default is 5005 E Communication Password Password to improve the security of your data you can set the communication password authentication You can only download the records if this authe...

Page 29: ...Face Fingerprint Recognition Terminal F WebSocket Server URL icon Setting Communication WebSocket Server URL 29...

Page 30: ...Log Warning Set a reminder for when time logs exceed a certain number C Reverification Time Change the time after first log in that counts as a duplicate verification A Management Log Warning icon Set...

Page 31: ...oor stays open D Door Sensor Type Set the door sensors to always open or close E Duress Setting The option to activate alarm with a preset duress password and to set the delay before alarm F Watch Tam...

Page 32: ...umn to begin editing Timezone Group and ensure the selected is highlighted in blue Click on a row to edit Select the Start Time End Time and Verification Mode Press OK You may have up to 50 Timezone g...

Page 33: ...Face Fingerprint Recognition Terminal C Door Open Timeout icon Setting Access Door Open Timeout D Door Sensor Type icon Setting Access Door Sensor Type 33...

Page 34: ...Face Fingerprint Recognition Terminal E Duress Settings icon Setting Access Duress Settings F Watch Tamper icon Setting Access Watch Tamper 34...

Page 35: ...rprint Recognition Terminal G Wiegand Output Type icon Setting Access Wiegand Output Type Choose your preferred Wiegand Output Type H Forward Card ID to Wiegand icon Setting Access Forward Card ID to...

Page 36: ...10 Test You may test the functions of Sound Sensor fingerprint Touchscreen RTC real time clock Camera IR Infrared Camera and Camera Deviation All test results except Sound Touchscreen and RTC can be s...

Page 37: ...ed to our Time Atten dance Software icon Setting USB Disk A Download Latest TimeLog Download logs that weren t down loaded before B Download Specified TimeLog Specify the dates of time logs you wish t...

Page 38: ...elow for quick registration on a second device for applica tions where you use more than one device or for quick setup after factory reset G Upload User Database H Upload User Database XML Chapter 12...

Page 39: ...lease S N Manufacturer Product name and type and Firmware version C Advanced To see the logs you may manually input the User ID or scan a user s face to automatically pull the correct User ID If appli...

Page 40: ...ecognition Terminal Advanced info includes Time Log Management Log and User List If you select Specify Date you should make sure you input the proper starting and ending date into the respective boxes...

Page 41: ...nger onto the sensor Be sure to place the finger parallel to the sensor slowly increase a moderate amount of pressure to ensure proper induction If none of the methods alleviates the problem try re en...

Page 42: ...trator 5 The touchscreen is insensitive or too sensitive Answer Keep a distance between the user and the device during power up cycle as this will affect the touch initialization 6 USB flash drive can...

Page 43: ...43...

Page 44: ...ernehmen hinsichtlich des Managements ber Arbeitsteilnahme zu erf llen Das Produkt bietet Pr zision gro e Erkennungsgeschwindigkeit und Arbeitszeit berwachung Es unterst tzt das Protokoll TCP IP und e...

Page 45: ...er Verpackung Das Ger t hat keinen eingetragenen Administrator bitte tragen Sie einen Nutzer ein der die Rolle des Administrators oder des Managers erf llt Kapitel 3 Nutzer eintragen und l schen Um Sa...

Page 46: ...das folgende Formular aus Dr cken Sie OK um die Eintragung zu beenden Um die Eintragung zu beenden verfolgen Sie die folgenden Abschnitte 1 Gesicht eintragen Nutzer Eintragen Felder ausf llen Gesicht...

Page 47: ...etragen ist 2 Fingerabdruck eintragen Finger richtig positionieren Positionieren Sie den Finger und dr cken Sie leicht in der Mitte des Fingerabdrucksensors Unten sehen Sie Schemata f r eine richtige...

Page 48: ...eben Sie manuell die Zahl ein im Feld FP No Dr cken Sie OK Scannen Sie den Finger dreimal Dr cken Sie weiter um mehrere Finger zu scannen oder Exit um zu beenden 3 Eintragung Proxy Kartei Nutzer Eintr...

Page 49: ...en Feldern f gen Sie dasselbe Passwort hinzu Kombination von 3 6 Zeichen Dr cken Sie OK 5 Foto Eintragen Nutzer Eintragen Felder ausf llen Foto w hlen wenn Sie fertig sind dr cken Sie Foto machen Dr c...

Page 50: ...fen W hlen Sie die Pr fmethode Dr cken Sie OK System Default ist das beliebteste Pr fmodus im Kapitel 5 fortgeschrittene Einstellungen 7 Zeitzone Arbeitsprogramm Nutzer Eintragen Felder ausf llen Nutz...

Page 51: ...en Sie Alarm Fingerabdruck Eintragen erm glicht die Eintragung eines neuen Fingerabdrucks w hrend Sie den Fingerabdruck f r Notf lle einstellen Alarm Fingerabdruck Panik Fingerabdruck W hlen Sie eine...

Page 52: ...nen Finger und das Ger t detektiert automatisch die Nummer des Fingers Dr cken Sie OK dann Ja zu best tigen Entfernen und Alles Entfernen l scht nur den Alarm Fingerabdruck es l scht den Fingerabdruck...

Page 53: ...ngeben Dr cken Sie OK w hlenSiediezul schendeEintragungoderdr ckenSie AllesL schen Dr ckenSieJa C Nutzer editieren Nutzer Editieren Klicken Sie die Zeile oder benutzen Sie die Suchfunktion W hlen Sie...

Page 54: ...Die Suchfunktion hilft Ihnen die entsprechende Eintragung zu finden nach Nutzer ID Namen Gesicht Pr fen Sie dass Sie OK dr cken wenn Sie Namen als Suchkriterium w hlen Kapitel 4 Ger teeinstellungen 54...

Page 55: ...C Lautst rke Kontrolle Lautst rke w hlen Sie einen Wert von 0 10 D Auto Change Zeit Editiert das Arbeitsprogramm E Klingeleinstellungen Klingeleinstellungen F Klingelzahl Stellt die Zahl der Laute f...

Page 56: ...B Lauteinstellungen Einstellungen Basic Ton W hlen Sie JA sau NEIN 56...

Page 57: ...le Lautst rke Setting Basic Lautst rke W hlen Sie einen Wert von 0 10 Dr cken Sie OK D Arbeitsprogramm Zeitmodus wechseln Setting Basic Zeitmodus wechseln Klicken Sie eine Zeile f r Editieren Dr cken...

Page 58: ...amm aufnehmen wird der implizite Wert ist 9999 und bezieht sich auf das Infinitum E Klingeleinstellungen Setting Basic Klingeleinstellungen Klicken Sie eine Zeile f r Editieren Dr cken Sie OK Sie k nn...

Page 59: ...G Part Abteilungen Setting Basic Part Klicken Sie eine Zeile f r Editieren Geben Sie den Namen der Abteilung ein Dr cken Sie OK 59...

Page 60: ...nagers Einstellung der maximalen Managerzahl E Calibrate Sensor Sensor neu kalibrieren F Upgrade Firmware USB anschlie en mit Firmware Datei f r Update G Factory Reset Zur ck zu ersten Einstellungen H...

Page 61: ...FP CD PWD braucht Gesicht Fingerabdruck Kartei oder Passwort um das Pr fen zu bestehen Die Pr fmodus bedeutet dass die Nutzer konsekutiv alle Pr fmethoden in der aktuellen Reihenfolge bestehen m ssen...

Page 62: ...r m ssen eine RF Kartei und einen Fingerabdruck eintragen Authentifizierung notwendig mit diesen konsekutiven M glichkeiten Kartei Gesicht Die Nutzer m ssen eine RF Kartei eintragen und ein Gesicht Au...

Page 63: ...vers Network Time Protocol zu w hlen Die Uhrzeit synchronisiert sich mit dem automatischen Server im angegebenen Zeitintervall DieFunktionZeitSynchronisationsynchronisiertdieUhrzeitimServernachderAkti...

Page 64: ...D Erlaubte Zahl von Managern Setting Fortgeschritten zugelassen Managers W hlen Sie die zugelassene Zahl von eingetragenen Manager Dr cken Sie OK 64...

Page 65: ...Machen Sie Backup f r alle Daten Kap 11 USB Stick bevor Sie das Ger t neu einstellen Setting Fortgeschritten zur ck zur Werkeinstellungen H Historie l schen Setting Fortgeschritten Alle Login l schen...

Page 66: ...wenn das Ger t den Bildschirm ausschaltet und zeigt nur die Uhrzeit an A Neu starten Setting Power neu starten um Geben Sie die Uhrzeit ein wenndasGer tneustartensoll Dr cken Sie OK B Standby nach Se...

Page 67: ...lungen schlie en Sie sich an WiFi an Sie k nnen auch die Anschlusseinstellungen ndern C Device ID Wenn Sie mehrere Ger te benutzen k nnen Sie eine ID Ger t um alle zu berwachen einstellen D TCP Port S...

Page 68: ...B WiFi nur f r bestimmte Modelle Setting Kommunikation WiFi 68...

Page 69: ...tene Nutzer Link Information zeigt den Zustand des Wi Fi Anschlusses an Auto Select sie k nnen automatisch WiFi Hotspot ausw hlen Dr cken Sie Auto Select Setting um einen Zugangspunkt in der Selbstans...

Page 70: ...5 D Passwort Passwort um die Datensicherheit zu optimieren k nnen Sie die Authentifizierung mit einem Passwort machen Sie k nnen die Eintragungen herunterladen nur wenn die Authentifizierung erfolgrei...

Page 71: ...E Web Socket Server URL Einstellung Kommunikation Web Socket Server URL 71...

Page 72: ...Stellen Sie einen Memento ein wenn die Managementberichte eine bestimmte Zahl berschreiten C Reverification Time ndern Sie die Zeit ab der ersten Pr fung nach der eine Pr fung als Duplikat gilt A Warn...

Page 73: ...sor Type Stellen Sie die Sensoren ein dass die T r immer offen oder geschlossen ist E Duress Setting Option f r Alarmaktivierung mit einem voreingestellten Fingerabdruck und nach der Einstellung Verz...

Page 74: ...nd pr fen Sie dass die Auswahl blau ist Klicken Sie eine Zeile um zu editieren Stellen Sie die Startzeit die Endzeit und das Pr fmodus ein Dr cken Sie OK Sie k nnen bis zu 50 Gruppen in der Zeitzone h...

Page 75: ...C Zeit offene T r Einstellung Zugang Door Open Timeout D Typ T rsensor Einstellung Zugang Door Sensor Type 75...

Page 76: ...E Einstellungen Alarm Panik Einstellung Zugang Zwang Einstellungen F Watch Tamper Einstellung Zugang Watch Tamper 76...

Page 77: ...G Typ Ausgang Wiegand Einstellung Zugang Wiegand Output Type W hlen Sie den Ausgangtyp Wiegand H ID Kartei an Wiegand weiterleiten Einstellung Zugang Kartei ID nach Wiegand weiterleiten 77...

Page 78: ...k nnen die Funktionen laut Sensor Fingerabdruck Touchscreen RTC Kamera IR Kamera und Kameradeviation testen Alle Ergebnisse au er Ton Ergebnisse TouchscreenundRTC k nnenaufeinemUSBgespeichertwerden E...

Page 79: ...Download Latest TimeLog Laden Sie die Journalen herunter B Download Specified TimeLog Spezifizieren Sie die Zeit die Sie herunterladen wollen C Download New Management Log Laden Sie die letzten Daten...

Page 80: ...er f r eine schnelle Konfiguration nach einer neuen Einstellung G Upload Nutzer Database Laden Sie die Nutzer Datenbank auf H Upload Nutzer Database XM Laden Sie die Nutzer Datenbank in XML Format auf...

Page 81: ...p Firmware Version an C Fortgeschritten um die Journale zu sehen k nnen Sie manuell die ID Nutzer eintragen oder Sie k nnen das Gesicht scannen um die richtige ID zu erfahren wenn notwendig w hlen Sie...

Page 82: ...geschrittene Informationen schlie en Zeitjournal Managementjournal und Nutzerliste ein Wenn Sie Specify Date ausw hlen pr fen Sie dass Sie das Start und das Endzeit richtig eingegeben haben Siehe unte...

Page 83: ...esicht PIN Kartei 2 Das Ger t kommuniziert nicht mit dem Computer Das Ger t ist ausgeschaltet oder es ist nicht richtig am Computer angeschlossen Pr fen Sie ob der serielle Port des Computers und RD48...

Page 84: ...Das Ger t verlangt mehrmals dass der Fingerabdruck wiedergelesen wird obwohl niemand versucht die Arbeit zu berwachen nachweisen Die Scanner Fl che ist schmutzig oder eine Spur des Fingerabdrucks vom...

Page 85: ...85...

Page 86: ...idades de las empresas y sociedades sobre la gesti n de la presencia de los empleados El producto ofrece alta precisi n y rapidez de reconocimiento y fichaje admite el protocolo TCP IP y permite la ca...

Page 87: ...e el dispositivo del marco con el tornillo suministrado El dispositivo no viene impl citamente con ning n administrador registrado de forma predeterminada por favor registre un usuario como administra...

Page 88: ...ndamos que rellene el formulario correctamente Toque OK para finalizar el registro Para finalizar el registro contin a siguiendo todas las secciones de abajo 1 Registro del twarz User Enroll Rellene l...

Page 89: ...est registrado 2 El registro de la huella Colocar su dedo correctamente Coloque su dedo y presione ligeramente en el centro del sensor de huellas dactilares A continuaci n se muestran esquemas de la f...

Page 90: ...nado o ingrese manualmente el n mero en el campo FP No Toque OK Escanea el dedo 3 veces Toque Continue para escanear varios dedos o Exit para finalizar 3 El registro de una tarjeta de proximidad User...

Page 91: ...assword Agregue la misma contrase a en ambos campos una combinaci n de 3 6 caracteres Toque OK 5 Grabaci n de la foto User Enroll Rellene las secciones Elige photo Cuando est preparado toque Take Phot...

Page 92: ...Mode Elige el m todo de verificaci n Toque OK System default es la forma preferida de verificaci n personalizable en el Cap tulo 5 Configuraciones avanzadas 7 Timezone Horario de trabajo User Enroll R...

Page 93: ...e las secciones Elige Fingerprint Alarm Register le permite registrar una nueva huella dactilar mientras la configura como su huella dactilar de emergencia huella de alarma de p nico Elige un n mero o...

Page 94: ...edo previamente inscrito y el dispositivo detectar autom ticamente el n mero del dedo Toque OK despu s Yes para confirmar Remove y Remove all borra solamente la huella de alarma y no la huella para fi...

Page 95: ...te introduzca User ID Toque OK elige el registro que desea borrar o toque Delete All Toque Yes C Edici n de un usuario User Edit Haga clic en la fila deseada o utilice la funci n de b squeda Elige el...

Page 96: ...n de b squeda le ayudar a encontrar el registro correcto en funci n de User ID Nombre Cara Aseg rese que toque el bot n OK si elige Nombre como criterio de b squeda Capitulo 4 Configuraci n del dispo...

Page 97: ...Volume Control del volumen elige un valor entre 0 10 D Auto Change of Time Mode Editar el horario de trabajo E Bell Setting Configuraciones relacionadas con el timbre F Bell Count Establece el n mero...

Page 98: ...B Configuraciones de sonido Setting Basic Sound Selecciona Yes o No 98...

Page 99: ...ntrol del volumen Setting Basic Volume Elige un valor entre 0 10 Toque OK D Horario de trabajo Auto Change of Time Mode Setting Basic Auto Change of Time Mode Haga clic en una fila para editar Toque O...

Page 100: ...ar en ese horario de trabajo el valor predeterminado es 9999 que se refiere al infinito E Configuraciones del timbre Setting Basic Bell setting Haga clic en una fila para editar Toque OK Puede cambiar...

Page 101: ...G Part Departamentos Setting Basic Part Haga clic en una fila para editar introduzca el nombre del departamento Toque OK 101...

Page 102: ...o m ximo permitido por los administradores E Calibrate Sensor Recalibrar el sensor F Upgrade Firmware Conecte una memoria USB con firmware para actualizaci n G Factory Reset Reconfigurar el dispositiv...

Page 103: ...de las siguientes cara huella tarjeta o contrase a para pasar la verificaci n Las maneras de verificaci n con significan que los usuarios tienen que pasar consecutivamente todos los m todos de verifi...

Page 104: ...ue registrar una tarjeta RF y una huella dactilar si es necesaria la autenticaci n usando estas modalidades consecutivamente Card face Los usuarios tienen que registrar una tarjeta RF y un chip si es...

Page 105: ...Time Protocol La hora del dispositivo se sincronizar autom ticamente con el server especificado AutoSync Interval en el intervalo de tiempo especificado La funci n Time Synchronization sincronizar la...

Page 106: ...D El n mero permitido de Manageres Setting Advanced Allowed of Managers Elige el n mero m ximo permitido de Manageres registrados Toque OK 106...

Page 107: ...e f brica Se recomienda que realice una copia de seguridad de todos los datos Cap tulo 11 USB Disk antes de reiniciar el dispositivo Setting Advanced Factory Reset H Eliminar el historial Setting Adva...

Page 108: ...e el momento cuando el dispositivo cierra la pantalla y muestra solo la hora A Reinicia a la Setting Power Restart At Introduceti ora cand doriti sa reporneasca dispozitivul Apasati OK B Standby despu...

Page 109: ...e permiten conectarse a un punto de acceso WiFi y cambiar las configuraciones de conexi n C Device ID Si desea utilizar varios dispositivos puede configurar un Device ID para poderlos monitorizar D TC...

Page 110: ...B WiFi Solo para ciertos modelos Setting Communication WiFi 110...

Page 111: ...suarios avanzados Link Information muestra el estado de la conexi n Wi Fi Auto Select Permite la selecci n autom tica del hotspot Wi Fi toque Auto Select Setting para agregar un punto de acceso a la l...

Page 112: ...es 5005 E Contrase a de comunicaci n Contrase a Para mejorar la seguridad de los datos puede configurar la autenticaci n basada en contrase a Solo puede descargar los registros si la autenticaci n es...

Page 113: ...F WebSocket Server URL Setting Communication WebSocket Server URL 113...

Page 114: ...uando los registros de tiempo exceden un cierto n mero C Reverification Time Cambie el tiempo desde la primera verificaci n despu s de lo cual se considera como una verificaci n duplicada A Advertenci...

Page 115: ...puerta para que est n siempre abierto o cerrado E Duress Setting Opci n para activar la alarma con una huella digital predefinida y para configurar el retraso de la alarma F Watch Tamper Activar desa...

Page 116: ...Haga clic en una fila para editar Seleccione la hora de inicio la hora de finalizaci n y la manera de verificaci n Toque OK Puede tener hasta 50 grupos de Timezone Cada grupo de Timezone consiste en u...

Page 117: ...C Tiempo de puerta abierta Setting Access Door Open Timeout D Tipo sensor puerta Setting Access Door Sensor Type 117...

Page 118: ...E Configuraciones alarma p nico Setting Access Duress Settings F Watch Tamper Setting Access Watch Tamper 118...

Page 119: ...G Tipo salida Wiegand Setting Access Wiegand Output Type Alegeti tipul de iesire Wiegand H Forward Card ID hacia Wiegand Setting Access Forward Card ID to Wiegand 119...

Page 120: ...deSonido Sensor huelladigital Pantallat ctil RTC relojen tiempo real C mara foto C mara IR infrarojo y Deviaci n de la c mara Todos los resultadosdelaspruebas exeptoelsonido touchscreeny RTC sepuedens...

Page 121: ...Latest TimeLog Descargue registros que no se han descargado antes B Download Specified TimeLog Especifique la fecha de los registros de tiempo que desea descargar C Download New Management Log Descar...

Page 122: ...es dispositivos o para una configuraci n r pida despu s de reiniciar G Upload User Database Carga la base de datos con los usuarios H Upload User Database XM Carga la base de datos con los usuarios en...

Page 123: ...el producto el tipo y la versi n del firmware C Advanced Para ver los registros puede ingresar el ID de usuario manualmente o escanear la cara de un usuario para obtener autom ticamente el ID del usua...

Page 124: ...n avanzada incluye registro de tiempo registro de administraci n y lista de usuarios Si seleccione Specify Date aseg rese de que ha introducido correctamente la fecha de inicio y de final como se mues...

Page 125: ...todos de verificaci n del usuario chip PIN Tarjeta 2 El dispositivo no puede comunicarse con la computadora El dispositivo est apagado o no est conectado correctamente a la computadora Compruebe que...

Page 126: ...d menor de 8GB La capacidad restante en la memoria USB es insuficiente 7 El dispositivo solicita repetidamente la relectura de la huella dactilar incluso si nadie intenta ficharse La superficie del es...

Page 127: ...127...

Page 128: ...s societes et des entreprises concernant le management de la presence des employes Le produit offre exactitude et une grande vitesse de pointage il supporte le protocole TCP IP et permet de charger et...

Page 129: ...ourni Le dispositif n est pas fourni avec aucun administrateur enregistre on vous prie d enregistrer un utilisateur avec le role d administrateur ou manager Chapitre 3 Enregistrer et effacer un utilis...

Page 130: ...ous recommande de completer correctement le formulaire Appuyez sur OK pour terminer l enregistrement Pour finaliser l enregistrement continuez avec les sections suivantes 1 L enregistrement du visage...

Page 131: ...deja enregistre 2 L enregistrement de l empreinte Positionner le doigt correctement Positionnez le doigt et appuyez au centre du capteur de l empreinte Ci dessous on vous presente les schemas du model...

Page 132: ...umero manuellement dans le champ FP No Appuyez sur OK Scannez le doigt 3 fois Appuyez sur Continue pour scanner plusieurs doigts ou sur Exit pour finaliser 3 L enregistrement d une carte de proximite...

Page 133: ...dans les deux champs le meme mot de passe la combinaisaon de 3 6 caracteres Appuyez sur OK 5 L enregistrement de la photo User Enroll Completez les champs Choisissez photo Quand vous etes prepare app...

Page 134: ...hoisissez la facon de verification Appuyez sur OK System default est le mode prefere qui peut etre personnalise dans le Chapitre 5 Les Reglages avancees 7 Timezone Le programme de travail User Enroll...

Page 135: ...s Choisissez Fingerprint Alarm Register vous permet l inscription d une nouvelle empreinte pendant le reglage comme l empreinte pour les situations d urgence l empreinte d alarme de panique Choisissez...

Page 136: ...eurement et le dispositif va detecter automatiquement le numero du doigt Appuyez sur OK et ensuite sur Yes pour confirme Remove et Remove all efface seulement l empreinte d alarme et pas l empreinte p...

Page 137: ...ppuyez sur OK selectez l enregistrement que vous voulez effacer ou appuyez sur Delete All Appuyez sur Yes C Editer un utilisateur User Edit Clickez sur la rangee desiree ou utilisez la fonction de rec...

Page 138: ...recherche vous aide pour trouver l enregistrement en fonction du User ID Nom Visage Assurez vous que vous appuyez sur OK si vous choisissez le Nom comme critere de recherche Chapitre 4 Les reglages du...

Page 139: ...olume Controle du volume choisissez une valeur entre 0 10 D Auto Change of Time Mode Editer le programme de travail E Bell Setting Les reglages de la sonnerie F Bell Count Le reglage du nombre de sons...

Page 140: ...B Les reglages du son Setting Basic Sound Selectez Yes ou No 140...

Page 141: ...ume Setting Basic Volume Choisissez une valeur entre 0 10 Appuyez sur OK D Le programme de travail Auto Change of Time Mode Setting Basic Auto Change of Time Mode Clickez sur une rangee pour editer Ap...

Page 142: ...e programme de travail la valeur implicite est 9999 qui se rapporte a l infini E Les reglages de la sonnerie Setting Basic Bell setting Clickez sur une rangee pour editer Appuyez sur OK Vous pouvez ch...

Page 143: ...G Part Les departements Setting Basic Part Clickez sur une rangee pour editer introduisez le nom du departement Appuyez sur OK 143...

Page 144: ...des utilisateurs E Calibrate Sensor Recalibrez le capteur F Upgrade Firmware Connectez un stick USB avec le fichier firmware pour upgrade G Factory Reset Retournez a l etat initial H Clear All Time L...

Page 145: ...necessite le visage l empreinte la carte ou le mot de passe pour passer la verification Les modes de verification avec signifie que les utilisateurs doivent passer toutes les methodes de verification...

Page 146: ...strer une carte RF et une empreinte et l authentification est necessaire en utilisant ces modalites consecutivement Carte visage Les utilisateurs doivent enregistrer une carte RF et un visage et l aut...

Page 147: ...e Protocol L heure du dispositif sera synchronisee avec le serveur specifie automatiquement AutoSync Interval a l intervalle horaire specifie La fonction Time Synchronization va synchroniser l heure a...

Page 148: ...D Le nombre permis de Managers Setting Advanced Allowed of Managers Choisissez le nombre maximal permis des Managers enregistres Appuyez sur OK 148...

Page 149: ...recommande de sauvegarder toutes les donnees CHapitre 11 USB Disk avant de retourner aux parametres de l usine Setting Advanced Factory Reset G Effacer l historique Setting Advanced Clear All Time Log...

Page 150: ...eglez le moment quand le dispositif ferme l ecran et affiche seulement l heure A Redemarrer Setting Power Restart At Introduisez l heure pour redemarrer Appuyez sur OK B Standby apres Setting Power Sl...

Page 151: ...vous permettent de vous connecter a un point d acces WiFi et de modifier les reglages de connexion C Device ID Si vous utilisez plusieurs dispositifs vous pouvez regler un Device ID pour les suivre D...

Page 152: ...B WiFi seulement pour certains modeles Setting Communication WiFi 152...

Page 153: ...ilisateurs avances Link Information Affiche l etat de la connexion Wi Fi Auto Select Permet la selection automatique du hotspot Wi Fi appuyez sur Auto Select Setting pour ajouter un point d acces a la...

Page 154: ...la communication Le mot de passe pour optimiser la securite des donnees vous pouvez regler l authentification en fonction du mot de passe Vous pouvez telecharger les enregistrements seulement si l au...

Page 155: ...F WebSocket Server URL Setting Communication WebSocket Server URL 155...

Page 156: ...ssent un certain numero C Reverification Time Changez le temps depuis la premiere verification apres lequel celui ci est considere comme une double verification A Avertissement les journaux de managem...

Page 157: ...Door Sensor Type Reglez les capteurs de la porte pour etre toujours ouvert sau ferme E Duress Setting Option pour activer l alarme avec une certaine empreinte predefinie et pour regler le retard jusqu...

Page 158: ...ection est evidenciee en bleu Clickez sur une rangee pour editer Selectez l heure de demarrage l heure de fin et le mode de verification Appuyez sur OK Vous pouvez avoir jusqu a 50 groupes de Timezone...

Page 159: ...C Le temps pendant lequel la porte est ouverte Setting Access Door Open Timeout D Le type du capteur de la porte Setting Access Door Sensor Type 159...

Page 160: ...E Les reglages de l alarme panique Setting Access Duress Settings F Watch Tamper Setting Access Watch Tamper 160...

Page 161: ...G Le type de sortie Wiegand Setting Access Wiegand Output Type Choisissez le type de sortie Wiegand H Forward Card ID vers Wiegand Setting Access Transmettre la carte ID vers Wiegand 161...

Page 162: ...du Son du Capteur l empreinte digitale de l Ecran tactile deRTC lamontreentempsreel duCameraphoto duCameraIR infrarouge et laDeviationducamera Touslesresultatsdestests al exceptionduson dutouchscreen...

Page 163: ...meLog Telechargez les journaux qui n ont pas ete telecharges anterieurement B Download Specified TimeLog Specifiez la date des journaux de temps que vous voulez telecharger C Download New Management L...

Page 164: ...ou pour la configuration rapide apres le nouvel reglage G Upload User Database Telechargez la banque de donnees des utilisateurs H Upload User Database XM Telechargez la banque de donnees avec les uti...

Page 165: ...de firmware C Advanced Pour visualiser les journaux vous avez la possibilite d introduire manuellement le ID de l utilisateur ou de scanner le visage fata de l utilisateur pour obtenir automatiquement...

Page 166: ...ent le journal de temps le journal de management et la liste des utilisateurs Si vous selectez Specify Date assurez vous que vous avez correctement introduit la date de debut et de fin conformement a...

Page 167: ...te 2 Le dispositif ne peut pas communiquer avec l ordinateur Le dispositif est arrete ou il n est pas connecte correctement a l ordinateur Verifiez si le porte serial de l ordinateur et de RS485 fonct...

Page 168: ...sur la disquette USB est insuffisante 7 Le dispositif demande de lire l empreinte de nouveau meme si personne n essaye se pointer La surface du scanner est sale ou il y a des traces de l empreinte de...

Page 169: ...169...

Page 170: ...re vonatkoz sz ks gleteinek kiel g t se rdek ben gy rtottuk A term k szabatoss got s nagy azonos t si s jelenl t nyilv ntart si sebess get ny jt elviseli a TCP IP protokollt s lehet v teszi az adatok...

Page 171: ...hez A k sz l kkel nem szolg ltatunk semmilyen regisztr lt kezel t k rj k regisztr ljon egy kezel vagy egy menedzser szerepet bet lt felhaszn l t 3 fejezet Egy felhaszn l bejegyz se s t rl se A szabot...

Page 172: ...nljuk hogy t ltse ki helyesen a nyomtatv nyt A regisztr l s befejez s hez nyomja meg az OK gombot A regisztr l s befejez s hez folytassa az al bbi r szek k vet s vel 1 Az arcprofil regisztr l sa User...

Page 173: ...elhaszn l nem regisztr lhat jb l 2 Az ujjlenyomat regisztr l sa Az ujj helyes elhelyez se Helyezze az ujj t az ujjlenyomat rz kel k zep re s k nnyed n nyomja meg Al bb a digit lis ujjlenyomat helyes r...

Page 174: ...be a sz mot az FP No mez be Nyomja meg az OK gombot Szkennelje be 3 szor az ujj t T bb ujj beszkennel s hez nyomja meg a Continue gombot a befejez shez pedig az Exit gombot 3 Egy k zels gi k rtya regi...

Page 175: ...indk t mez be ugyanazt a 3 6 karakterb l ll jelsz t Nyomja meg az OK gombot 5 A fot regisztr l sa User Enroll T ltse ki a mez ket V lassza a photo opci t Amikor k szen van nyomja meg a Take Photo gomb...

Page 176: ...a ki az ellen rz si m dot Nyomja meg az OK gombot A System default a kedvelt szem lyre szabhat ellen rz si m d a B v tett be ll t sok c m 5 fejezetben 7 Timezone Munkaprogram User Enroll T ltse ki a m...

Page 177: ...ingerprint Alarm gombot A Register men lehet v teszi hogy egy j ujjlenyomatot jegyezzen be mik zben v szhelyzeti ujjlenyomatk nt ll tja be v szjelz p nik ujjlenyomat V lasszon ki egy sz mot vagy vezes...

Page 178: ...ett ujjlenyomatot a k sz l k pedig automatikusan azonos tja az ujjlenyomat sz m t Meger s t shez nyomja meg az OK majd a Yes gombot A Remove s Remove all gombok csak a v szjelz ujjlenyomatot t rlik a...

Page 179: ...User ID Nyomja meg az OK gombot v lassza ki a t r lni k v nt regisztr l st vagy nyomja meg a Delete All gombot Nyomja meg a Yes gombot C j felhaszn l szerkeszt se User Edit Kattintsonak v ntsorravagyh...

Page 180: ...seg ts get ny jt a megfelel regisztr l s megtal l s ban az User ID N v Arcprofil ut n Gy z dj n meg arr l hogy az Ok gombot nyomja meg keres si krit riumk nt a N v kiv laszt sakor 4 fejezet A k sz l...

Page 181: ...r ss g ellen rz s v lasszon egy 0 10 k zti rt ket D Auto Change of Time Mode Munkaprogram szerkeszt s E Bell Setting A hangjelz vel kapcsolatos be ll t sok F Bell Count A hangjelz hangjelz sei sz m na...

Page 182: ...B Hangbe ll t sok Setting Basic Sound V lassza a Yes vagy a No gombot 182...

Page 183: ...se Setting Basic Volume V lasszon egy 0 10 k zti rt ket Nyomja meg az OK gombot D Munkaprogram Auto Change of Time Mode Setting Basic Auto Change of Time Mode A szerkeszt shez kattintson egy sorra Nyo...

Page 184: ...az illet munkaprogramban az alap rtelmezett rt k 9999 mely a v gtelenre vonatkozik E Cseng be ll t sok Setting Basic Bell setting A szerkeszt shez kattintson egy sorra Nyomja meg az OK gombot Megv lt...

Page 185: ...G Part Departamente Setting Basic Part A szerkeszt shez kattintson egy sorra adja meg a r szleg sz m t Nyomja meg az OK gombot 185...

Page 186: ...zser sz mot E Calibrate Sensor Hiteles tse jra az rz kel t F Upgrade Firmware A friss t shez upgrade csatlakoztasson egy firmware USB sticket G Factory Reset A k sz l ket ll tsa vissza az eredeti llap...

Page 187: ...ges b rmely arcprofil ujjlenyomat k rtya vagy jelsz az ellen rz sen val tjut shoz A ellen rz si m dok azt jelentik hogy a felhaszn l knak egym sut n minden ellen rz si m don t kell jutniuk a felt ntet...

Page 188: ...aszn l knak egy RF k rty t s egy ujjlenyomatot kell r gz teni k s sz ks ges a bejelentkez s ezen m dszerek folytat lagos haszn lat val Card face A felhaszn l knak egy RF k rty t s egy chipet kell r gz...

Page 189: ...e ll t s t A k sz l k r ja automatikusan szinkroniz l dik a meghat rozott Auto Sync Interval szerverrel a meghat rozott program intervallumban A Time Synchronization funkci szinkroniz lja a szerver r...

Page 190: ...D Enged lyezett menedzser sz m Setting Advanced Allowed of Managers V lassza ki a j v hagyott maxim lis regisztr lt menedzser sz mot Nyomja meg az OK 190...

Page 191: ...be ll t sokra A k sz l k jraprogramoz s hoz aj nlott minden adat biztons gi ment se backup 11 fejezet USB Disk Setting Advanced Factory Reset H El zm nyek t rl se Setting Advanced Clear All Time Log I...

Page 192: ...sz l k bez rja a k perny t s csak az r t mutatja A jra bekapcsol s Setting Power Restart At ll tsa be az k sz l k k v nt bekapcsol siid pontj t Nyomjameg az OK gombot B K szenl ti zemm d standby az a...

Page 193: ...t v teszik hogy WiFi hozz f r si ponthoz csatlakozzon s m dos tsa a csatlakoztat si be ll t sokat C Device ID Ha t bb k sz l k haszn lata eset n k vet s k rdek ben be ll that egy egys gazonos t t Devi...

Page 194: ...B WiFi Csak egyes modellekn l Setting Communication WiFi 194...

Page 195: ...ra Link Information Megjelen ti a WiFi csatlakoz s llapot t Auto Select Lehet v teszi a WiFi hotspot automatikus kiv laszt s t egy hozz f r si pontnak az automatikus csatlakoztat si jegyz khez val ho...

Page 196: ...p rtelmezett 5005 E Kommunik ci s jelsz Jelsz az adatok biztons g nak jav t sa rdek ben be ll thatja a jelsz alapj n t rt n azonos t st A regisztr l sok csak sikeres azonos t s eset n t lthet k le Set...

Page 197: ...F WebSocket Server URL Setting Communication WebSocket Server URL 197...

Page 198: ...son be egy eml keztet t ha az id napl k meghaladnak egy bizonyos sz mot C Reverification Time V ltoztassa meg az els ellen rz st l az id pontot mely m solat ellen rz snek sz m t A Menedzser napl el re...

Page 199: ...Sensor Type Az ajt rz kel ket gy ll tsa be hogy lland an nyitva vagy csukva legyenek E Duress Setting V szjelz aktiv l si opci egy bizonyos el re meghat rozott ujjlenyomattal s a v szjelz ig visszatar...

Page 200: ...arr l hogy a v laszt s k k sz nben van felt ntetve A szerkeszt shez kattintson egy sorra ll tsa be a bekapcsol si a kikapcsol si id pontot s az ellen rz si m dot Nyomja meg az OK gombot Legt bb 50 cso...

Page 201: ...C Nyitott kapu id tartam Setting Access Door Open Timeout D Kapu rz kel t pusa Setting Access Door Open Timeout 201...

Page 202: ...E V szjelz p nik be ll t sok Setting Access Duress Settings F Watch Tamper Setting Access Watch Tamper 202...

Page 203: ...G Wiegand kil p s t pus Setting Access Wiegand Output Type V lassza a Wiegand kil p si t pust H Forward Card ID a Wiegand r sz re Setting Access Forward Card ID to Wiegand 203...

Page 204: ...rz kel digit lisujjlenyomat rint k perny RTC val sidej ra Fot kamera IR infrav r s kamerafunkci kat sakamerakileng s t Mindenteszt eredm ny kiv ve a hang a touchscreen s az RTC teszt eredm nyt egy USB...

Page 205: ...USB Disk A Download Latest TimeLog T ltse le az el z leg nem let lt tt napl kat B Download Specified TimeLog Hat rozza meg a let ltend id napl k id pontj t C Download New Management Log T ltse le az...

Page 206: ...i gyors konfigur ci hoz az al bbi funkci kat haszn lhatja G Upload User Database T ltse fel a felhaszn l k adat llom ny t H Download User Database XML T ltse fel a felhaszn l k adat llom ny t XML form...

Page 207: ...t pust s v ltozatot C Advanced A napl k megtekint se rdek ben lehet s ge van a felhaszn l i azonos t k zzel t rt n megad s hoz vagy egy felhaszn l arcprofilj nak beszkennel s re a helyes ID automatik...

Page 208: ...magukban foglalj k az id napl t a menedzsment napl t s a felhaszn l k jegyz k t A Specify Date kiv laszt sa eset n bizonyosodjon meg arr l hogy j vezette be a kezd si s a befejez si id pontot Az al b...

Page 209: ...ik m dszer a felhaszn l k t bb m dszer nek chip PIN K rtya regisztr l sa 2 A k sz l k nem k pes a sz m t g ppel kommunik lni A k sz l k meg llt vagy nincs helyesen csatlakoztatva a sz m t g phez Ellen...

Page 210: ...aradt t rhelye 8GB n l kevesebb 2 Az USB stick fennmarad t rhelye nem elegend 7 A k sz l k nem ig nyli az ujjlenyomat ism telt leolvas s t m g akkor sem ha senki sem pr b lja jelenl t t nyilv ntartani...

Page 211: ...211...

Page 212: ...aziende e imprese per la gestione della presenza dei dipendenti Il prodotto offre elevata precisione e velocit di riconoscimento e registrazione supporta il protocollo TCP IP e consente il caricament...

Page 213: ...del telaio con la vite fornita Il dispositivo non viene preimpostato con alcun amministratore o manager registrato si prega di registrare un utente come amministratore o manager Capitolo 3 Registrazi...

Page 214: ...ord ti consigliamo di completare correttamente il modulo Premi OK per completare la registrazione Per completare la registrazione continua seguendo tutte le sezioni seguenti 1 Registrazione del viso U...

Page 215: ...fallir se l utente gi registrato 2 Registrazione dell impronta Posizionare il dito correttamente Posiziona il dito e premi leggermente al centro del sensore di impronte Di seguito sono riportati schem...

Page 216: ...erto dito o inserisci il numero manualmente nel campo FP No Premi OK Scansiona il dito tre volte Premi Continue per scansionare pi dita o Exit per completare 3 Registrazione di una carta di prossimit...

Page 217: ...ord Aggiungi la stessa password in entrambi i campi combinazione di 3 6 caratteri Premi OK 5 Registrazione della fotografia User Enroll Compila i campi Scegli photo Quando sei pronto premi Take Photo...

Page 218: ...rification Mode Scegli il metodo di verifica Premi OK System default il modo preferito per la verifica personalizzabile nel Capitolo 5 Impostazioni avanzate 7 Timezone User Enroll Compila i campi User...

Page 219: ...ila i campi Scegli Fingerprint Alarm Register consente di registrare una nuova impronta digitale impostandola come un impronta digitale per l emergenza impronta digitale di alarme panico Scegli un num...

Page 220: ...precedentemente registrato e il dispositivo rilever automaticamente il numero del dito Premi OK quindi Yes per confermare Remove e Remove all cancella solo l impronta di allarme e non l impronta per l...

Page 221: ...re User ID Premi OK scegli il record che desideri eliminare o fai clic su Delete All Premi Yes C Modifica di un utente User Edit Fai clic sulla rubrica desiderata o utilizzare la funzione di ricerca S...

Page 222: ...funzione di ricerca ti aiuter a trovare il record giusto usando User ID nome Viso Assicurati di premere il pulsante OK se scegli Name come criterio di ricerca Capitolo 4 Impostazioni del dispositivo...

Page 223: ...olume Controllo del volume scegli un valore tra 0 10 D Auto Change of Time Mode Modifica il programma di lavoro E Bell Setting Impostazioni suoneria F Bell Count Imposta il numero di suoni per la suon...

Page 224: ...B Impostazioni audio Setting Basic Sound Seleziona Yes oppure No 224...

Page 225: ...Controllo volume Setting Basic Volume Scegli un valore tra 0 10 Premi OK D Orario di lavoro Auto Change of Time Mode Setting Basic Auto Change of Time Mode Clicca su una riga per modificare Premi OK 2...

Page 226: ...o accetter in quel programma di lavoro Il valore predefinito 9999 che si riferisce all infinito E Impostazioni suoneria Setting Basic Bell setting Clicca su una riga per modificare Premi OK possibile...

Page 227: ...G Part Dipartimenti Setting Basic Part Clicca su una riga per modificare Inserisci il nome del tuo dipartimento Premi OK 227...

Page 228: ...numero massimo di manager consentiti E Calibrate Sensor Ricalibrare il sensore F Upgrade Firmware Collegare una chiavetta USB con firmware per l aggiornamento G Factory Reset Ripristina il dispositivo...

Page 229: ...FACE FP CD PWD richiede qualunque tra viso impronta carta o password per passare la verifica Le modalit di verifica con significa che gli utenti devono passare tutti i metodi di verifica nell ordine...

Page 230: ...i utenti devono registrare una scheda RF e un impronta digitale e l autenticazione richiesta utilizzando queste modalit consecutive Card face Gli utenti devono registrare una scheda RF e un viso e l a...

Page 231: ...NetworkTime Protocol La durata del dispositivo si sincronizzer con il server specificato automaticamentenell intervalloditempospecificato AutoSyncInterval La funzione Time Synchronization sincronizzer...

Page 232: ...D Il numero consentito di manager Setting Advanced Allowed of Managers Scegli il numero massimo consentito di manager registrati Premi OK 232...

Page 233: ...tazioni di fabbrica Si consiglia di eseguire il backup di tutti i dati Capitolo 11 USB Disk prima di resettare il dispositivo Setting Advanced Factory Reset H Elimina cronologia Setting Advanced Clear...

Page 234: ...mposta quando il dispositivo chiude lo schermo e visualizza solo l ora A Riavvia a Setting Power Restart At Inserire l ora in cui si desidera riavviare il dispositivo Apasati OK B Standby dopo Setting...

Page 235: ...no di connettersi a un punto di accesso WiFi e modificare le impostazioni di connessione C Device ID Se si utilizza pi di un dispositivo puoi impostare un ID dispositivo per rintracciarli D TCP Port I...

Page 236: ...B WiFi solo per certi modelli Setting Communication WiFi 236...

Page 237: ...utenti esperti Link Information Visualizza lo stato della connessione Wi Fi Auto Select Consente la selezione automatica dell hotspot Wi Fi Premi Auto Select Setting per aggiungere un punto di accesso...

Page 238: ...5 E Password per la comunicazione Password per migliorare la sicurezza dei dati possibile impostare l autenticazione basata su password possibile scaricare i registri solo se l autenticazione ha esito...

Page 239: ...F WebSocket Server URL Setting Communication WebSocket Server URL 239...

Page 240: ...moria quando i registri del tempo superano un certo numero C Reverification Time Cambiare l ora dal primo controllo dopo il quale viene considerato come un controllo duplicato A Avvisi sui registri di...

Page 241: ...ostare i sensori delle porte in modo che siano sempre aperti o chiusi E Duress Setting Opzione per attivare l allarme con un impronta digitale predefinita e per impostare il ritardo sull allarme F Wat...

Page 242: ...ssicurarsi che la selezione sia evidenziata in blu Clicca su una riga per modificare Seleziona ora di inizio ora di fine e modalit di pagamento Premi OK Puoi avere fino a 50 gruppi di fuso orario Ogni...

Page 243: ...C Tempo porta aperta Setting Access Door Open Timeout D Tipo sensore porta Setting Access Door Sensor Type 243...

Page 244: ...E Impostazioni di allarme panico Setting Access Duress Settings F Watch Tamper Setting Access Watch Tamper 244...

Page 245: ...G Tipo uscita Wiegand Setting Access Wiegand Output Type Scegli il tipo di uscita Wiegand H Forward Card ID a Wiegand Setting Access Forward Card ID to Wiegand 245...

Page 246: ...Sensore impronta digitale Touchscreen RTC orologio in temporeale Telecamera IR infrarossi eDeviazionedellatelecamera Tuttiirisultatidei test ad eccezione di suono touchscreen e RTC possono essere salv...

Page 247: ...Disk A Download Latest TimeLog Scarica i registri che non sono stati scaricati prima B Download Specified TimeLog Specificare la data dei registri orari che si desidera scaricare C Download New Manage...

Page 248: ...in cui si utilizzano pi dispositivi o per impostare rapidamente dopo il ripristino G Upload User Database Carica il database utente H Upload User Database XM Carica il database utente in formato XML...

Page 249: ...il tipo e la versione del firmware C Advanced Pentru a vedea jurnalele aveti posibilitatea sa introduceti manual ID ul de utilizator sau sa scanati fata unui utilizator pentru a trage automat ID ul co...

Page 250: ...oni avanzate includono il registro temporale il registro di gestione e l elenco utenti Se si seleziona Specify Date assicurati di aver inserito correttamente le date di inizio e fine Come mostrato di...

Page 251: ...2 Il dispositivo non pu comunicare con il computer Il dispositivo spento o non correttamente collegato al computer Verificare che la porta seriale del computer e RS485 funzionino correttamente Se TCP...

Page 252: ...dispositivo richiede ripetutamente di rileggere l impronta digitale anche se nessuno tenta di eseguire il ponte La superficie dello scanner sporca o l impronta digitale lasciata dall utente precedent...

Page 253: ...253...

Page 254: ...nia potrzeb w a cicieli i firm w celu zarz dzania obecno ci pracownik w Produkt oferuje wysok dok adno i szybko rozpoznawania i wykrywanie obs uguje protok TCP IP i umo liwia przesy anie danych oraz p...

Page 255: ...dzenie domy lnie nie ma zarejestrowanego administratora zarejestruj si jako administrator lub mened er Rozdzia 3 Rejestracja i usuwanie u ytkownika Aby zapewni ochron anty sabota zalecamy zarejestrowa...

Page 256: ...ecamy prawid owe wype nienie formularza Naci nij przycisk OK aby uko czy rejestracj Aby zako czy rejestracj kontynuuj wykonuj c wszystkie poni sze sekcje 1 Rejestracja twarzy User Enroll Wype nij pola...

Page 257: ...li u ytkownik jest ju zarejestrowany 2 Rejestracja odcisku palca Prawid owe u o enie palca Ustaw palec i lekko naci nij na rodku czujnika odcisk w palc w Poni ej przedstawiono schematy poprawnego spos...

Page 258: ...lonemu palcu lub wprowad numer r cznie w polu FP No Kliknij OK Zeskanuj odcisk palca 3 razy Kliknij Continue aby skanowa wi cej palc w lub Exit aby zako czy Rejestracja karty zbli eniowej User Enroll...

Page 259: ...Password Dodaj to samo has o w obu polach kombinacj od 3 do 6 znak w Kliknij OK 4 Rejestracja zdj cia User Enroll Wype nij pola Wybierz photo Kiedy b dziesz gotowy naci nij Take Photo Kliknij Register...

Page 260: ...tion Mode Wybierz metod weryfikacji Kliknij OK Domy lny system to preferowany niestandardowy tryb sprawdzania w Rozdziale 5 Ustawienia zaawansowane 6 Timezone Program pracy User Enroll Wype nij pola U...

Page 261: ...ij pola Wybierz Fingerprint Alarm Register umo liwia zapisanie nowego odcisku palca podczas ustawiania go jako odcisku palca w nag ych wypadkach alarmowy odcisk palca panika Wybierz liczb lub r cznie...

Page 262: ...aci nij uprzednio wprowadzony palec a urz dzenie automatycznie wykryje numer palca Kliknij OK nast pnie Yes aby potwierdzi Remove i Remove all Usu tylko odcisk alarmowy a nie odcisk dla czytnika W raz...

Page 263: ...er Delete wprowad User ID Kliknij OK wybierz rekord kt ry chcesz usun lub kliknij Delete All Kliknij Yes C Edycja u ytkownika User Edit Kliknij dany wiersz lub u yj funkcji wyszukiwania Wybierz rekord...

Page 264: ...Funkcja wyszukiwania pomo e ci znale w a ciw rejestracj po User ID Nazwa Twarz Upewnij si e naci niesz przycisk OK je li wybierzesz Nazwa jako kryterium wyszukiwania Rozdzia 4 Ustawienia urz dzenia 26...

Page 265: ...mieniag osoweid wi kdotyku C Volume Regulacja g o no ci wybierz warto mi dzy 0 10 D Auto Change of Time Mode Edytuj program pracy E Bell Setting Ustawienia dotycz ce d wi ku F Bell Count Ustaw numer d...

Page 266: ...B Ustawienia dzwonka Setting Basic Sound Wybierz Yes lub No 266...

Page 267: ...ontrola g o no ci Setting Basic Volume Wybierz warto od 0 10 Kliknij OK D Program pracy Auto Change of Time Mode Setting Basic Auto Change of Time Mode Kliknij wiersz kt ry chcesz edytowa Kliknij OK 2...

Page 268: ...enie zaakceptuje w tym programie roboczym domy lna warto to 9999 kt ra odnosi si do niesko czono ci E Ustawienia dzwonka Setting Basic Bell setting Kliknij wiersz kt ry chcesz edytowa Kliknij OK Mo es...

Page 269: ...G Part Departamenty Setting Basic Part Kliknij wiersz kt ry chcesz edytowa Wprowad nazw swojego dzia u Kliknij OK 269...

Page 270: ...maln liczb dozwolon przez mened era E Calibrate Sensor Ponownie skalibruj czujnik F Upgrade Firmware Pod cz pami USB do oprogramowania uk adowego aby dokona aktualizacji G Factory Reset Resetuje urz d...

Page 271: ...wymaga twarzy odcisku palca karty lub has a do przej cia weryfikacji Tryby weryfikacji za pomoc oznaczaj e u ytkownicy musz przekazywa wszystkie metody weryfikacji sekwencyjnie w przedstawionej kolej...

Page 272: ...art RF i odcisk palca a uwierzytelnianie jest wymagane przy u yciu tych kolejnych tryb w Card face Utilizatorii trebuie sa inregistreze un card RF si un chip si este necesara autentificarea folosing a...

Page 273: ...k Time Protocol Czas urz dzenia zostanie zsynchronizowany z okre lonym serwerem automatycznej synchronizacji w okre lonym przedzialeczasu Funkcja TimeSynchronization synchronizujeczasserwerapoaktywacj...

Page 274: ...C Liczba dozwolona przez Mened er w Setting Advanced Allowed of Managers Wybierz maksymaln liczb zarejestrowania dozwolon przez mened er w Kliknij OK 274...

Page 275: ...abrycznych Zaleca si wykonanie kopii zapasowej wszystkich danych Rozdzia 11 Dysk USB przed zresetowaniem urz dzenia Setting Advanced Factory Reset G Usuni cie historii Setting Advanced Clear All Time...

Page 276: ...dzenia B Sleep After Ustaw gdy urz dzenie wygasi ekran i wy wietli tylko godzin Restart Setting Power Restart At Wprowad czas kiedy chcesz zrestartowa urz dzenie Kliknij OK A Standby po Setting Power...

Page 277: ...te ustawienia umo liwiaj po czenie z punktem dost pu WiFi i zmian ustawie po czenia C Device ID Je li korzystasz z wielu urz dze mo esz skonfigurowa identyfikator urz dzenia aby m c je ledzi D TCP Por...

Page 278: ...B WiFi Tylko dla wybranych modeli Setting Communication WiFi 278...

Page 279: ...awansowanych u ytkownik w Link Information Wy wietla stan po czenia Wi Fi Auto Select Umo liwia automatyczny wyb r hotspotu Wi Fi naci nij Auto Select Setting aby doda punkt dost pu do listy automatyc...

Page 280: ...e to 5005 E Has o komunikacji Has o w celu poprawy bezpiecze stwa danych mo na ustawi uwierzytelnianie oparte na ha le Rejestracje mo na pobiera tylko wtedy gdy uwierzytelnianie zako czy si powodzenie...

Page 281: ...F WebSocket Server URL Setting Communication WebSocket Server URL 281...

Page 282: ...staw przypomnienie gdy dzienniki przekrocz okre lon liczb C Reverification Time Zmie czas od pierwszego sprawdzenia po kt rym jest uwa any za duplikat A Dzienniki ostrze e zarz dzania Setting Log Mana...

Page 283: ...te D Door Sensor Type Ustaw czujniki drzwi tak aby zawsze by y otwarte lub zamkni te E Duress Setting Mo liwo aktywacji alarmu za pomoc predefiniowanego odcisku palca i ustawienia op nienia alarmu F W...

Page 284: ...i upewnij si e wyb r jest zaznaczony na niebiesko Kliknij wiersz kt ry chcesz edytowa Wybierz czas rozpocz cia godzin zako czenia i tryb weryfikacji Kliknij OK Mo esz mie do 50 grup Timezone Ka da gru...

Page 285: ...C Czas otwarcia drzwi Setting Access Door Open Timeout D Typ czujnika drzwi Setting Access Door Sensor Type 285...

Page 286: ...E Ustawienia alarmu paniki Setting Access Duress Settings F Watch Tamper Setting Access Watch Tamper 286...

Page 287: ...G Typ wyj cia Wiegand Setting Access Wiegand Output Type Wybierz typ wyj cia Wiegand H Forward Card ID do Wiegand Setting Access Forward Card ID to Wiegand 287...

Page 288: ...ik odcisk palca ekran dotykowy zegar RTC zegar czasu rzeczywistego kamer kamer IR podczerwie i odchylenie kamery Wszystkie wyniki testu z wyj tkiem d wi ku ekranu dotykowego i zegara czasu rzeczywiste...

Page 289: ...e chcesz pobra C Download New Management Log Pobierz najnowsze dzienniki danych D Download All Management Log Pobierz wszystkie dzienniki danych E Download User Database Pobierz baz danych z u ytkowni...

Page 290: ...base XM Prze lij baz danych u ytkownik w w formacie XML Rozdzia 12 Informacje systemowe Sys Info A Enroll Info Wy wietla liczb zarejestrowanych u ytkownik w twarzy odcisk w palc w kart hase dziennik w...

Page 291: ...ktu typ i wersj oprogramowania uk adowego C Advanced Aby wy wietli dzienniki mo na r cznie wprowadzi ID u ytkownika lub zeskanowa twarz u ytkownika aby automatycznie pobra w a ciwy ID u ytkownika W ra...

Page 292: ...rmacje zaawansowane obejmuj dziennik czasu dziennik zarz dzania i list u ytkownik w Je li wybierzesz Specify Date upewnij si e poprawnie wprowadzi e daty rozpocz cia i zako czenia Jak pokazano poni ej...

Page 293: ...rta 2 Urz dzenie nie mo e komunikowa si z komputerem Urz dzenie jest wy czone lub nie jest prawid owo pod czone do komputera Sprawd czy port szeregowy komputera i RS485 dzia aj poprawnie Je li protok...

Page 294: ...est niewystarczaj ca 7 Urz dzenie wielokrotnie prosi o ponowne odczytanie odcisku palca nawet je li nikt nie pr buje tego zrobi Powierzchnia skanera jest brudna lub jest odcisk palca pozostawiony prze...

Page 295: ...295...

Page 296: ...ampinarea nevoilor societatilor si intreprinderilor privind managementul prezentei angajatilor Produsul ofera acuratete si viteza mare de recunoastere si pontare suporta protocolul TCP IP si permite u...

Page 297: ...de cadru cu surubul furnizat Dispozitivul nu vine implicit cu nici un administrator inregistrat va rugam sa inregistrati un utilizator cu rol de administrator sau manager Capitolul 3 Inregistrarea si...

Page 298: ...istrarile va recomandam sa completati corect formularul Apasati OK pentru a finaliza inregistrarea Pentru a finaliza inregistrarea continuati urmand toate sectiunile de mai jos 1 Inregistrarea chipulu...

Page 299: ...orul este deja inregistrat 2 Inregistrarea amprentei Pozitionarea corecta a degetului Pozitionati degetul si apasati usor in centrul senzorului de amprenta Mai jos sunt scheme ale modului corect de in...

Page 300: ...introduceti numarul manual in campul FP No Apasati OK Scanati degetul de 3 ori Apasati Continue pentru a scana mai multe degete sau Exit pentru a finaliza 3 Inregistrarea unui card de proximitate Use...

Page 301: ...word Adaugati in ambele campuri aceeasi parola combinatie de 3 6 caractere Apasati OK 5 Inregistrarea fotografiei User Enroll Completati campurile Alegeti photo Cand sunteti pregatit apasati Take Phot...

Page 302: ...Mode Alegeti metoda de verificare Apasati OK System default este modul preferat de verificare personalizabil in Capitolul 5 Setari avansate 7 Timezone Programul de lucru User Enroll Completati campuri...

Page 303: ...pletati campurile Alegeti Fingerprint Alarm Register va permite sa inrolati o noua amprenta in timp ce o setati ca amprenta pentru situatii de urgenta amprenta de alarma de panica Alegeti un numar sau...

Page 304: ...deget inscris anterior si dispozitivul va detecta automat numarul degetului Apasati OK apoi Yes pentru a confirma Remove si Remove all sterge doar amprenta de alarma nu si amprenta pentru pontare In c...

Page 305: ...User ID Apasati OK alegeti inregistrarea pe care doriti sa o stergeti sau apasati Delete All Apasati Yes C Editarea unui utilizator User Edit Click pe randul dorit sau folositi functia de cautare Ale...

Page 306: ...Functia de cautare va ajuta sa gasiti inregistrarea potrivita dupa User ID Nume Fata Asigurati va ca apasati butonul OK daca alegeti Nume ca si criteriu de cautare Capitolul 4 Setari dispozitiv 306...

Page 307: ...atingere C Volume Control volum alegeti o valoare intre 0 10 D Auto Change of Time Mode Editeaza programul de lucru E Bell Setting Setari legate de sonerie F Bell Count Seteaza numarul de sunete pentr...

Page 308: ...B Setari de sunet Setting Basic Sound Selectati Yes sau No 308...

Page 309: ...ontrol volum Setting Basic Volume Alegeti o valoare intre 0 10 Apasati OK D Program de lucru Auto Change of Time Mode Setting Basic Auto Change of Time Mode Click pe un rand pentru a edita Apasati OK...

Page 310: ...pozitivul in respectivul program de lucru valoarea implicita este 9999 care se refera la infinit E Setari sonerie Setting Basic Bell setting Click pe un rand pentru a edita Apasati OK Puteti schimba o...

Page 311: ...G Part Departamente Setting Basic Part Click pe un rand pentru a edita introduceti numele departamentului Apasati OK 311...

Page 312: ...axim permis de manageri E Calibrate Sensor Recalibrati senzorul F Upgrade Firmware Conectati un stick USB cu fisier firmware pentru upgrade G Factory Reset Reseteaza dispozitivul la starea initiala H...

Page 313: ...necesita oricare dintre fata amprenta card sau parola pentru a trece verificarea Modurile de verificare cu inseamna ca utilizatorii trebuie sa treaca consecutiv toate metodele de verificare in ordinea...

Page 314: ...orii trebuie sa inregistreze un card RF si o amprenta si este necesara autentificarea folosing aceste modalitati consecutiv Card face Utilizatorii trebuie sa inregistreze un card RF si un chip si este...

Page 315: ...Network Time Protocol Ora dispozitivului se va sincroniza cu serverul specificat automat AutoSync Interval la intervalul orar specificat Functia Time Synchronization va sincroniza ora la server dupa...

Page 316: ...D Numarul permis de Manageri Setting Advanced Allowed of Managers Alegeti numarul maxim permis de Manageri inregistrati Apasati OK 316...

Page 317: ...le din fabrica Este recomandat sa faceti backup la toate datele Capitolul 11 USB Disk inainte de a reseta dispozitivul Setting Advanced Factory Reset H Stergere istoric Setting Advanced Clear All Time...

Page 318: ...ti momentul in care dispozitivul inchide ecranul si afiseaza numai ora A Reporneste la Setting Power Restart At Introduceti ora cand doriti sa reporneasca dispozitivul Apasati OK B Standby dupa Settin...

Page 319: ...tari va permit sa va conectati la un punct de acces WiFi si sa modificati setarile de conexiune C Device ID Daca folositi mai multe dispozitive puteti seta un Device ID pentru a le putea urmari D TCP...

Page 320: ...B WiFi Doar pentru anumite modele Setting Communication WiFi 320...

Page 321: ...ru utilizatorii avansati Link Information Afiseaza starea conexiunii Wi Fi Auto Select Permite selectarea automata a hotspot ului Wi Fi apasati Auto Select Setting pentru a adauga un punct de acces la...

Page 322: ...icit este 5005 E Parola de comunicare Parola pentru a imbunatati securitatea datelor puteti seta autentificarea pe baza de parola Puteti descarca inregistrarile numai daca autentificarea are succes Se...

Page 323: ...F WebSocket Server URL Setting Communication WebSocket Server URL 323...

Page 324: ...emento cand jurnalele de timp depasesc un anumit numar C Reverification Time Schimbati timpul de la prima verificare dupa care se considera ca o verificare duplicat A Avertizare jurnale de management...

Page 325: ...i senzorii de usa sa fie intotdeauna deschis sau inchis E Duress Setting Optiune pentru activarea alarmei cu o anumita amprenta prestabilita si pentru setarea intarzierii pana la alarma F Watch Tamper...

Page 326: ...i va ca selectia este evidentiata in albastru Click pe un rand pentru a edita Selectati ora de pornire ora de sfarsit and si modul de verificare Apasati OK Puteti avea pana la 50 de grupuri de Timezon...

Page 327: ...C Timp usa deschisa Setting Access Door Open Timeout D Tip sensor usa Setting Access Door Sensor Type 327...

Page 328: ...E Setari alarma panica Setting Access Duress Settings F Watch Tamper Setting Access Watch Tamper 328...

Page 329: ...G Tip iesire Wiegand Setting Access Wiegand Output Type Alegeti tipul de iesire Wiegand H Forward Card ID catre Wiegand Setting Access Forward Card ID to Wiegand 329...

Page 330: ...iile de Sunet Senzor amprenta digitala Ecran tactil RTC ceas in timp real Camerafoto CameraIR infrarosu siDeviatiacamerei Toaterezultateletestelor cu exceptiasunetului touchscreenuluisiRTC potfisalvat...

Page 331: ...Latest TimeLog Descarcati jurnale care nu au fost descarcate inainte B Download Specified TimeLog Specificati data jurnalelor de timp pe care doriti sa le descarcati C Download New Management Log Des...

Page 332: ...utilizati mai multe dispozitive sau pentru configurare rapida dupa resetare G Upload User Database Incarcati baza de date cu utilizatori H Upload User Database XM Incarcati baza de date cu utilizator...

Page 333: ...siunea de firmware C Advanced Pentru a vedea jurnalele aveti posibilitatea sa introduceti manual ID ul de utilizator sau sa scanati fata unui utilizator pentru a trage automat ID ul corect al acestuia...

Page 334: ...ile avansate includ jurnalul de timp jurnalul de management si lista de utilizatori Daca selectati Specify Date asigurati va ca ati introdus corect data de inceput si de sfarsit Cum este prezentat mai...

Page 335: ...ard 2 Dispozitivul nu poate comunica cu computerul Dispozitivul este oprit sau nu este conectat corect la computer Verificati daca portul serial al computerului si RS485 functioneaza corect Daca TCP I...

Page 336: ...nta 7 Dispozitivul solicita in mod repetat recitirea amprentei chiar daca nimeni nu incearca sa se ponteze Suprafata scanerului este murdara sau a ramas o urma de amprenta de la utilizatorul anterior...

Page 337: ...Capitolul 14 Diagrama de conexiuni Capitolul 15 Diagrama conexiuni control acces 1 Diagrama A Yala Fain Safe Yala Fain Secure PNI YR300 337...

Page 338: ...2 Diagrama B 338...

Page 339: ...Utiliza i o surs de alimentare specializat 339...

Page 340: ...de www pni ro RO Software ul Time Attendance System poate fi descarcat de pe pagina produsului din site ul www pni ro FR Le logiciel Time Attendance System peut tre t l charg partir de la page produi...

Page 341: ...mit UE est disponible l adresse Internet suivante https www mypni eu products 6464 download certifications HU Egyszer s tett EU Megfelel si K zlem ny SC ONLINESHOP SRL kijelenti azt hogy a Ujjlenyomat...

Page 342: ...342...

Reviews: