8
Air supply hoses shall have a minimum working pressure ra
ti
ng equal
to or greater than the pressure from the power source if a regulator
fails, or 150 PSI
G
, whichever is greater.
Disconnect
Tools shall be
fi
tt
ed with a
fi
tti
ng or hose coupling on or near the tool
in such a manner that all compressed air in the tool is discharged at
the
ti
me the
fi
tti
ng or hose coupling is disconnected.
13
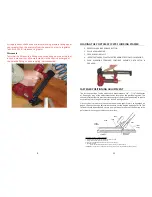
LOADING THE PORTAMATIC 475 FLOORING STAPLER
1.
D
EPRESS MA
G
AZINE RELEASE BUTTON.
2. PULL BACK MA
G
AZINE.
3. OPEN
MA
G
AZINE FULLY.
4. INSERT FASTENERS, POINTS MUST BE A
G
AINST BOTTOM OF MA
G
AZINE.
5. PUSH MA
G
AZINE FORWAR
D
. CONTINUE PUSHIN
G
UNTIL LATCH IS
EN
G
A
G
E
D
.
FASTENER POSITIONING ADJUSTMENT
The fastener posi
ti
on can be adjusted to accommodate 1/4” - 7/16” thicknesses
of
fl
ooring by way of the adjustment knobs located on the posi
ti
oning shoe. The
shoe adjustment feature provides close control of the fastener posi
ti
oning to reduce
occurrence of split tongues or dimples in the
fl
ooring surface.
First set the air pressure for consistent drive in the speci
fi
c work as described on
page 4, then use the shoe adjustment knobs to set the desired posi
ti
on of drive. The
fastener should be posi
ti
oned so that it enters the ver
ti
cal face of the
fl
ooring at the
point where the tongue meets the ver
ti
cal face.
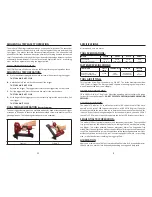
TO ADJUST THE TOOL TO THE FLOORING:
1. Loosen both
Knobs
un
ti
l the
Foot
and
Front Guide
move freely.
2. Engage the
Nose
with the
Tongue of Flooring
.
3. Push the
Front Guide
to the sub
fl
oor and the
Foot
to the
fl
ooring.
4. Tighten both
Knobs
.
Note:
periodically check the Knobs to ensure that they are
ti
ght during use.
**Important:
Test the tool on a scrap piece of
fl
ooring to ensure proper staple placement and compa
ti
bility.
FOOT
FLOOR
VAPOR
BARRIER
KNOB
NOSE
FRONT
G
UI
D
E
SUBFLOOR
TON
G
UE OF
FLOORIN
G


