background image

Safety information

The materials with the symbol are recyclable. Disposethe 

packaging in a suitable collection containers to recycle it .

1 . Disconnect the mains plug from the mains socket .

2 . Cut off the mains cable and discard it.

WARNING! During using , service and disposal 

the appliance , please pay attention to symbols 

left side , which is located on rear of appliance 

(rear panel or compressor). It's risk of fire 

warning symbol. There are flammable materials 

in refrigerant pipesand compressor .

Please be far away fire source during using . 

service and disposal.

This refrigerating appliance is not intended to be used as 

abuilt-in appliance.

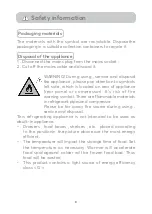
• Drawers , food boxes , shelves , etc . placed according

to the positionin the picture above are the most energy

efficient.

• The temperature will impact the storage time of food. Set

the temperature as necessary. Warmer will accelerate

food spoilageand colder will be frozen food bad. Thus

food will be wasted

• This product contains a light source of energy efficiency

class < G >

Packaging materials

Disposal of the appliance

9

Summary of Contents for 4025442269187

Page 1: ...B E D I E N U N G S A N L E I T U N G D E Side by Side K G KOMBI 5 9 5 7 8 0 9 0 0 5 9 5 7 8 0 9 0 1 5 9 5 7 8 0 9 0 2...

Page 2: ...1 15 16 21 24 Sicherheitshinweise bersicht Montage Bedienung Aufbewahrung von Nahrungsmitteln T glicher Gebrauch 28...

Page 3: ...Sicherheitshinweise 1...

Page 4: ...Sicherheitshinweise 2...

Page 5: ...Sicherheitshinweise 3...

Page 6: ...Sicherheitshinweise 4...

Page 7: ...Sicherheitshinweise 5...

Page 8: ...Sicherheitshinweise 6...

Page 9: ...Sicherheitshinweise 7...

Page 10: ...Sicherheitshinweise 8...

Page 11: ...Sicherheitshinweise 9...

Page 12: ...Sicherheitshinweise 10...

Page 13: ...Sicherheitshinweise 11...

Page 14: ...Sicherheitshinweise 12...

Page 15: ...Sicherheitshinweise 13...

Page 16: ...Sicherheitshinweise 14...

Page 17: ...im Tiefk hlbereich Regalb den im K hlbereich T rf cher im K hlbereich Wassertank Abdeckplatten K hlfach K hlf cher T rf cher im Tiefk hlbereich Abdeckplatten f r Einsch be Einsch be Verstellbare F e b...

Page 18: ...chl ssel aus dem Zubeh rbeutel Stellen Sie sicher dass das Ger t leer und der Stecker aus der Steckdose gezogen ist Heben Sie alle Teile auf die Sie entfernen Sie ben tigen diese um die T r wieder zu...

Page 19: ...en Gegenstand damit es beim Abmontieren der T r nicht wegrutschen kann Heben Sie alle Teile auf die Sie entfernen Sie ben tigen diese um die T r wieder zu montieren Legen Sie das Ger t nicht flach auf...

Page 20: ...und legen Sie sie auf eine weiche Unterlage Montieren Sie danach die andere T r auf dieselbe Weise ab 5 Schrauben Sie die unteren Scharniere ab 6 Schrauben Sie die T ren nach dem Aufstellen des Ger ts...

Page 21: ...n Seiten sowie hinten eine L cke von mindestens 50 mm frei H A B C D E F G H 900 660 1770 min 50 min 50 1800 1560 135 Nivellieren des K hlger ts Door Drehen Sie die F e von Hand im Uhrzeigersinn um si...

Page 22: ...rekt unter einem berstehenden Wandelement aufgestellt werden Eine pr zise Nivellierung wird durch das Einstellen der Nivellierf e unter dem Geh use sichergestellt Dieses K hlger t ist nicht f r die Un...

Page 23: ...perren Anzeige In der Betriebsart SMART regelt das K hlger t die Temperatur beider Bereiche abh ngig von der Innen und der Au entemperatur In der Betriebsart ECO arbeitet das K hlger t mit dem niedrig...

Page 24: ...t dient zum Sparen von Energie Super Cooling Betriebsart Diese Betriebsart dient zum schnellen K hlen von Lebensmitteln Die Funktion wird nach 2 5 Stunden automatisch deaktiviert Super Freezing Betrie...

Page 25: ...und halten Sie die Sperrtaste LOCK 3S etwa 3 Sekunden lang gedr ckt Die Schloss Anzeige leuchtet wenn die Kindersicherung aktiviert ist Zum Deaktivieren der Funktion halten Sie die Taste LOCK 3S etwa...

Page 26: ...24...

Page 27: ...25...

Page 28: ...26...

Page 29: ...27...

Page 30: ...e den Wassertank den Deckel und das Fach f r den Tank wie folgt wieder ein 3 Reinigen Sie den Spenderhebel au en an der K hlger tet r Wasser in den Wassertank f llen 1 ffnen Sie den kleinen Deckel 2 F...

Page 31: ...raum vor dem ersten Gebrauch des Ger ts mit lauwarmem Wasser und etwas Neutralseife ab um den typischen fabrikneuen Geruch zu beseitigen Trocken Sie dann alles gr ndlich ab Wichtig Benutzen Sie keine...

Page 32: ...Fall l nger Zubeh r Versetzbare Regalb den In die Innenw nde des K hlschranks sind mehrere Laufschienen eingearbeitet sodass die Regalb den nach Wunsch versetzt werden k nnen Anbringen der T rf cher...

Page 33: ...g Summer K hlfach eingestellt auf 4 Tiefk hlfach eingestellt auf 18 Normal K hlfach eingestellt auf 4 Tiefk hlfach eingestellt auf 18 Winter K hlfach eingestellt auf 4 Tiefk hlfach eingestellt auf 18...

Page 34: ...onensaft oder der Saft von Orangenschalen Butans ure Reinigungsmittel mit Ethans uregehalt Verhindern Sie dass diese Stoffe Kontakt mit den Ger teteilen erhalten Keine Scheuermittel verwenden Die Lebe...

Page 35: ...T glicher Gebrauch 33 Art des K hlger ts...

Page 36: ...T glicher Gebrauch 34...

Page 37: ...600a 75 g CYCLOPENTAN Erweitert gemaBigt SN Dieses Kuhlgerat ist fur den Einsatz bei Umgebungstemperaturen zwischen 10 C und 32 C vorgesehen Gehartet N Dieses Kuhlgerat ist fur den Einsatz bei Umgebun...

Page 38: ...36 T glicher Gebrauch...

Page 39: ...37 T glicher Gebrauch...

Page 40: ...e des Gerats beruhrt ein wegbiegen anderes Teil am Ger oder an der Wand Seitenwande werden heiB Dies ist normal Wenn die Seiten beruhrt werden An den Seiten befinden sich Teile des mussen Handschuhe a...

Page 41: ...39...

Page 42: ...Side by Side Refrigerator 5 9 5 7 8 0 9 0 0 5 9 5 7 8 0 9 0 1 5 9 5 7 8 0 9 0 2...

Page 43: ...Content 1 10 11 16 19 22 Safety Information Overview Installation User Interface Storage food Daily Use...

Page 44: ...erty keep theprecautions of these users instructions as themanufacturer is not responsible for damages causedby omission This appliance can be used by children aged from 8years and above and persons w...

Page 45: ...a springock atch on the door or lid be sure to makethat spring lack unusable before you discard theold appliance This will prevent it from becominga death trap for a child WARNING Keep ventilation op...

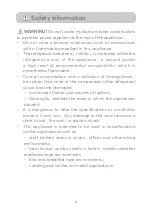
Page 46: ...ppliance be certain that none of the components ofthe refrigerant circuit become damaged avoid open flames and sources of ignition thoroughly ventilate the room in which the applianceis situated It is...

Page 47: ...ug of theappllance Do not pull the mains cable If the power plug socket is loose do not insert thepower plug There is a risk of electric shock or fire You must not operate the appliance without the la...

Page 48: ...food please respect thefollowina instructions Opening the door for long periods can cause asignificant increase of the temperature in thecompartments of the appliance Clean regularly surfaces that can...

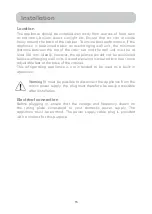
Page 49: ...connection carefully followthe instructions given in specific paragraphs Unpack the appliance and check if there aredamages on it Do not connect the appliance if it isdamaged Report possible damages i...

Page 50: ...n authorized Service Center and only genuine spare parts must beused Don t put hot food in the appliance Don t pack food close together as this prevents air circulating Make sure food don t touch the...

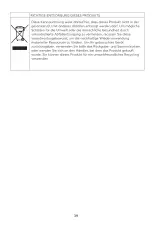
Page 51: ...marked by the symbols are recyclable The symbol on the product or on its packaging indicates that this product may not be treatedas household waste Instead it should be takento the appropriate collect...

Page 52: ...There are flammable materials in refrigerant pipesand compressor Please be far away fire source during using service and disposal This refrigerating appliance is not intended to be used as abuilt in...

Page 53: ...Overview Freezer shelves Fridge shelves Fridge door shelves Water tank Crisper covers Crispers Freezer door shelves Drawer covers Drawers Adjustable feet 10...

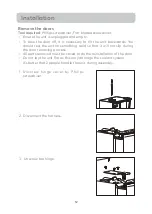
Page 54: ...rocess Remove the handles Tool required Hex wrench in accessary bag Ensure the unit is unplugged and empty All parts removed must be saved to do the reinstallation of the door 7 1 Unscrew handles with...

Page 55: ...You should rest the unit on something solid so that it will not slip during the door removing process All parts removed must be saved to do the reinstallation of the door Do not lay the unit flat as...

Page 56: ...Installation 4 Lift the door and place it on a softpad Then remove an other door as same process 5 Unscrew bottom hinges 6 After the appliance is positioned install the doors as reversed process 13...

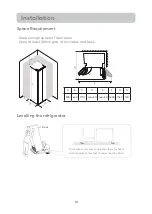
Page 57: ...of door open Keep at least 50mm gap at two sides and back 8 H A B C D E F G H 900 660 1770 min 50 min 50 1800 1560 135 Levelling the refrigerator Door Clockwise rotate feet to heighten them by hand An...

Page 58: ...ould not be positioned below overhanging wall units Accurate leveling is ensured by one or more adjustable feet at the base of the cabinet This refrigerating appliance is not intended to be used as a...

Page 59: ...other three bottons Press it and hold for 1 second to unlock other three bottons Display compartments automatically according to internal temperature and ambient temperature ECO mode the refrigerator...

Page 60: ...C No change 11 11 11 11 NOTES ECO mode Select this mode when you want to save power Super cooling mode This mode allows you to cool foods quickly and will be automatically deactivated after 2 5 hours...

Page 61: ...activate the function press and hold LOCK 3Sfor about 3 seconds t will illuminate indicating the safety lock The lock indicator light function is activated To deactivate the function press and hold L...

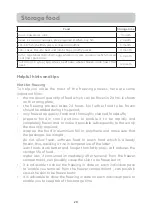
Page 62: ...f top Foods that do not need cooking such as ready to eat food deli meats leftovers 1 week Freezing fresh food The freezer compartment is suitable for freezing fresh food and storing frozen and deep f...

Page 63: ...eriod only freeze top quality fresh and thoroughly cleaned foodstuffs prepare food in small portions to enable it to be rapidly and completely frozen and to make it possible subsequently to thaw only...

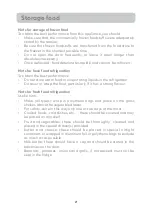
Page 64: ...ator Do cover or wrap the food particularly if it has a strong flavour Hints for fresh food refrigeration Useful hints Make all types wrap in polythene bags and place on the glass shelves above the ve...

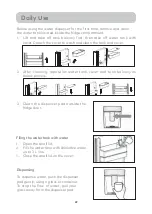
Page 65: ...nk and cover 2 After cleaning reposition water tank cover and tank balcony as below process 3 Clean the dispenser pad outside the fridge door Filing the water tank with water 1 Open the small lid 2 Fi...

Page 66: ...st time wash the interior and all internal accessories with lukewarm water and some neutral soap so as to remove the typical smell of a brand new product then dry thoroughly Important Do not use deter...

Page 67: ...take longer Accessories Movable shelves The walls of the refrigerator are equipped with a series of runners so that the shelves can be positioned as desired Positioning the door balconies To permit st...

Page 68: ...ommendation Environment Temperature Temperature Setting Summer Fridge set on 4 Freezer set on 18 Normal Fridge set on 4 Freezer set on 18 Winter Fridge set on 4 Freezer set on 18 Information above giv...

Page 69: ...ice or the juice form orange peel butyric acid cleanser that contain acetic acid Do not allow such substances to come into contact the appliance parts Do not use any abrasive cleaners Remove the food...

Page 70: ...her refrigerating appliance Parameter Parameter Overal dimensions millimetre Height Total volume dm3 or Depth Energy efficiency class Airborne acoustical noise emissions dB A re 1 pW Airborne acoustic...

Page 71: ...No Variable temperature compartment No For 4 star compartments Fast freeze facility Yes Light source parameters Type of light source LED Energy efficiency class G Minimum duration of the guarantee off...

Page 72: ...ance is intended to be used at ambient temperatures ranging from 10 C to 32 C Temperate N this refrigerating appliance is intended to be used at ambient temperatures ranging from 16 C to 32 C Subtropi...

Page 73: ...ong as necessary A large quantity of warm food was placed in the appliance within the last 24 hours Turn the temperature regulation to a colder setting temporarily The appliance is near a heat source...

Page 74: ...ontrolled waste disposal recycle it responsibly to promote the sustainable reuse of material resources To return your used device please use the return and collection systems or contact the retailer w...

Page 75: ...CKPOC J01 A...
Reviews: