background image

19

18

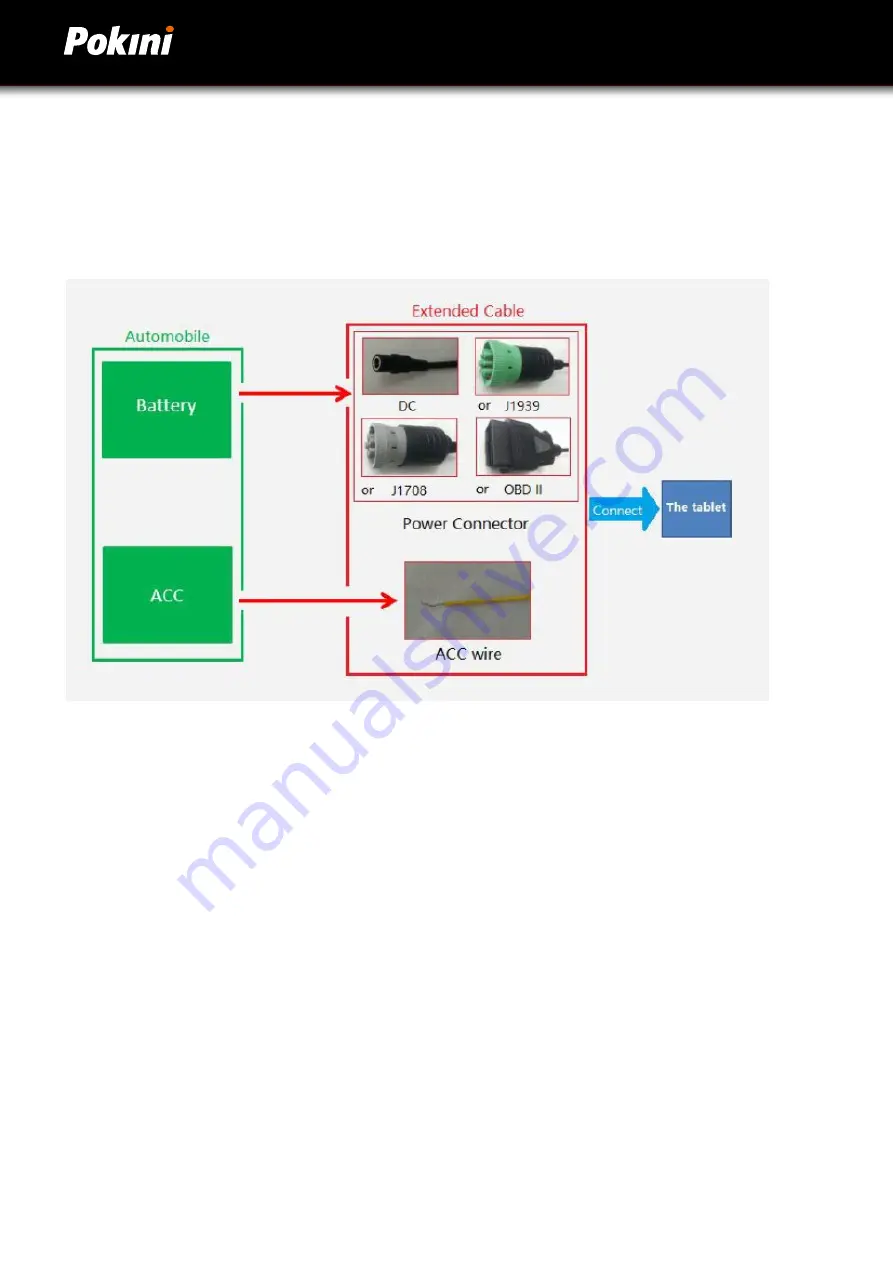
3.3 Using ACC

Please see “1.3 Extended cable definition” for ACC Interface details.

3.3.1 ACC Connection Instruction

Connecting the tablet with vehicle power supply through extended cable or docking station, and connecting ACC wire 
on extended cable of the tablet with ACC of vehicle.

3.3.2 ACC Functions

I. Power on the tablet by ACC.

II. Light up the screen by ACC.

III. To turn off the screen by ACC trigger based upon the setting delayed time.

IV. To shut down the tablet by ACC trigger based upon the setting delayed time.

Note:

a) The ACC is triggered by the electric level.

b) Function of “Power on the tablet by ACC” can’t be modified from the system.

c) It takes about 10 seconds to completely shut down the system after ACC is

started. Please do not try to use boot-triggered actions during this process.

Summary of Contents for FT 10M

Page 1: ...Pokini FT 10M Manual english ...

Page 2: ...nces will the manufacturer be liable for any direct indirect special incidental or consequential damages arising from the use or inability to use the product or documentation even if advised of the possibility of such damages About this Manual This user s manual provides the general information and installation instructions for the product The manual is meant for the experienced users and integrat...

Page 3: ... 2 3 Optimizing Battery Life 15 2 4 Installing Micro SD and SIM Card 17 Chapter 3 Hardware Interface 17 3 1 Transferring Files between Computer and the Device 17 3 1 1 Connection 17 3 2 Using Serial Port Demo App 18 3 3 Using ACC 19 3 3 1 ACC Connection Instruction 19 3 3 2 ACC Functions 19 3 3 3 ACC Settings Path 20 3 3 4 ACC Settings 20 3 4 Using GPIO 22 3 4 1 GPIO Tail Lines Instruction 22 3 4 ...

Page 4: ...ct should warning no tices be disregarded Battery Recycle This symbol indicates electrical warning Important Safety Instructions Read all cautions and warnings on the equipment Place this equipment on a reliable surface when installing Dropping it or letting it fall may cause damage Make sure the correct voltage is connected to the equipment For pluggable equipment the socket outlet should be near...

Page 5: ...e months If you store an uncharged battery it could fall into a deep worn out state which would render it incapable of holding any charge Be sure to store the equipment and battery at the proper temperature as described in 1 5 Specifications Additional Information Technical Support You can download the related technical documents such as data sheet and user s manual as well as driver on our websit...

Page 6: ...tion System Comply with IP67 rating WI FI Bluetooth LTE GNSS and 8000 mAh rechargeable battery supported 10 Inch IPS Display physical 1280 800 resolution 1000 cd m multi point capacitive touch Portable with Docking Station Comply with IP67 rating Comply with MIL STD 810G Fingerprint 1D 2D scanner 1 2 Parts of the Device ...

Page 7: ...7 1 3 Extended Cable Definition 1 3 1 Docking Station ...

Page 8: ...Deutsch 8 1 3 2 All in one cable ...

Page 9: ...9 1 4 Specifications ...

Page 10: ...Deutsch 10 ...

Page 11: ...11 1 4 Specifications ...

Page 12: ... The indicator is on when tablet activate normally 2 Power on by connecting ACC see the details in Chapter 3 3 Using ACC 3 Power consumption during operation 9 6w typical 2 1 2 Power off the Device 1 Power off by pressing the button In the status of working on the device desk top long press the power button for more than 2 seconds until the shutdown prompt pop up then click the POWER OFF option 2 ...

Page 13: ...The switch is on the right to unlock the machine status and the battery can be removed 3 In the direction of the arrow push the indicated skateboard up The specific operation methods of installation and removal are as follows 1 To lock the battery status switch turn it to the left When you want to remove the battery you need to turn the switch to the right 2 Slide the control battery back plate up...

Page 14: ... 1 Charging with the Power Adapter A Use a 12V power adapter to directly connect the charging port on the tablet to charge B The machine with a docking station or integrated cable can also be charged through the power input on the tail cable Detailed reference Extended Cable Definition Warning Please ensure that the input voltage of the DC interface is within the range of 8 36 V or use the 12V ada...

Page 15: ...ng the Battery 2 3 Optimizing Battery Life If the tablet is unable to keep charging by DC power supply to optimize the operating time of the battery it is recom mended that you do the following Decrease the LCD display brightness Set a shorter timeout of inactivity to allow the screen enter sleep mode Turn off the display if you are not using it Turn off Wi Fi Bluetooth or GPS function if you are ...

Page 16: ...on battery settings page to limit the maximum CPU performance to conserve battery life and lower device temperature To access the battery settings page swipe down the Status Bar in the upper right corner and then tap and hold the Battery icon ...

Page 17: ...w Finally load the battery and press the power button to start the machine Chapter 3 Hardware Interface 3 1 Transferring Files between Computer and the Device You can transfer files such as pictures or audio files between your computer and your device using the provided USB cable 3 1 1 Connection Connect the device to the computer by using the USB type c cable and open the prompt message of the de...

Page 18: ...he right box in red means COM port switch to switch on off corresponding COM port 5 The boxes in red means auto send interval time setting 6 The boxes in red means auto send mode selection and COM port info sending button 7 COM port info sending button 8 The boxes in red means text rows counting in the information receiving text box the above numbers correspon ding to the COM port information rece...

Page 19: ...ctions I Power on the tablet by ACC II Light up the screen by ACC III To turn off the screen by ACC trigger based upon the setting delayed time IV To shut down the tablet by ACC trigger based upon the setting delayed time Note a The ACC is triggered by the electric level b Function of Power on the tablet by ACC can t be modified from the system c It takes about 10 seconds to completely shut down t...

Page 20: ...nctions of turning on the screen turning off the screen and turning off the power 2 ACC controls switch to turn off the screen function 3 Click to pop up the dialog box in Figure to set the delay time to turn off the screen display after ACC is disconnected 4 Display current delay time 5 ACC controls switch to turn off the tablet 6 After clicking the dialog box shown in Figure to set the delay tim...

Page 21: ...21 ACC Settings interface 1 ACC Settings interface 2 Screen off delay time setting dialog box ...

Page 22: ... diagram of GPIO interface please see the details in Chapter 1 3 Extended cable definition 3 4 2 GPIO Specification The GPIO interface instruction diagram is as follows In case of inductive load of motor relay and so on be sure to use the clamp diode externally Typical relay connection ...

Page 23: ... device and it isn t suitable for factory s standard soft ware b GPIO_DEMO Main Interface c Introduction of Main Components The part marked with a red box 1 Name means the port names of GPIO 2 Direction means the input or output direction of the ports 3 State means the current level state of the GPIO ports ...

Page 24: ...h 24 The button marked with a red box It can read the value at once when GPIO is set as the input direction The button marked with a red box shown in Figure used to set the high or low of GPIO output at once ...

Page 25: ...25 3 5 Using NFC Function 3 5 1 NFC Activation Method Activate the NFC function ...

Page 26: ...ea A prompt tone would be heard if the card is successfully identified If the card contains some information such as manufacturer s information there will be an interface popped up as shown in figure Note If the card has been identified it does not always pop up an interface but there must be a prompt tone ...

Page 27: ...27 ...

Page 28: ...Refer to the following figure to enter the Root privilege on off function setting interface 2 The root switch setting interface is as follows In the figure 1 is the Root permission on off switcher 2 to modify the password Initial password qwertyuiop ...

Page 29: ...off status Note If restore the factory settings the root switch state will be reset to OFF and the password is restored to the initial Chapter 4 Docking Station Using Instruction 4 1 Docking Station Install Steps 1 Insert the key and turn it 90 degrees to the right to unlock the key to unlock the telescopic buckle as Fig 4 1 shown ...

Page 30: ...Deutsch 30 2 Align the tablet to the limit slot of docking station as Fig 4 2 shown 3 Pull the buckle up as the Fig 4 3 shown ...

Page 31: ...ke it attached the docking via snap joint as Fig 4 4 shown 5 Release and finish the installation as Fig 4 5 shown 4 2 Docking Station Disassemble Steps 1 Stretch upwards the buckle to release it from the device as Fig 4 6 shown ...

Page 32: ...Deutsch 32 2 Take out the device as Fig 4 7 shown 3 Hold down the key and rotate 90 degrees to the locked sign pull out the key to lock the telescopic buckle as shown in Fig 4 8 ...

Page 33: ...r 5 Accessories 5 1 Accessories Allen Wrench 1 pc Screws for RAM 4 pc USB to Type C cable 1 pc DC 12V 1 pc 5 2 Optional accessories J1939 female to open cable 1 pc OBD II female to open cable 1 pc RAM 101U 1 pc ...

Page 34: ...uter GmbH Brühlstr 12 89537 Giengen Sachsenhausen Deutschland Germany all rights reserved www pokini de Support You have any technical questions If you have problems or questions please contact us by e mail support pokini de ...

Reviews: