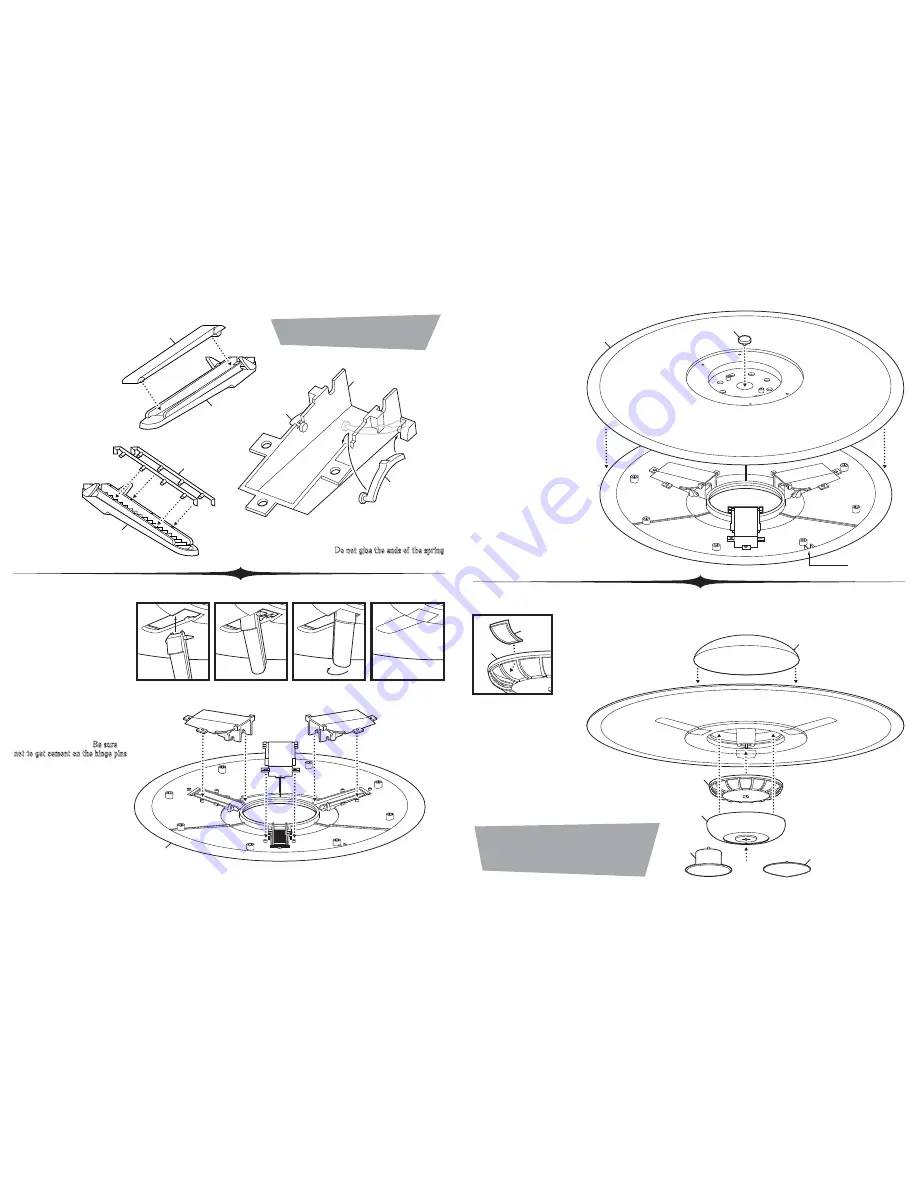
Cement conveyor belt part
#10
to ramp part
#9
.
Paint conveyor flat
Dark Gray
.
Place engine cage pin part
#5
into the center hole of
upper saucer part
#1
.
Align the keys in the parts
to orient the saucer
assemblies correctly. Then
cement together.
Paint outer ring of the
saucer a darker shade of
Silver
.
Cement engine cage assembly
to
the pin in the main assembly.
Cement the lower dome part
#19
to the main assembly.
Then cement upper dome part
#3
to the assembly.
Glue is optional to hold either the central landing column
part
#14
or the lower cap part
#15
in place.
Choose part
#14
for landed position and use part
#15
for
flying position.
If building in flying position, paint part
#4
in
Black
and paint part
#20
in
clear Red
. Cement all clear insert
parts
#20
to engine cage part
#4
.
If building in landed position, omit
parts
#4
&
#20
paint lower dome
part
#19
silver to match the rest of
the model.
Place the three ramp assemblies
into lower saucer part
#2
by
inserting them through the bottom
of the openings. Push one side into
the corner of the opening and twist
the ramp into place. Once in place,
the ramps should be held in the
closed position when installing
the hallways.
Cement hallway assemblies to the
top of part
#2
while
trapping the
hinge pins of the ramps. Be sure
not to get cement on the hinge pins.
It is important to glue the areas
closest to the center of the saucer
thoroughly and allow them to dry
completely before moving on in
order to withstand the action of
opening and closing the ramps.
Cement railing parts
#7
to stair ramp part
#6
.
Paint rails
Red
.
Attach leaf spring parts
#12
&
#13
to hallway part
#11
by
inserting one end into corner as pictured, then flex spring to hang
nailhead end over hallway wall. Do not glue the ends of the spring.
PAINT NOTE: Unless otherwise stated,
paint all parts BRIGHT SILVER.
NOTE: If desired, a hole can be drilled
into the upper dome to hang the model
by a string (not included). Use the dimple
inside the dome to find the center.
Step 1
10
Step 3
Step 4
Step 2
9
11
12
KEY
OR
13
7
6
2
A
B
C
D
5
3
1
4
4
20
19
14
15


