background image

21

EN

ADVANCED PARAMETER SETTING

2 push-buttons

4 push-buttons

1

1

2

2

3

4

1

2

CODE

3

4

1

2

CODE

3

4

1

2

CODE

3

4

1

2

CODE

or

or

Complete 

opening 

Opening for pedestrian 

entry (if the function 

is active)

Unassigned

Available combinations of push-buttons for complete 

opening / opening for pedestrian entry:

[1].


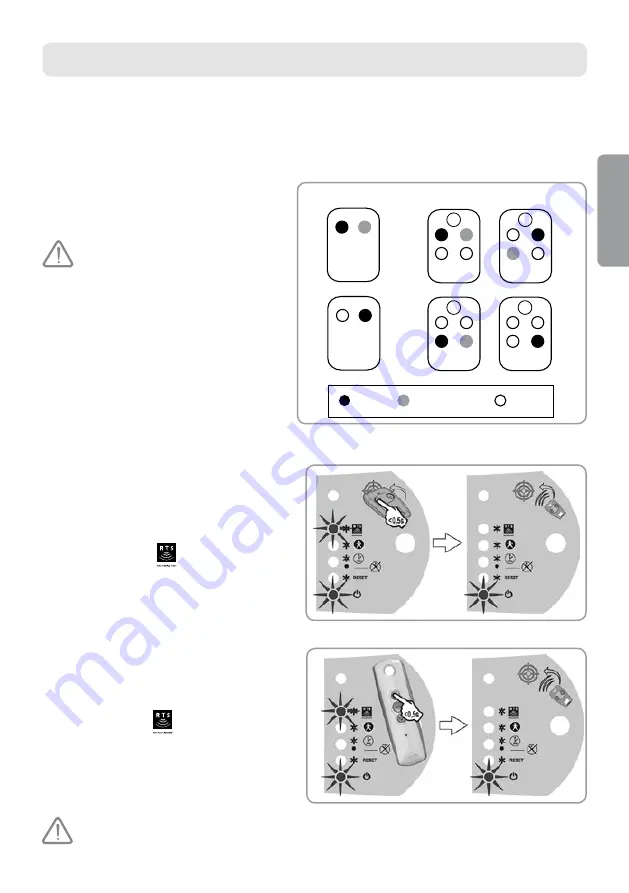
Place the remote control on the picture 

showing a target. 

[2].

  Press quickly the remote control push-button 

designed for the control of COMPLETE gate 

opening. 


>   RADIO  indicator 

 lights up and then goes 

out when the push-button is released.  


The push-button has been programmed.

[1].

  Place the remote control on the picture showing 

a target.

[2].

  Press quickly the remote control push-button 

Up or Down. 


>   RADIO  indicator 

 lights up and then  

goes out.  


The remote control has been programmed.


If 16 remote controls have been programmed, then while programming the 17

th 

remote control, the first remote control will be deleted, etc

.

Note:

   You cannot set parameters when the gate is running. 

Any introduced parameter changes will be taken into account after the first opening of the gate.

Available push-buttons in remote controls with 2 or 4 push-buttons

Each remote control push-button can be 

programmed for control of complete gate opening.
The next push-button allows activation of the function 

of opening for pedestrian entry (the function of 

opening for pedestrian entry, see page 20).

  Push-button 1 cannot be 

programmed for the function of 

opening for pedestrian entry. 

Unassigned push-buttons or an inactive 

push-button for opening for pedestrian entry 

can be used to control another automatic 

mechanism (garage door, shutter, etc.). 

Programming of a remote 

control with 2 or 4  

push-buttons

Programming of a remote control with 3 push-buttons

Summary of Contents for Simple Move 101

Page 1: ...Simple Move 101 CANTILEVER GATE DRIVE UNIT EN ...

Page 2: ...HIELDS 17 OPERATIONAL USE 18 Operation in sequential mode 18 Operation in automatic mode 19 Operation of obstacle detection function 19 Operation of zone lighting 19 Operation of remote controls or transmitters with 3 push buttons 20 Drive Unit unlocking blocking 20 ADVANCED PARAMETER SETTING 21 Available push buttons on remote controls with 2 or 4 push buttons 21 Programming of a remote control w...

Page 3: ...erience or knowledge unless under the supervision of the person responsible for their safety or using instructions provided as regards the operation of this device Children are not allowed to play with fixed control devices Remote control transmitters must be kept out of the reach of children When using a switch without an interlock check if another people are at a suitable distance from the gate ...

Page 4: ... Components of the set Item Name Quantity 1 Shield 1 2 Antenna 1 3 Electronic module 1 4 Drive 1 5 Shield screw 1 6 Round gasket 9x2 1 7 Toothed bar 33 cm 13 8 Cable bush 1 9 Thread forming screw TCB M4x10 galvanized 3 10 Fan shaped washer AZ4 1 11 Wire holder 1 12 Flat medium washer M4x10 1 13 Round insulated terminal D4 1 14 Assembly template printed on cardboard to be cut out 1 15 Adhesive labe...

Page 5: ...is function the setting mode is available only with the shield removed If the shield is installed the drive is switched to standby mode Light sensor Gate dimensions and maximum weight Maximum weight P 300 kg Maximum height H 2 m Maximum width L Gate 4M Overall length with counterbalance 6 m Drive dimensions in mm 84 72 232 48 109 218 214 109 180 25 ...

Page 6: ...ng to EN 12 453 Working temperature Between 20 C and 60 C Thermal shield Yes Protection level IP 44 Built in radio wave receiver Yes Remote controls Radio frequency Range of operational use Number of memory settings 433 42 MHz 50 m 16 Possible connections Orange light output Zone lighting output supplied terminals Accessory supply output Emergency battery input Photocell input Control input suppli...

Page 7: ...close without the necessity of using excessive power Check if the guide is absolutely perpendicular to the ground and if there are no obstructions that could prevent proper gate displacement The presence of gate stops Gate movement must be controlled by stops firmly fixed to the ground The stops limit the extreme position of the gate during opening while the post performs this function during clos...

Page 8: ...de and to open a gate Photocell conductors see page 23 Provide a connection for the photocell conductors in the shield between the two gate posts Drill holes for shields in both ends of the gate construction The photocells must be connected with the electronic system of the gate using a cable 2x0 75 mm Supply conductors must be led under the photocells Location of the photocells see page 23 Orange...

Page 9: ...f use Successive stages Drive Unit location Installation of stops Foundations Drive unit location Horizontal setting Pay attention to the fact that that the drive unit must be always within the area of the gate operation during both opening and closing Vertical setting The drive unit should be located a little off the ground more than 20 mm Choose a suitable position for the toothed bar If necessa...

Page 10: ...e ground attach it using washers flat Ø10 5x22x2 galvanized 18 and 4 nuts M10 galvanized 17 5 Insert the cable bush 8 that has been drilled through previously in the hole provided for the supply conductor Successive stages Screw assembly Drive fastening Toothed bar assembly Mechanical adjustment Screw assembly 1 Place the assembly template on the ground the template is printed on cardboard and dri...

Page 11: ... bars should start from the lock side 4 Insert bar No 1 at a suitable distance from the lock side 5 Fix the toothed bar 7 to bar No 1 and fasten using screws M6x50 77 11 0 4 1 1 Check if the drive is really unlocked when the lever is in position No 1 No 2 No 3 No 4 ...

Page 12: ...12 EN Toothed bar Washer M6 Bar No 2 Start of assembly Bar No 3 Bar No 1 Screw M6x50 Bar No 4 lis ...

Page 13: ...ve unit is located at a suitable height the gate moves properly the gate should move without difficulty along its track the gear wheel is driven all the time when the gate moves along its track the set consisting of the toothed bar and the gear wheel does not change its position substantially along the gate path If these conditions are not met 1 Adjust the height and set the drive at a suitable le...

Page 14: ...ys connect the drive unit to the terminals 9 and 10 green label M1 of the electronic module of the drive The drive unit 4 and the electronic module 3 are initially equipped with conductors designed for the drive unit mounted on the left hand side To change direction of the drive unit operation interchange the conductors connected to terminals 9 and 10 Blue Black Brown Green 9 10 M1 Blue Black Brow...

Page 15: ...ic module red label 230 V Check whether the conductors are blocked correctly by pulling them slightly Terminal Blue conductor N 15 Red brown black conductor P 16 Green yellow conductor It is obligatory to observe the recommendations concerning the colours of conductors Connection to a solar energy source See page 30 Connection of protecting accessories Photocells to be sold separately as an option...

Page 16: ... Gate track teaching The electronic system of the drive stores automatically the following The necessary drive torque to control the gate in the usual mode The saving of this information allows detection of any abnormalities in the drive unit operation Thegatetracksduringtheopeningandclosingofthegatecompletelyaswellasthepositionsofthestops During setting the parameters stand at the usual distance ...

Page 17: ...n the flange base of the drive 2 Mount the gasket 6 to ensure the tight fitting of the drive unit and then the shield screw 5 THE DRIVE UNIT IS READY FOR ACTION According to the default settings the drive unit operates in sequential mode and in complete opening mode only 2 6 5 1 ...

Page 18: ...g of the gate by pressing push button 1 Partial opening of the gate about 1 m by pressing of the active push button Complete opening Opening to allow pedestrian entry Closing of the gate by renewed pressing of the active push button Close the gate by renewed pressing of push button 1 Stop the gate movement by renewed pressing of push button 1 Opening to allow pedestrian entry is carried out by pre...

Page 19: ...er 30 seconds In case an obstacle is detected during closing the gate stops and then opens completely To close the gate press push button 1 Operation of the obstacle detection function In case an obstacle is detected during opening the gate stops and carries out a short movement backwards during closing the gate stops and then it opens fully Operation of zone lighting The zone lighting lights up e...

Page 20: ...rive is set in the unlocked position the gate can be controlled manually in case of power failure Then the gate can be moved completely freely Exercise caution when carrying out this operation Unlock the drive unit by pulling the lever towards yourself Lock the drive unit by pushing the lever in the direction of the gate Operation of remote controls or transmitters with 3 push buttons Opening by p...

Page 21: ... has been programmed If 16 remote controls have been programmed then while programming the 17th remote control the first remote control will be deleted etc Note You cannot set parameters when the gate is running Any introduced parameter changes will be taken into account after the first opening of the gate Available push buttons in remote controls with 2 or 4 push buttons Each remote control push ...

Page 22: ...ings are not accessible To switch off automatic closing mode and return to sequential mode repeat stage 1 described above and then press quickly remote control push button 2 pilota AUTOMATIC CLOSING indicator will go out and then start flashing Press remote control push button 1 twice 2 3 1 x2 1 Put the programmed remote control with 2 or 4 push buttons on the picture showing a target Press push b...

Page 23: ...23 EN ACCESSORIES A cross section of conductors for individual types of devices TX RX concentric cable ...

Page 24: ...ote If the gate is closed and the photocells are obstructed the gate will not open A set of photocells consists of transmitting photocells TX receiving photocells RX 2 8 m 25 cm max 20 cm Location of photocells Photocell installation and conductors 107 mm 43 mm 26 mm 2 x 0 75 mm2 HO5 RR F IP44 1 A 24 Vac dc 60 C 20 C 1 2 Ø4 5 6 mm 12 mm 6 Ø4 3 4 ...

Page 25: ... the photocell RX using a pad Check once again If the receiving photocell indicator emits light continuously proper setting close the shield of the receiving photocell RX RX TX 1 2 1 2 3 5 10 1 2 TX 7 1 2 3 5 RX 9 8 11 11a 11b To check that the photocells are set properly mount the shield of the transmitting photocell but do not install the shield of the receiving photocell ...

Page 26: ...d during gate closing the gate will stop and start moving in the reverse direction If the gate is closed and the photocells are obstructed the gate will not open Safety rules The photocell operation must be checked every 6 months To do this shield the photocell with one hand during gate closing The gate should stop and open again 1 Puttheprogrammedremotecontrolwith2or4push buttonsonthepictureshowi...

Page 27: ...ashing 2 seconds before the gate starts moving Installation of orange light There are two methods available of installing the orange light see Fig 4a and 4b Ø3 4b 1 2 3 Ø3 4a 5 10 9 8 11 6 6 mm 12 mm 7 HO5 RR F 2 x 0 75 mm2 175 mm 60 mm 77mm 24 V E14 Ø22 10 Watt max 60 C 20 C IPX4 24 Vac dc ...

Page 28: ...nd radio transmitters only Note STATUS indicator flashes 1 pulse when the drive is supplied by the battery Technical data of the battery Operating time 10 cycles in continuous mode or 24 hours if the gate is in good technical condition Optimum charging time for the battery before use 48 hours Battery life 3 years To ensure optimum battery life disconnect the power supply from the gate three times ...

Page 29: ...inal provided for this purpose grey label BATT Connect the interphone to the electronic module terminals 3 and 4 yellow label BUS Note In the case of the connection of an interphone of a different type to the one presented above check to see if it is equipped with an output contact without power supply This element is not compatible with a solar energy supply Interphone Battery conductors and inst...

Page 30: ... electronic module terminals 3 and 4 yellow label BUS V and V of the panel with digital code to the electronic module terminals 5 and 6 black label 24 V An independent antenna with a longer range can replace the wire antenna Place it on the post top and check to see if it is exposed Connect the antenna to the electronic module terminals 1 and 2 blue label ANT conductor core to terminal 1 stranded ...

Page 31: ...ote When the drive is supplied with a solar energy source the wire control systems are disconnected the gate is controlled by means of remote controls and radio transmitters only 1 2 3 Never connect the drive unit to a power supply of 230 V when it is already connected to a solar energy source because this can lead to damage to the electronic module of the drive To reduce energy consumption by the...

Page 32: ...tensity outdoor the drive unit is in standby mode To carry out settings increase illumination outside the electronic module eg using a torch STATUS indicator of the electronic module is flashing 1 pulse Working mode with the emergency battery supply Check the mains supply 2 pulse The drive unit is awaiting the gate path teaching Restart the gate path teaching see page 15 3 pulse Photocell failure ...

Page 33: ...within the drive unit Check the conductors of the drive unit see page 13 The automatic closing mode does not start the AUTOMATIC CLOSING indicator remains unlit Photocells have not been installed Install photocells see pages 23 and 24 Replacement of the remote control battery The battery life is usually 2 years WARNING Observe the polarity of the batteries they must not be recharged or thrown into...

Page 34: ...hts up Release push button 2 STATUSindicator is flashing Removal of settings The following settings can be removed the gate path and activation of the automatic gate closing mode When are the settings to be removed After the gate path teaching in the case of modification of the drive conductors In the case of detection of an unexpected obstacle as a consequence of normal wear of the gate Antenna A...

Page 35: ...emote control push button 1 once MEMORYRESETindicator RESET isflashing 3 Press remote control push button 2 until all indicators light up Release push button 2 STATUSindicator isflashing 3 2 1 Removal of programmed settings and remote controls The following settings can be removed the gate path activation of the automatic gate closing mode and all programmed remote controls or radio transmitters ...

Page 36: ...Oziemkówka 57A 08 420 Miastków Kościelny Polska Tel 48 25 683 05 55 fax 48 25 683 78 38 e mail serwis polagros pl www polargos eu ...

Reviews: