background image

English

5

Read the complete owner’s 

manual before you begin installation.

Prepare the Pool

1.  Turn on the filtration pump, allow to prime. 
2.  Turn on the booster pump and flush plumbing lines for five minutes.
3.  Turn off both pumps.

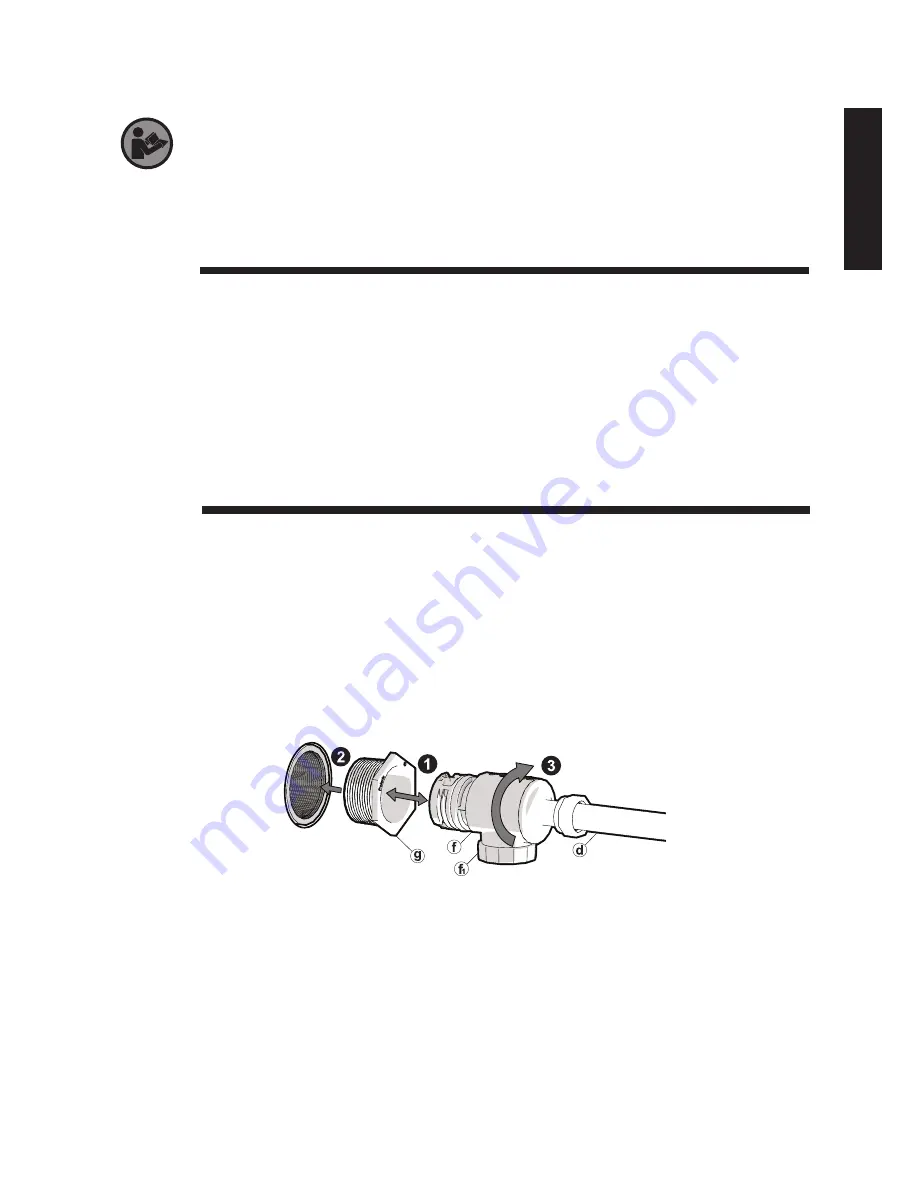
Install the Universal Wall Fitting

The UWF installs on pools with a dedicated cleaner return line and a threaded 1-1/2” 

female pipe fitting.
1.  Remove the Universal Wall Fitting (UWF) (g) from the Quick Disconnect (f). 
2.  Thread the UWF (g) with Blue Restrictor Disk (h)  in place, into the dedicated 

cleaner return line.

3.  Attach the Quick Disconnect (f) and hose to the UWF (g). Turn clockwise then 

pull away to secure.

Cleaner return line

Buse de refoulement de la piscine

línea de retorno para el limpiador

dedicated cleaner 

return line

Summary of Contents for Quattro

Page 1: ...OWNER S MANUAL English Français Español H0645700_REVA Works with Polaris Booster Pump Fonctionne avec un surpresseur Funciona con bomba de presión adicional ...

Page 2: ...objects coming into contact with the vinyl surface including pool brushes pool toys floats fountains chlorine dispensers and automatic pool cleaners Some vinyl liner patterns can be seriously scratched or abraded simply by rubbing the surface with a pool brush Ink from the pattern can also rub off during the installation process or when it comes into contact with objects in the pool Zodiac Pool Sy...

Page 3: ...ashing the pool filter Always remove the cleaner from the pool before chemical shock treatments After cleaning or backwashing let the filtration system run for at least five minutes before re connecting the cleaner Before You Start Important Information Zodiac Pool Systems LLC 2620 Commerce Way Vista CA 92081 1 800 822 7933 polarispool com Zodiac Pool Care Europe Boulevard de la Romanerie BP 90023...

Page 4: ... Fine Debris d Hose Assembly e In Line Filter Assembly f Quick Disconnect f1 Pressure Relief Valve g Universal Wall Fitting UWF h Retrictor Disks Blue and Red i Hose Nuts j Feed Hose Connector k Hose Floats l Hose Swivels Included in the Box Installed in cleaner i in bag blue red ...

Page 5: ... installs on pools with a dedicated cleaner return line and a threaded 1 1 2 female pipe fitting 1 Remove the Universal Wall Fitting UWF g from the Quick Disconnect f 2 Thread the UWF g with Blue Restrictor Disk h in place into the dedicated cleaner return line 3 Attach the Quick Disconnect f and hose to the UWF g Turn clockwise then pull away to secure Cleaner return line Buse de refoulement de l...

Page 6: ... 6 15 cm longer or shorter of farthest point If hose is too short add a feed hose section with floats a swivel and two hose nuts available through your local Polaris dealer Adjust to proper length 3 Cut the hose so that it is within 6 15 cm of the farthest point Cut to within 6 15 cm of the farthest point Couper à 15 cm du point le plus éloigné Corte a 15 cm o menos del punto más lejano Walk hose ...

Page 7: ...t i onto the end of the feed hose connector j 2 Push the hose assembly d onto the feed hose connector j Water can be used to lubricate the hose Tightly secure the hose nut i onto the hose assembly d 3 3 Position the first hose float k up against the feed hose connector j and then space hose floats 1 3 ft 30 90 cm apart 4 ...

Page 8: ...erious injury do not swim or use the pool when the cleaner is submerged or operating 1 Attach the feed hose connector j to the cleaner 2 Confirm the first hose float k is up against the feed hose connector j 3 Submerge the cleaner allow it to sink to the bottom of the pool ...

Page 9: ...th both pumps on pull the cleaner to the waterline and keep submerged CAUTION Always lift the cleaner using the handle and take care to avoid possible hair entanglement when leaning over NOTE The Polaris logo latch is not a handle 4 Using the Polaris logo on the left front wheel as a reference count wheel revolutions RPM for 1 minute If wheels change direction during timing start over 5 Target whe...

Page 10: ... cause loss of water pressure Check hose swivels l for for excessive leaking or spraying Verify flow direction arrow is toward the cleaner Remove the blue restrictor disk h from the UWF g 32 RPM Replace the blue restrictor disk with the red restrictor disk h Loosen the pressure relief valve f1 until proper RPM is reached NOTE The Pressure Relief Valve should only be adjusted when a restrictor disk...

Page 11: ... of the cleaner Factory position is three 3 o clock but depending on the pool other thrust jet positions can be helpful to improve cleaner coverage If needed use a wrench to loosen the square nut fine tune and then tighten to secure PushesCle a n e r R i g h t P u s h e s Cleaner Left D ecreases Climbing Increases Climbing 3 3 9 12 6 8 Fine Tuning Thrust Jet Flow Adjust the flow by turning counter...

Page 12: ... 1 Press the lid release latch 2 Lift the handle to remove the filter canister 3 Press the filter cover release to remove the filter canisters 4 Separate the fine debris canister c from the all purpose canister b 5 Empty debris and rinse the filter canisters with fresh water b c c c c 5 9 Maintenance ...

Page 13: ...ot covered under the warranty 2 Remove the UWF from the pool wall using the Quick Disconnect Use a pulling pressure as you unscrew If necessary use the UWF Removal Tool part 10 102 00 available from any Polaris dealer Clean the In Line Filter Screen 1 Turn off the booster pump 2 Loosen the in line filter cap 3 Separate the in line filter body from the filter cap 4 Remove the filter screen 5 Rinse ...

Page 14: ...just Wheel Speed 2 Check for debris in the filter canister and clean if necessary 3 Ensure the hose is floating and the hose floats are positioned properly Position the first float k up against the feed hose connector j and then space hose floats 1 3 ft 30 90 cm apart 4 Adjust the thrust jet Refer to Section 8 Fine Tuning 5 Remove unnecessary pool hardware or install a Ladder Guard Kit part G21 fr...

Page 15: ...Target wheel speed is 28 32 RPM If wheel speed is not in target range refer to Section 7 Adjust Wheel Speed 2 Ensure the hose is floating and the hose floats are positioned properly Position the first float k up against the feed hose connector j and then space hose floats 1 3 ft 30 90 cm apart 3 Check for debris in the filter canister and clean if necessary 4 Adjust the thrust jet Refer to Section...

Page 16: ...c Pool Systems LLC H0646400 REV A Polaris y el diseño de limpiafondos de tres ruedas son marcas registradas de Zodiac Pool Systems LLC Las demás marcas mencionadas en esta guía son propiedad de sus respectivos propietarios Polaris and the 3 wheeled cleaner design are registered trademarks of Zodiac Pool Systems LLC All other trademarks referenced herein are the property of their respective owners ...

Reviews: