4.11
FUEL INJECTION
4
5.
If the pump did not activate (Step 2), disconnect the plug
from the fuel pump. Connect a DC voltmeter across
terminals “A” and “C” in the plug, turn on the key switch
and observe if a minimum of 7 volts is present. If voltage
is between 7 and 14, turn key switch off and connect an
ohmmeter between the terminals “A” and “C”' on the pump
to check for continuity.
NOTE: If there was no continuity between the pump
terminals, replace the fuel tank assembly.
NOTE: If the voltage was below 7Vdc, test the
battery, ignition switch, wiring harness and ECU.
6.
If voltage at the plug was good, and there was continuity
across the pump terminals, reconnect the plug to the pump,
making sure you have good, clean connections. Turn on the
key switch and listen for the pump to activate.
NOTE: If the pump starts, repeat steps 1 and 2 to
verify correct pressure.
NOTE: If the pump still does not operate, check for
correct ECU operation by plugging in a known-good
ECU of the same model.
NOTE: If the pump still does not operate, replace the
pump/tank assembly.
Fuel Pump / Tank Assembly Replacement
NOTE: All EFIs utilize quick connect fuel lines.
NOTE: The fuel pump cannot be replaced as an
individual part, the entire fuel pump and fuel tank is
replaced as an assembly. Refer to your parts book
for the proper part number.
1.
Disconnect the negative battery cable.
2.
Remove the side panels and front cab assembly. Refer to
“COVER PANEL REMOVAL" in Chapter 5 for details.
3.
Remove the clamps on the PVT intake duct and remove the
PVT duct.
4.
Remove the gas tank cover vent hose. Be sure to properly
route the vent hose upon reassembly.
5.
With all the body panels removed from the front of the ATV
and the gas tank exposed, disconnect the pump wiring
harness.
6.
Relieve the fuel pressure at the fuel test valve.
7.
Loosen the fuel tank hose and pull the fuel line from
the tank. NOTE: A small amount of fuel may come
out of the fuel line or tank. Plug the fuel line and tank
inlet or use a shop towel during removal.
WARNING
Always wear safety equipment when working with
high pressure or flammable fluids. Failure to do so
could result in serious injury or complications.
WARNING
Wear safety equipment while performing this
procedure, failure to do so could result in serious
injuries.
Summary of Contents for Sportsman 800 EFI
Page 4: ...NOTES ...
Page 18: ...NOTES GENERAL INFORMATION 1 14 ...
Page 25: ...2 7 MAINTENANCE 2 LUBRICATION FLUIDS SPORTSMAN Component Locations Sportsman Only Deluxe ...
Page 56: ...2 38 MAINTENANCE Maintenance Schedule Service Date Hours Miles Service Performed Serviced By ...
Page 116: ...NOTES ENGINE 3 60 ...
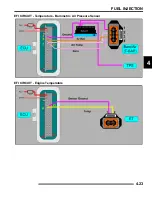
Page 137: ...4 21 FUEL INJECTION 4 EFI CIRCUIT Power On EFI CIRCUIT Crank Position Sensor ...
Page 138: ...4 22 FUEL INJECTION EFI CIRCUIT Fuel Pump EFI CIRCUIT Throttle Position Sensor ...
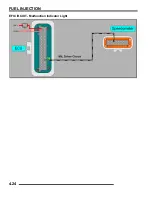
Page 140: ...4 24 FUEL INJECTION EFI CIRCUIT Malfunction Indicator Light ...
Page 167: ...5 27 BODY STEERING SUSPENSION 5 X2 CARGO BOX Exploded View ...
Page 170: ...5 30 BODY STEERING SUSPENSION X2 SEAT ASSEMBLY Exploded Views ...
Page 174: ...NOTES BODY STEERING SUSPENSION 5 34 ...
Page 206: ...NOTES CLUTCH SYSTEM 6 32 ...
Page 244: ...7 38 FINAL DRIVE Rear Gearcase Exploded View ...
Page 245: ...TRANSMISSION 8 1 CHAPTER 8 TRANSMISSION 8 SPORTSMAN 8 3 8 18 SPORTSMAN X2 8 19 8 38 ...
Page 246: ...NOTES TRANSMISSION 8 2 ...
Page 248: ...8 4 SPORTSMAN TRANSMISSION TRANSMISSION EXPLODED VIEW Sportsman Transmission ...
Page 265: ...8 21 X2 Touring Transmission 8 242 262 262 262 262 262 ...
Page 266: ...8 22 X2 Touring Transmission Mounting Exploded View x2 x3 x4 x4 x2 x1 x1 x1 ...
Page 312: ...NOTES BRAKES 9 30 ...
Page 322: ...10 10 ELECTRICAL SPEEDOMETER TROUBLESHOOTING Test 1 No All Wheel Drive ...
Page 323: ...10 11 ELECTRICAL 10 TEST 2 No Display TEST 3 No Reverse Speed Limit ...
Page 324: ...10 12 ELECTRICAL TEST 4 No AWD Hub Safety Limiter ...
Page 325: ...10 13 ELECTRICAL 10 TEST 5 Reverse Speed Limiter TEST 6 Speed Sensor ...
Page 326: ...10 14 ELECTRICAL TEST 7 No Fuel Gauge TEST 8 Transmission Switch ...
Page 357: ...10 45 ELECTRICAL 10 BASIC WINCH WIRING PRE WIRED MODELS ...
Page 367: ...10 55 ELECTRICAL 10 Cooling Fan EFI Fuel Pump EFI ...
Page 368: ...10 56 ELECTRICAL Gear Switch EFI Power Circuit EFI ...
Page 369: ...10 57 ELECTRICAL 10 Reverse Override EFI Fan Control EFI ...
Page 370: ...10 58 ELECTRICAL Start Circuit EFI Start Enable EFI ...
Page 373: ...11 3 800 TOURING EFI INTERNATIONAL 11 Exploded View Foot Brake Supply Hand Brake Supply ...
Page 376: ...NOTES 800 TOURING EFI INTERNATIONAL 11 6 ...
Page 382: ...IX 6 Intentional Blank Page ...
Page 383: ...WD 1 WIRE DIAGRAM 2008 SPORTSMAN 800 EFI WIRE DIAGRAM ...
Page 384: ...WD 2 WIRE DIAGRAM ...
Page 385: ...WD 3 WIRE DIAGRAM 2008 SPORTSMAN 700 X2 800 TOURING EFI WIRE DIAGRAM ...
Page 386: ...WD 4 WIRE DIAGRAM ...
Page 387: ...WD 5 WIRE DIAGRAM 2008 SPORTSMAN 800 TOURING EFI INTERNATIONAL WIRE DIAGRAM ...
Page 388: ...WD 6 WIRE DIAGRAM ...


