background image

64

Polaroid PDC 5355 Digital Camera User Guide

www.polaroid-digital.com

65

Polaroid PDC 5355 Digital Camera User Guide
www.polaroid-digital.com

• Software Included with Your Camera

PDC 5355 Camera Driver 

Plug & Play removable disk

Easy to use, just plug the camera to a computer and use it as a 

removable disk. Use the ArcSoft® PhotoImpression™ 5.0 to edit and 

print the Pictures.

ArcSoft PhotoImpression™ 5.0 

Picture Editing Software

ArcSoft PhotoImpression™ is an easy to use image-editing program. 

This program enables users to upload still image and movie clips stored 

in your camera. You could also edit and retouch your photos, then add 

special effects or place them in cards, calendars, frames and fantasy 

templates. ArcSoft PhotoImpression™ also includes a wide variety of 

printing options.

Adobe® Acrobat® Reader 

.PDF File Reading Software

Adobe® Acrobat® Reader lets you view and print Adobe Portable 

Document format (PDF) files on all major computer platforms, as well 

as fill in and submit Adobe PDF forms online.

Summary of Contents for PDC 5355

Page 1: ...www polaroid digital com PDC 5355 Value Added Kit of Digital Camera User Guide ...
Page 2: ...oom lens PDC 5355 Front View 1 Capture Playback mode button 2 Power LED 3 Flash charging LED 4 Viewfinder 5 Auto focus LED 6 LCD screen 7 Display button 8 Menu button Back View OK M W T 9 OK button 10 Cover for USB port 11 USB port 12 Wide zoom Thumbnail button 13 Tele zoom button 14 Buzzer 15 Flash Up button 16 Right button 17 Self timer Down button 18 Macro Left button ...

Page 3: ...3 Polaroid PDC 5355 Digital Camera User Guide www polaroid digital com 1 Power button 2 Shutter button 3 Battery SD card door 4 Tripod mount Bottom View 3 4 2 Top View 1 ...

Page 4: ...Menu 17 Setting the Current Date and Time 18 Auto Power Save Settings 19 Setting the Beep Sound On Off 20 Setting Frequency 20 Setting Display Language 21 Setting the Date Stamp On and Off 21 Resetting to Default Settings 22 Formatting the Internal Memory 23 Turning the Information Display and LCD Screen On Off 24 3 Taking Pictures 25 Taking a Picture 25 Taking Macro Pictures 27 Taking a Picture w...

Page 5: ...s or Video Clip s 44 Deleting Picture s and Video Clips 45 6 Print Setting 47 About PictBridge 47 DPOF Digital Print Order Format 54 7 Using the SD Secure Digital Card 57 Using the SD Card 57 To Copy Pictures and Video Clips from Internal Memory to a Memory Card 60 8 Installing the Software Onto a Computer 62 Installing the Software 62 Software Included with Your Camera 64 Computer System Requirem...

Page 6: ...ooting 70 11 Getting Help 73 Polaroid digital Online Services 73 ArcSoft Software Help 73 12 Appendix 74 Technical Specifications 74 Storage Capacities 76 Uninstalling Polaroid PDC 5355 driver PC Only 79 Camera Default Settings 80 Using Your Batteries 81 Tips Your Safety Maintenance 82 Regulatory Information 82 ...

Page 7: ... simplicity and sound optical performance Other important information about the PDC 5355 digital camera that you may find interesting is A high quality glass lens system for sharp image shooting from 3 9 inches to infinity with 12 zoom positions Selectable image size and quality settings for emailing and printing Auto focus macro mode 3X optical zoom and manual mode Built in flash with four modes ...

Page 8: ...5 Hand Strap PDC 5355 USB Cable 2 x AA size 4 x AAA size Rechargeable Batteries Registration Card Digital Imaging Products 201 Burlington Road Bedford MA 01730 1434 PDC 5355 CD ROM includes Polaroid PDC 5355 Camera Driver PC Arcsoft PhotoImpression 5 0 PC Mac Adobe Acrobat Reader PC Mac User Guide in PDF format Quick Guide Clearing Cloth Screen Protector for LCD Screen Pouch Photo Album Charger CD...

Page 9: ... Ni MH batteries Its portable design is convenient for travel and business trip The charger has two kinds of slots the upper one for AA batteries and the lower one for AAA batteries After purchase and before use charge the batteries for 14 hours and 3 11 hours for subsequent chargings Subject to the type of batteries see page 11 for details Charge LED for Back Battery Slot Charge LED for Front Bat...

Page 10: ...0mA AA 4 x 1 2V 85mA AAA Install the batteries 1 Press the negative polarity end of the battery down onto the spring 2 Push the positive polarity end of the battery down into the slot 3 Ensure the signs are strictly followed Removing the batteries 1 Push the negative polarity end of the battery towards the spring 2 Pull the positive polarity end of battery upwards and out of the battery slot ...

Page 11: ... charging and discharging are required to optimize the batteries performance If batteries are stored for a long period such as over one week always charge them before use Do not short circuit batteries Never charge other types of batteries such as alkaline rechargeable alkaline etc which may cause leakage or burst causing personal injury and damage For indoors use only do not expose the charger to...

Page 12: ...igns correctly 3 Close the battery door by pressing it downwards and then sliding it towards the camera to lock Turning the Camera On and Off and Setting the Current Date and Time Fully press the Power button until the LCD screen is on The Power LED lights up and remains on while the camera is powered on Press the Power button again to turn off the camera PDC 5355 The first time the camera is turn...

Page 13: ...ry power is exhausted NOTE The Power LED will blink when battery power is low Please replace the batteries How to Navigate Menus Menus are used to adjust capture and play settings as well as other camera settings like the Date Time and Auto Power Off OK M W T M 1 Press the M button to enter a menu bar and press it again to exit 2 Press the or button to select a menu item DRIVE MODE STILL VIDEO 3 P...

Page 14: ...l Zoom Status Number of remaining pictures White Balance Auto Daylight Cloudy Tungsten Fluorescent Battery Level Full Adequate Low Exhausted ISO Sensitivity Auto ISO 100 ISO 200 ISO 400 Flash Off Auto Flash Red eye reduction Forced On Flash Mode Optical and digital zoom status bar Capture Mode Still Image Video Quality High Normal Low 2592x 1944 7 Image Resolution 2592 X 1944 2304 X 1728 2048 X 15...

Page 15: ...40 x 480 320 x 240 Resolution Video Mode Recording time counter White Balance for Video clips Auto Daylight Cloudy Tungsten Fluorescent Recording Indicator Default Setting Playback Mode Play Pause 2592 x 1944 0003 0003 02 02 05 09 14 Locked File Date Time File Type Folder Number File Number Picture Video Clip ...

Page 16: ...e mode Under this mode you can select the image and video settings according to the shooting environment and take pictures and video clips under the settings you have selected For more details please refer to Taking Pictures on page 25 and Recording Video Clips on page 37 Playback mode This mode allows the playback or deletion of pictures and video clips from the camera For more details please ref...

Page 17: ...button to select DRIVE MODE 4 Press the or button to select the desired setting 5 Press the OK button 2592 x 1944 0010 NOTE Still Image mode is the default capture mode This setting is also available in Video mode DRIVE MODE STILL VIDEO Setup Menu Setup menu can be accessed in both Still Image and Video modes Here we take Still Image mode for an example 1 Set the camera to Still Image mode 2 Press...

Page 18: ... select DATE FORMAT 6 Press the OK button DATE TIME DATE FORMAT DATE SETUP DATE FORMAT DD MM YY MM DD YY YY MM DD 7 Press the or button to select the desired setting 8 Press the OK button Setting the date and time 5 Press the or button to select DATE SETUP 6 Press the OK button DATE TIME DATE FORMAT DATE SETUP 7 Press the or button to adjust the value 8 Press the or button to switch to the next fi...

Page 19: ...up menu 3 Press the or button to select AUTO OFF 4 Press the OK button SETUP FORMAT DATE TIME AUTO OFF BEEP 6 Press the or button to select the desired setting 7 Press the OK button AUTO OFF OFF 1 MIN 3 MIN 5 MIN NOTE Auto power off is automatically disabled under any one of the following conditions While an auto play is undergoing While the camera s USB port is connected to a computer or other ex...

Page 20: ... button to select the desired setting 6 Press the OK button BEEP ON OFF NOTE This setting is also available in Video mode Setting Frequency In order to take a better indoor picture the camera needs to be set to suit the correct lighting frequency Set the frequency to 60Hz for US and 50Hz for Europe 1 Set the camera to Still Image mode 2 Access the Setup menu 3 Press the or button to select FREQUEN...

Page 21: ... This setting is also available in Video mode LANGUAGE ENGLISH DEUTSCH FRANÇAIS ESPAÑOL Setting the Date Stamp On and Off Use the Date Stamp to imprint the date on your pictures Make sure the camera clock is set to the correct date before setting the date stamp on 1 Set the camera to Still Image mode 2 Access the Setup menu 3 Press the or button to select DATE STAMP 4 Press the OK button SETUP BEE...

Page 22: ...ing steps Please refer to Camera Default Settings on page 80 for more details 1 Set the camera to Still Image mode 2 Access the Setup menu 3 Press the or button to select DEFAULT SETTING SETUP FREQUENCY LANGUAGE DATE STAMP DEFAULT SETTING 4 Press the OK button 5 Press the or button to select YES 6 Press the OK button NOTE This setting is also available in Video mode RETURN TO DEFAULT SETTING NO YE...

Page 23: ...he OK button SETUP FORMAT DATE TIME AUTO OFF BEEP REALLY WANT TO FORMAT FORMAT CANCEL NOTE Data deleted by a format operation cannot be recovered Make sure you do not have any useful data currently stored in the internal memory before you format it Formatting the internal memory destroys all the pictures even those are protected With a memory card inserted the above operation would format the inse...

Page 24: ...the LCD screen to the next display mode in the following sequence NOTE The LCD screen automatically goes to hibernation after one minute of inactivity Press any button except the Power button to re activate the LCD screen OK M W T Capture Mode Press Press Press Press 2592 X 1944 0005 2592 X 1944 0005 Playback Mode Press Press Press 2592 X 1944 0005 2592 X 1944 0005 ...

Page 25: ...ght that may cause sun spots in pictures Always make sure that the sun or other light source is in front of the subject Taking a Picture Taking pictures at approximately 2 feet to infinity 0 6 metre to infinity 1 Turn on the camera 2 Set the camera to Still Image mode 3 Frame your subject using the LCD screen or the viewfinder 4 Press the shutter button halfway to set the exposure and focus The ca...

Page 26: ...he scene and press the shutter button halfway to reset the focus Focus Mark 5 Press the shutter button completely down to take a picture while holding the camera steady A beep will sound if the Beep sound is turned on when a picture is taken Auto Focus LED Operation When you see this Auto Focus LED blinks Auto Focus LED remains steady on It means this There is difficulty in focusing the subject Th...

Page 27: ... 1 Turn on the camera 2 Set the camera to Still Image mode 3 Press the Macro button to activate the Macro mode The image displayed on the LCD screen will change accordingly NOTE The icon will appear on the LCD screen indicating the Macro mode is activated Pressing the Macro button again will disable the Macro mode OK M W T 4 Capture procedures are the same as for taking a picture in the normal cap...

Page 28: ...finder instead Setting Flash Mode 1 Turn on the camera 2 Set the camera to Still Image mode 3 Press the Flash button to cycle through the flash settings and select the one you need 2592 x 1944 7 Flash Mode OK M W T When you press the Flash button the icon according to the flash setting you selected will appear on the LCD screen You can now take pictures using the flash mode you selected The flash ...

Page 29: ... environment is not enough when using this setting your pictures will be too dark Auto Flash Mode The flash fires automatically as needed Use this setting to take most pictures Red eye Reduction Mode Use this setting to avoid red glare in your subject s eyes The camera fires a brief preflash flash before the regular flash Forced On Mode The flash fires for every picture Use this setting in high co...

Page 30: ... of ten seconds NOTE Press the Self timer button again to disable the self timer function and the SELF TIMER OFF indicator will be shown on the LCD screen for a while OK M W T 2592 x 1944 7 Self time On 5 Capture procedures are the same as for taking a picture in the normal capture mode Please see Taking a Picture on page 25 6 Press the shutter button to take a picture The camera beeps if the beep...

Page 31: ...oom in the central area of an image and photograph only the enlarged portion of the picture 1 Turn on the camera 2 Set the camera to Still Image mode 3 Press the Tele Zoom or Wide Zoom button to zoom in or zoom out the subject image Keep pressing the Tele Zoom button and the camera switches from optical zoom to digital zoom when it reaches the maximum optical zoom OK M W T W T 4 Now you can takes ...

Page 32: ...on refers to the number of pixels in a digital picture Picture quality depends on the JPEG file compression that the camera applies when the picture is taken Higher resolution and less compression produces better quality but occupies more memory space Smaller size pictures and normal quality are easier to email while larger size and fine quality are better for printing Image Size Setting 1 Set the...

Page 33: ...Guide www polaroid digital com Quality Setting 1 Set the camera to Still Image mode 2 Press the M button 3 Press the or button to select QUALITY 4 Press the or button to select the desired setting 5 Press the OK button QUALITY HIGH NORMAL LOW ...

Page 34: ...hting a dark background etc 1 Set the camera to Still Image mode 2 Press the M button 3 Press the or button to select EXPOSURE 4 Press the or button to select the desired setting 5 Press the OK button EXPOSURE AUTO NOTE A higher EV value is best used for light coloured subjects and backlit subjects A lower EV value is best for dark coloured subjects and for shooting outdoors on a clear day When sh...

Page 35: ...e of lighting that is available 1 Set the camera to Still Image mode 2 Press the M button 4 Press the or button to select WHITE BALANCE 5 Press the or button to select the desired setting 6 Press the OK button WHITE BALANCE AUTO DAY LIGHT CLOUDY TUNGSTEN When shooting under these conditions Select this setting Automatic adjustment Outdoor daylight Cloudy Indoors illuminated by tungsten lighting In...

Page 36: ...digital camera higher ISO value allows higher shutter speed at the expense of mottled or grain appearing in the final picture 1 Set the camera to Still Image mode 2 Press the M button 3 Press the or button to select ISO 4 Press the or button to select the desired setting 5 Press the OK button ISO AUTO 100 200 400 AUTO The camera s sensitivity is automatically detected by different lighting value o...

Page 37: ... on page 17 Recording Video Clips Use the Video mode to record video clips with audio The recording time displayed on the LCD screen will decrease and the icon will blink while recording 1 Turn on the camera 2 Set the camera to Video mode 3 Frame your subject using the LCD screen 4 Press the shutter button completely down to start recording 5 Press the shutter button again to stop recording or rec...

Page 38: ...eo clip quality depends on the file resolution that the camera applies when the video clip is recorded Higher resolution makes better quality which occupies more memory space 1 Set the camera to Video mode 2 Press the M button 3 Press the or button to select IMAGE SIZE 4 Press the or button to select the desired setting 5 Press the OK button IMAGE SIZE 640 x 480 320 X 240 ...

Page 39: ...the type of lighting that is available 1 Set the camera to Video mode 2 Press the M button 3 Press the or button to select WHITE BALANCE 4 Press the or button to select the desired setting 5 Press the OK button WHITE BALANCE AUTO DAY LIGHT CLOUDY TUNGSTEN When shooting under these conditions Select this setting Automatic adjustment Outdoor daylight Cloudy Indoors illuminated by tungsten lighting I...

Page 40: ...ease see Camera Mode on page 16 Reviewing Pictures on the LCD Screen 1 Turn on the camera 2 Set the camera to Playback mode 3 Press the left or right button to view the pictures taken The icon is shown on the LCD screen when a picture is selected The currently displayed picture can be magnified up to 4 times using the Tele Zoom button You can move around the magnified picture using the left right ...

Page 41: ...wice and up to 9 picture and video clip files will be shown on the LCD screen at a time The latest reviewed picture will be highlighted OK M W T W T 4 Use the up down left and right buttons to select a thumbnail file and view it in full screen by pressing the Display button again Press Press Press 2592 X 1944 0005 2592 X 1944 0005 NOTE In the normal playback mode you can also view the thumbnail fi...

Page 42: ...on and make Auto Play direction and interval according to the following steps 1 Set the camera to Playback mode 2 Press the M button 3 Press the or button to select AUTO PLAY 4 Press the or button to select SETUP 5 Press the OK button AUTO PLAY ON SETUP Set Auto Play Direction 6 Press the or button to select DIRECTION 7 Press the OK button AUTO PLAY DIRECTION INTERVAL 8 Press the or button to sele...

Page 43: ...Perform steps 1 2 and 3 on page 42 4 Press the or button to select ON 5 Press the OK button AUTO PLAY ON SETUP The camera will automatically run from the first file or from the last file stored Every file will display for the specified period according to your interval setting You can press the left or right button to manually skip backward or forward You may press the OK button to pause or press ...

Page 44: ...creen when a video clip is selected Protect or Unprotect Picture s or Video Clip s 1 Set the camera to Playback mode 2 Press the M button 3 Press the or button to select PROTECT PROTECT LOCK THIS UNLOCK THIS LOCK ALL UNLOCK ALL 4 Press the or button to select the desired setting 5 Press the OK button 640 x 480 0004 0004 04 06 04 00 42 LOCK THIS Protect the selected picture or video clip UNLOCK THI...

Page 45: ...E To protect one picture or video clip or to remove protection from one picture or video clip use the or button to select the one you want to protect or unprotect before the above operation Deleting Picture s and Video Clip s 1 Set the camera to Playback mode 2 Press the M button 3 Press the or button to select ERASE 4 Press the or button to select the desired setting ERASE ERASE THIS ERASE ALL ...

Page 46: ... setting 7 Press the OK button ERASE ERASE ALL You can cancel the deletion by choosing NO NOTE To delete one picture or video clip use the or button to select the one you want to delete before the above operation Protected files can not be deleted Remove protection before deleting All deleted picture and video clips can not be recovered ...

Page 47: ...e sure battery level is full before printing Refer to the user guide that comes with your printer and make preparations paper ink cassette cartridge etc as required Turn on the camera and the printer 2 Selecting PictBridge mode Set the camera to Playback mode and select the PictBridge mode Refer to page 48 for details 3 Connecting the camera to the printer Refer to Camera Printer Connection on pag...

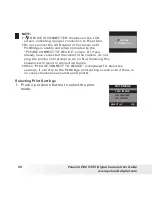
Page 48: ...RORS CANCEL CONTINUE NOTE Please refer to the printer s user guide for the solutions Printing may resume once the problem is solved Printing operation may still fail with some errors even if you press the OK button after selecting CONTINUE In that case select CANCEL and press the OK button Selecting PictBridge Mode 1 Set the camera to Playback mode 2 Press the M button PRINT SETTING PICTBRIDGE DPO...

Page 49: ...era Printer Connection Connecting with the USB Cable OK M W T USB port To Printer 1 Plug Series A of the USB cable into the marked socket on your printer Location of USB socket will vary from printer to printer 2 Plug Series Mini B of the USB cable into the port on your camera ...

Page 50: ...CONNECT TO DEVICE screen Or if you already have connected the cable to the camera do not plug into printer until prompt to do so Not following this sequence will result in connection failure When PLEASE CONNECT TO DEVICE is displayed for about ten seconds it will skip to the PictBridge print setting screen even if there is no connection between camera and printer Selecting Print Settings 1 Press u...

Page 51: ...according to the specified settings NOTE To print a single image select the image before enabling PictBridge Print settings are configured for images only Make sure there are no video clips or other file besides images in the memory before printing otherwise an error will occur if trying to print using the ALL IMAGES or ALL INDEX option Not all printers will support all these print options Please ...

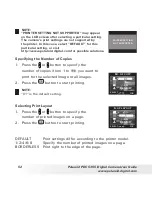
Page 52: ... the Number of Copies 1 Press the or button to specify the number of copies from 1 to 99 you want to print for the selected image or all images 2 Press the OK button to start printing NOTE 01 is the default setting NO OF COPY SELECT x OK 01 1 ON DEFAULT Selecting Print Layout 1 Press the or button to specify the number of printed images on a page 2 Press the OK button to start printing N UP LAYOUT...

Page 53: ...name Setting the Date Stamp On Off 1 Press the or button to select DEFAULT ON or OFF 2 Press the OK button to start printing DATE STAMPING SELECT x 01 1 ON DEFAULT OK DEFAULT Print settings differ according to the printer model ON Add the date stamp to the printed image OFF Print without the date stamp Selecting Paper Size 1 Press the or button to select the paper size The following paper sizes ar...

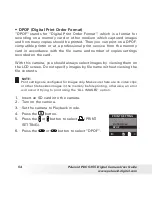
Page 54: ...s settings recorded on the card With this camera you should always select images by viewing them on the LCD screen Do not specify images by file name without viewing the file contents NOTE Print settings are configured for images only Make sure there are no video clips or other file besides images in the memory before printing otherwise an error will occur if trying to print using the ALL IMAGES o...

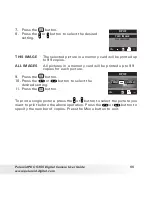
Page 55: ...e printed up to 99 copies ALL IMAGES All pictures in a memory card will be printed up to 99 copies for each picture 9 Press the OK button 10 Press the or button to select the desired setting 11 Press the OK button DPOF PRINT 01 COPIES To print a single picture press the or button to select the picture you want to print before the above operation Press the or button to specify the number of copies ...

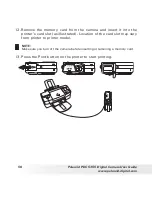
Page 56: ...mory card from the camera and insert it into the printer s card slot as illustrated Location of the card slot may vary from printer to printer model NOTE Make sure you turn off the camera before inserting or removing a memory card 13 Press the Print button on the printer to start printing ...

Page 57: ...ns 1 Use only an SD memory card with this camera 2 Electrostatic charge electrical noise and other phenomena can cause data corruption or even loss Always make sure that you always back up important data on other media MO disc computer hard drive etc 3 If a memory card starts to behave abnormally you can restore normal operation by reformatting it However we recommend that you always take along mo...

Page 58: ...ard recorded by other cameras may conflict with the PDC 5355 camera and valuable data in your existing SD card may be distorted or lost when the card is inserted in the PDC 5355 camera We strongly recommend the user to use a NEW or formatted SD card for the PDC 5355 camera The manufacturer is not liable for losing or corrupting any valuable data or files in your SD card due to your improper operat...

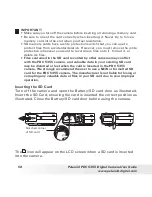
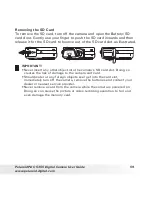
Page 59: ... slot as illustrated IMPORTANT Never insert any other object into the camera s SD card slot Doing so creates the risk of damage to the camera and card Should water or any foreign objects ever get into the card slot immediately turn off the camera remove the batteries and contact your dealer or nearest service provider Never remove a card from the camera while the camera is powered on Doing so can ...

Page 60: ...Procedures are the same as for formatting the internal memory Refer to Formatting the Internal Memory on page 23 for details IMPORTANT You can format a memory card on the camera or on a computer However formatting a memory card on a computer takes much longer Note that data deleted by a format operation cannot be recovered Make sure you do not have any useful data currently stored on a memory card...

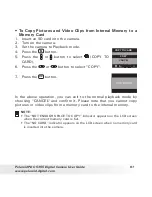
Page 61: ... TO CARD 6 Press the or button to select COPY COPY TO CARD CANCEL COPY 7 Press the OK button In the above operation you can exit to the normal playback mode by choosing CANCEL and confirm it Please note that you cannot copy pictures or video clips from a memory card to the internal memory NOTE The NOT ENOUGH SPACE TO COPY indicator appears on the LCD screen when the current memory card is full The...

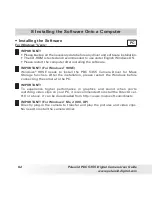
Page 62: ...are IMPORTANT For Windows 98SE Windows 98SE needs to install the PDC 5355 Camera Driver for Mass Storage function After the installation please restart the Windows before connecting the camera to the PC IMPORTANT To experience higher performance in graphics and sound when you re watching video clips on your PC it is recommended to install the DirectX ver 9 0 or above It can be downloaded from http...

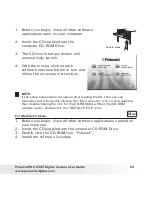
Page 63: ...ow the on screen instructions Open Close NOTE If the setup screen does not appear after loading the CD then you can manually start it by double clicking the My Computer icon on your desktop then double clicking the icon for the CD ROM drive When the CD ROM window opens double click the INSTALL E EXE icon For Macintosh Users Mac 1 Before you begin close all other software applications opened on you...

Page 64: ...hotoImpression is an easy to use image editing program This program enables users to upload still image and movie clips stored in your camera You could also edit and retouch your photos then add special effects or place them in cards calendars frames and fantasy templates ArcSoft PhotoImpression also includes a wide variety of printing options Adobe Acrobat Reader PDF File Reading Software Adobe A...

Page 65: ...um III 450MHz or equivalent processor 128MB RAM 512MB recommended USB Port DirectX 9 0 or higher 500MB free disk space Colour monitor with high colour 16 bit graphic capability or higher CD ROM drive Standard mouse and keyboard Stereo speakers For Macintosh Users Mac PowerPC Processor Mac OS Version 9 2 X USB Port 96MB RAM 128MB recommended 400MB Free disk space Colour monitor with high colour 16 ...

Page 66: ...HE ENCLOSED CD PLEASE REFER TO 8 Installing the Software Onto a Computer Connecting to Your Computer Connecting with the USB Cable OK M W T OK M 1 Turn on the camera 2 Plug Series A of the USB cable into the marked socket on your computer 3 Plug Series Mini B of the USB cable into the port on your camera 4 Turn on the camera and an interface New Hardware Found will show on the computer desktop 5 A...

Page 67: ...der of your choice You can also create sub folders to group them or use the ArcSoft software to edit and manage the pictures or video clips For Macintosh Users Mac NOTE For Mac user directly plug in the camera and no need to install the driver 1 Turn on the camera 2 Set the camera to Playback mode 3 Connect the camera to a computer via the USB cable the systems will automatically recognize the MAS...

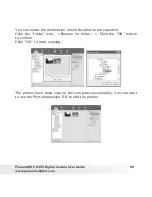
Page 68: ...otoImpression 5 0 will detect the connection between the camera and the computer automatically When connect the camera to the computer PhotoImpression 5 0 will launch on your desktop automatically PhotoImpression 5 0 will detect any new photos in the camera Click OK button to start the copying new photos to the computer ...

Page 69: ...u can select the destination which the photos are copied to Click the folder icon Browse for folder Click the OK button to confirm Click OK to start copying The photos have been copy to the computer successfully You can start to use the PhotoImpression 5 0 to edit the photos ...

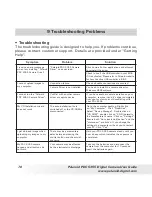
Page 70: ...s driver completely from your system to avoid conflicting with your PDC 5355 Camera Driver is not installed You need to install the camera driver for Windows 98SE systems My CD Installation wizard does not work The auto installation file is switched off or the CD ROM is disconnected Go to the computer desktop Right click on My Computer Click Properties Select Device Manager Double click on CD_ROM ...

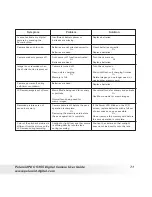
Page 71: ...use another memory card Camera powers off during self timer countdown Batteries are dead Replace batteries LCD screen image is out of focus Macro Mode being used for scenery or portraits Or Normal focus being used for macro images Use normal focus for scenery and portraits Or Use Macro mode for macro images Recorded pictures are not saved in memory Camera powers off before the save operation is co...

Page 72: ... disk is not created The removable disk crashes with the network drives Disconnect the crashed network drive and reserve this drive letter for the camera There is no response from the camera while pressing any buttons The LCD screen is frozen or the camera is hanged Remove and re install the battery or batteries to reset the camera Your valuable data stored in the camera will not be lost An error ...

Page 73: ...x 1 510 440 7978 E mail support arcsoftsupport com Web http www arcsoft com en support For Europe For China ArcSoft Europe Support Centre ArcSoft China Support Centre Ireland Hangzhou Tel 353 0 61 702087 Tel 86 571 88210575 Fax 353 0 61 702001 E mail support arcsoft com cn E mail eurosupport arcsoft com Web http www arcsoft com cn new support For Japan For Taiwan ArcSoft Japan Support Centre Tokyo...

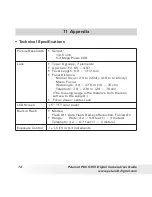
Page 74: ...Focal Distance Normal Focus 2 ft to infinity 0 6 m to infinity Macro Focus Wide angle 3 9 27 6 in 10 70 cm Telephoto 7 9 27 6 in 20 70 cm The focusing range is the distance from the lens surface to the subject Focus Zones center zone LCD Screen 1 5 TFT color panel Built in Flash Modes Flash Off Auto Flash Red eye Reduction Forced On Range Wide 3 2 9 8 feet 1 3 meters Telephoto 3 2 6 7 feet 1 2 met...

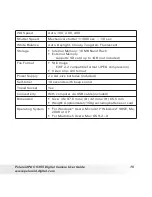
Page 75: ...D card up to 1GB not included File Format Still Image EXIF 2 2 compatible format JPEG compression Video Clip AVI format Power Supply 2 x AA size batteries included Self timer 10 seconds with beep sound Tripod Socket Yes Connectivity With computer via USB cable included Dimension Size W 97 6 mm x D 32 mm x H 65 5 mm Weight Approximately 150g excluding batteries or card Operating System For Windows ...

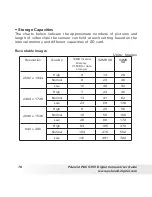
Page 76: ... setting based on the internal memory and different capacities of SD card Recordable Images Units Images Resolution Quality 16MB Internal Memory 11MB for data storage 32MB SD 64MB SD 2592 x 1944 High 4 14 28 Normal 8 23 46 Low 15 46 92 2304 x 1728 High 7 23 46 Normal 13 41 82 Low 23 69 138 2048 x 1536 High 9 29 58 Normal 16 50 100 Low 28 86 172 640 x 480 High 63 185 370 Normal 104 276 552 Low 141 ...

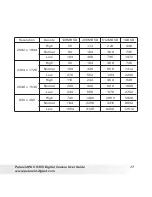
Page 77: ...B SD 2592 x 1944 High 56 112 224 448 Normal 92 184 368 736 Low 184 368 736 1472 2304 x 1728 High 92 184 368 736 Normal 164 328 656 1312 Low 276 552 1104 2208 2048 x 1536 High 116 232 464 928 Normal 200 400 800 1600 Low 344 688 1376 2752 640 x 480 High 740 1480 2960 5920 Normal 1104 2208 4416 8832 Low 1564 3128 6256 12512 ...

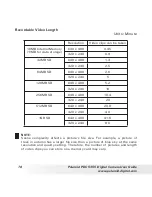
Page 78: ... SD 640 x 480 2 6 320 x 240 5 128MB SD 640 x 480 5 2 320 x 240 10 256MB SD 640 x 480 10 4 320 x 240 20 512MB SD 640 x 480 20 8 320 x 240 40 1GB SD 640 x 480 41 6 320 x 240 80 NOTE Scene complexity affects a picture s file size For example a picture of trees in autumn has a larger file size than a picture of blue sky at the same resolution and quality setting Therefore the number of pictures and le...

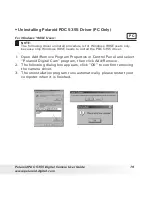
Page 79: ...e is for Windows 98SE users only because only Windows 98SE needs to install the PDC 5355 driver 1 Open Add Remove Program Properties in Control Panel and select Polaroid Digital Cam program then click Add Remove 2 The following dialog box appears click OK to confirm removing the camera driver 3 The uninstallation program runs automatically please restart your computer when it is finished ...

Page 80: ...de Setup Mode Description Image Resolution Quality Exposure Compensation White Balance for Pictures ISO Sensitivity Flash Mode Video Resolution White Balance for Video Clips Date Format Auto Power Off Beep Frequency Language Date Stamp Default 2592 x 1944 High Auto Auto Auto Auto Flash 640 x 480 Auto DD MM YY Off On 50 Hz English Off ...

Page 81: ...o take pictures Use the optical viewfinder to frame pictures Excessive use of the flash WARNING Batteries should be replaced by an adult Do not mix different types of batteries or new and used batteries Use recommended or equivalent type of batteries only Insert the batteries in the correct polarity Remove exhausted batteries from the camera immediately Do not short the supply terminals Do not dis...

Page 82: ... it ALWAYS remove dust or stains with a soft cloth dampened with water or neutral detergent NEVER place hot items on the surface of the Camera NEVER attempt to open or disassemble Camera as this will affect any warranty claim Regulatory Information FCC Notice This device complies with Part 15 of FCC Rules Operation is subject to the following two conditions 1 This device may not cause harmful inte...

Page 83: ... will not occur in a particular installation If this equipment does cause harmful interference to radio or television reception which can be determined by turning the equipment off and on the user is encouraged to try to correct the interference by one or more of the following measures Reorient or relocate the receiving antenna Increase the separation between the equipment and receiver Connect the...

Page 84: ...US 0505 Part No OM3365US001 ...

Reviews: