background image

Instruction Manual

Manual

Connecting A/V Equipment (continued)

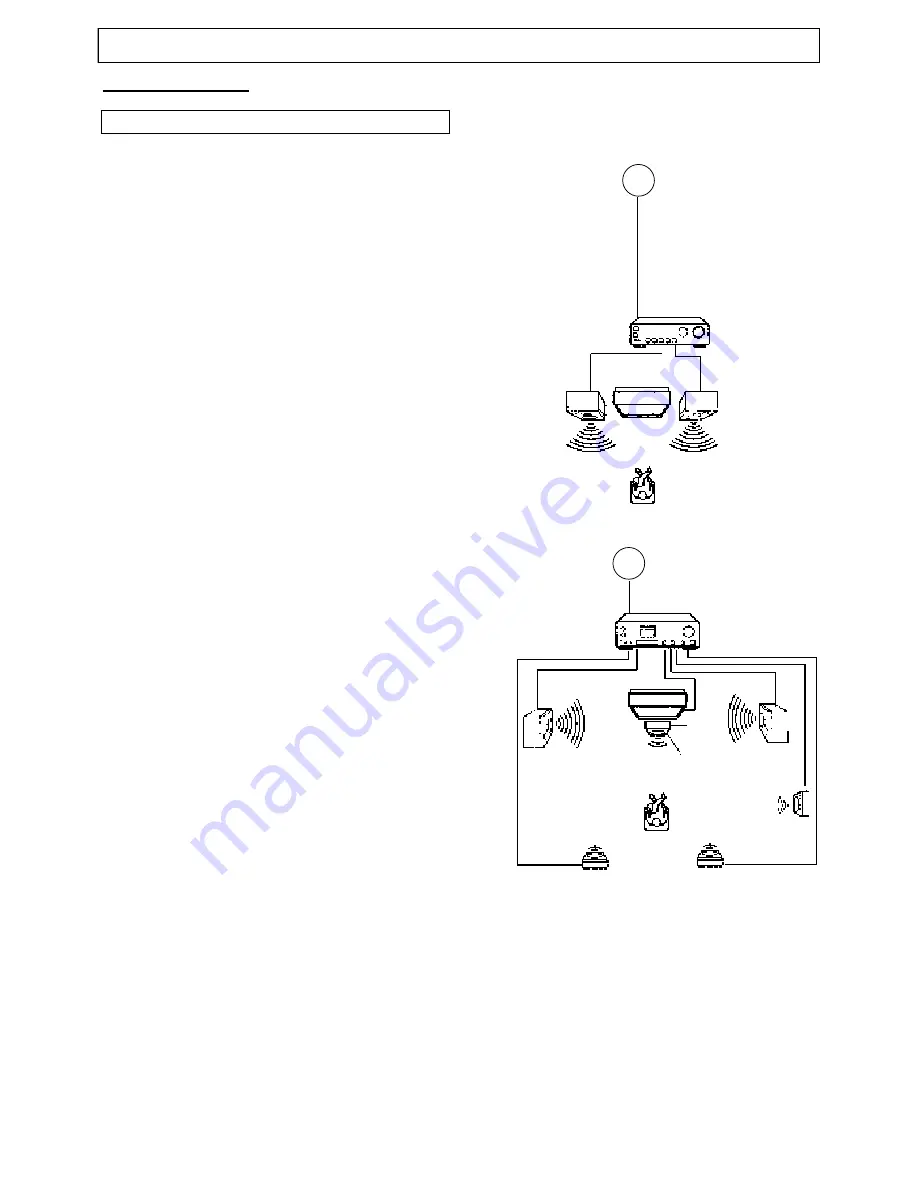
Enjoying Digital Stereo Sound (Digital Stereo)

Enjoy the dynamic sound of Digital Stereo by connecting
an amplifier equipped with a digital audio input and speaker
system (right and left front speakers).
Set "SPDIF Output" to "SPDIF/PCM" via the setup menu.

Enjoy DTS 

DTS programming can deliver surround sound with five
discrete full range channels plus a sixth channel for a
subwoofer. You can enjoy your unit with a DTS Digital
Surround Sound System. All you need is to connect your
unit to a DTS receiver with an external decoder.

How to setup the sound output:

From the "General Setup Page" display, set "SPDIF
Output" to "SPDIF/RAW".

This product incorporates copyright protection technology
that is protected by method claims of certain U.S. patents
and other intellectual property rights owned by Macrovision
Corporation and other rights owners. Use of this copyright
protection technology must be authorized by Macrovision
Corporation, and is intended for home and other limited
viewing uses only unless otherwise authorized by
Macrovision Corporation. Reverse engineering or
disassembly is prohibited.

It is forbidden by law to copy, broadcast, show, play in
public, or rent copyrighted material without permission.
DVD video discs are copy protected, and any recordings
made from these discs will be distorted.

Notes:

(1) Do not connect the PCM/BITSTREAM jack of the

unit to the AC-3 RF input of a Dolby Digital receiver.
Instead, connect to the "DIGITAL" or "COAXIAL"
input of a Dolby Digital/DTS receiver or Processor.
The input of the AV receiver is not compatible with
the PCM/BITSTREAM  jack and is primarily for
Laserdiscs only. 

(2) Connect the PCM/BITSTREAM jack of unit to the

"DIGITAL" or "COAXIAL" input of a DTS receiver or
Processor.  

(3) Refer to the ma n u a l   o f   t h e   c o n n e c t e d

Equipment.

(4) Adjus t   t h e   volume of your receiver to a

comfortable listening level to avoid any speaker
damage.

INSTALLATION (continued)

To PCM/BITSTREAM

Coaxial cable
(Optional)

To digital
audio input

Amplifier equipped
with digital audio input

Front

speaker

(right)

Front

speaker

(left)

Connection
Example

To PCM/BITSTREAM
(Optional)

COAXIAL

10

COAXIAL

Summary of Contents for TBX-2000AF

Page 1: ...20 TV DVD VCR Combo TBX 2000AF Instruction Manual...

Page 2: ...n the picture tube or projection TV picture tubes ALSO some network program logos phone numbers etc may cause similar damage This damage is not covered by your warranty Cable TV Installer This reminde...

Page 3: ...ed 15 Warning This unit should only be serviced by an authorized and properly trained technician Opening the cover or other attempts by the user to service this unit may result in serious injury or de...

Page 4: ...cannot wipe off the dirt off wipe the disc lightly with a slightly moistened soft cloth and finish with a dry cloth Do not use any of solvent such as paint thinner benzine commercially available clean...

Page 5: ...Tuner Menu 12 TV Timer Menu 12 General Menu 12 Useful Remote Control Features 14 DVD FUNTIONS Playing Back a Disc 15 Using the On Screen Display 16 Locating a Specific Title Chapter or Track 17 Playi...

Page 6: ...d sharpness AV Input Rear Standard composite input designed for use with A V devices such as a DVD player AV Output Rear Output signals from TV to devices such as VCR s RF IN Jack Standard coaxial ant...

Page 7: ...10 1112 13 14 15 161718 19 20 1 AV IN1 JACK 7 REC OTR 13 VOLUME DOWN UP 2 VCR DECK 8 TIMER REC INDICATOR 14 CHANNEL DOWN UP 3 STOP EJECT 9 REC OTR INDICATOR 15 DISC TRAY 4 PLAY PAUSE 10 POWER INDICAT...

Page 8: ...tep To makepictureadvanceframe by frame in the Still mode To pause during recording 13 SPEED To select speed of tape 14 OTR One touch record 15 PLAY PAUSE To play Play Pause Play Still 16 PREV VCRSEAR...

Page 9: ...de 2 Current channel has no signal 3 No key is pressed within 15 minutes Notes 1 It is recommended that a 75 ohm coaxial cable be used in order to eliminate interference and noise which may occur due...

Page 10: ...RN OFF ALL POWER BEFORE CONNECTING DEVICES TOGETHER Connect VCR s RF OUT terminal to the RF IN jack located on the rear panel of the TV Coaxial Cable VCR AUDIO VIDEO OUT DVD Player Camcorder VCR AUDIO...

Page 11: ...ration and is intended for home and other limited viewing uses only unless otherwise authorized by Macrovision Corporation Reverse engineering or disassembly is prohibited It is forbidden by law to co...

Page 12: ...o enter a new channel Adjusting the Volume To adjust the volume press the VOL keys Muting the Volume To mute the volume press the MUTE key To restore the volume press MUTE again or press the VOL key B...

Page 13: ...me is activated Off Time This feature allows you to preset a time when the TV set will turn off Timer Timer can be set to Once or Always TV Timer Menu Language This feature allows you to pick a langua...

Page 14: ...ing Please note that blocking a lower rating for example PG will block all higher ratings PG 13 R NC 17 X Pass Code Menu This menu allows you to change the access code for the Parental Guide functions...

Page 15: ...to the channel you just left CC Pressing the CC key will activate the currently selected Closed Caption or Text under the System Menu Pressing it again will turn off the Closed Caption or Text VIDEO...

Page 16: ...to pause playback Press the PLAY PAUSE key during playback Press the PLAY PAUSE key to resume normal playback 5 How to remove the disc Press the OPEN CLOSE key Wait until the disc tray is completely o...

Page 17: ...ck from the location where you stopped playback Notes 1 The following actions will cancel the RESUME function Unplugging the unit after you stop playback Ejecting the disc 2 Depending on the disc you...

Page 18: ...te proceeding chapters or tracks When you press the PREV key the DVD player starts playback from the beginning of the proceeding chapter or track How to locate succeeding chapters or tracks When you p...

Page 19: ...y during some scenes THIS UNIT ALLOWS YOU TO SELECT FROM SEVERAL DIFFERENT ANGLES AND LANGUAGES ANGLE 1 ANGLE 2 Good evening Bonsoir Buenas tardes Selecting the camera angle Selecting a language 1 How...

Page 20: ...re four modes to transformation Invert Mirror Left and Right The arrow keys are used to select the different transformation modes UP lnvert Normal Down Mirror Normal Left Turn left Right Turn right 3...

Page 21: ...t scenes unsuitable for children and replace them with more suitable scenes or lock out playback of the disc all together 1 Press STOP twice during playback 2 Press DVD SET UP The SETUP MENU appears o...

Page 22: ...out notice You must press STOP twice to set up Preferences 21 General Setup Page TV Display PS Angle Mark On OSD Lang ENG SPDIF Output RAW Captions Off Screen Saver On Speaker Setup Page Downmix Norma...

Page 23: ...ch to DVD mode and press the PLAY PAUSE key to watch the DVD To record from DVD to videotape Press DVD key to switch output to DVD mode Insert the desired DVD disc You cannot record a DVD disc which i...

Page 24: ...ber After setting up please press ENTER Clock Set Set the current date and time with or Number keys For Date set follow the order of month day year for TIME set follow the order of hour minute in CLOC...

Page 25: ...pressing the key will make pictures advance frame by frame The still function will be released if there is no operation for 5 minutes The VCR will change to the STOP mode F ADV Frame advance Each tim...

Page 26: ...ng set up Refer to manual Black box appears on screen Closed Caption to Text feature may be active Remote control doesn t operate Batteries may be weak Replace batteries Check the batteries are instal...

Page 27: ...ou appeler le 1 866 289 5168 aux tats Unis et le 1 866 301 7922 au Canada Au Mexique appeler le 01 800 400 2443 Polaroid est une marque d pos e de Polaroid Corporation Waltham MA tats Unis et dont l...

Reviews: