background image

[2]

1

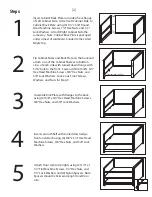
Insert Cabinet Back Plate in inside of rear flange 

of Left Cabinet Side.  Attach Left Cabinet Side to 

Cabinet Back Plate using (3) 1/4” x 5/8” Round 

Head Machine Screws, 1/4” Hex Nuts, and 1/4” 

Lock Washers.  Attach Right Cabinet Side the 

same way.  

Note: Cabinet Back Plate is packaged 

under a sheet of cardboard, banded to the crated 

Maple Top.

Tip Cabinet Sides and Back Plate on the back and 

attach  one of the Cabinet Shelves to bottom 

cross of each side with turned down flange with 

5/16” hole to the front.  Fasten with (4) 3/8” x 3/4” 

Hex Head Machine Screws, 3/8” Hex Nuts, and 

3/8” Lock Washers.  Leave out  Front Screws, 

Washers, and Nuts for Step 3.

2

Leave out Screws until Step 3.

3

Assemble Kick Plate with flanges to the back, 

using (2) 3/8” x 3/4” Hex Head Machine Screws, 

3/8” Hex Nuts, and 3/8” Lock Washers. 

4

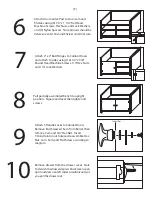
Insert second Shelf with turned down edge 

front and attach using (6) 3/8” x 3/4” Hex Head 

Machine Screws, 3/8” Hex Nuts, and 3/8” Lock 

Washers. 

5

Attach Door Jam to Uprights using (2) 1/4” x 1 

1/4” Flat Machine Screws, 1/4” Hex Nuts, and 

1/4” Lock Washers and (2) Nylon Spacers. 

Note: 

Spacers should be between Uprights and Door 

Jam.


Steps:

Summary of Contents for 163-530-34

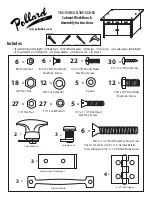
Page 1: ... x x 12 12 18 1 4 x 1 1 4 Flat Head Machine Screw 1 4 x 5 8 Round Head Machine Screw 1 4 Hex Nut 1 4 Lock Washer 3 8 x 2 1 2 Flat Head Machine Screw 12 3 4 Wood Screw 8 32 x 3 8 Flat Head Machine Screw 8 32 Hex Nut Spacer x 6 x 6 x 22 x 5 x 6 x 27 x 27 x 30 x 5 Note For163 530 35 6 3 8 x31 2 FlatHeadMachine Screwswillreplace 6 3 8 x21 2 FlatHeadMachineScrews Tools Needed wrench flat head screwdriv...

Page 2: ...h turned down flange with 5 16 hole to the front Fasten with 4 3 8 x 3 4 Hex Head Machine Screws 3 8 Hex Nuts and 3 8 Lock Washers Leave out Front Screws Washers and Nuts for Step 3 2 LeaveoutScrewsuntilStep3 3 Assemble Kick Plate with flanges to the back using 2 3 8 x 3 4 Hex Head Machine Screws 3 8 Hex Nuts and 3 8 Lock Washers 4 Insert second Shelf with turned down edge front and attach using 6...

Page 3: ...inetDoor Attach T Handle Locks to Cabinet Doors Remove End Screw w Sem from Barrel then remove Cam and 3 4 Hex Nut Insert T Handle into lock hole and reassemble Hex Nut Cam Sem and End Screw according to diagram 10 Remove drawer from the drawer cover Note To detach the drawer depress black lever up on right and down on left slides simultaneously as you pull the drawer out Attach 2 x 2 Butt Hinges ...

Page 4: ...ver remains 159 16 Note If interior drawer spacing is off gently bend sides of drawer cover to correct measurment 159 16 159 16 159 16 12 13 DrawerFront Attach Cylinder Locks to Drawer Fronts Remove End Screw Cam and 1 2 Hex Nut from Cylinder Insert Cylinder into lock hole and replace 1 2 Hex Nut Cam and End Screw according to diagram Then attach Drawer Handles to Drawer fronts using 6 8 32 x 3 8 ...

Reviews: