Vaporella Pro 5200 R
ENGLISH
II
II
M
M
M
M
P
P
P
P
O
O
O
O
R
R
R
R
T
T
T
T
A
A
A
A
N
N
N
N
T
T
T
T
Before leaving our factory all our products are rigorously tested. For this reason
your VAPORELLA, may contain a small quantity of remaining water in the tank.
P
P
P
P
R
R
R
R
E
E
E
E
P
P
P
P
A
A
A
A
R
R
R
R
A
A
A
A
T
T
T
T
II
II
O
O
O
O
N
N
N
N
F
F
F
F
O
O
O
O
R
R
R
R
U
U
U
U
S
S
S
S
E
E
E
E
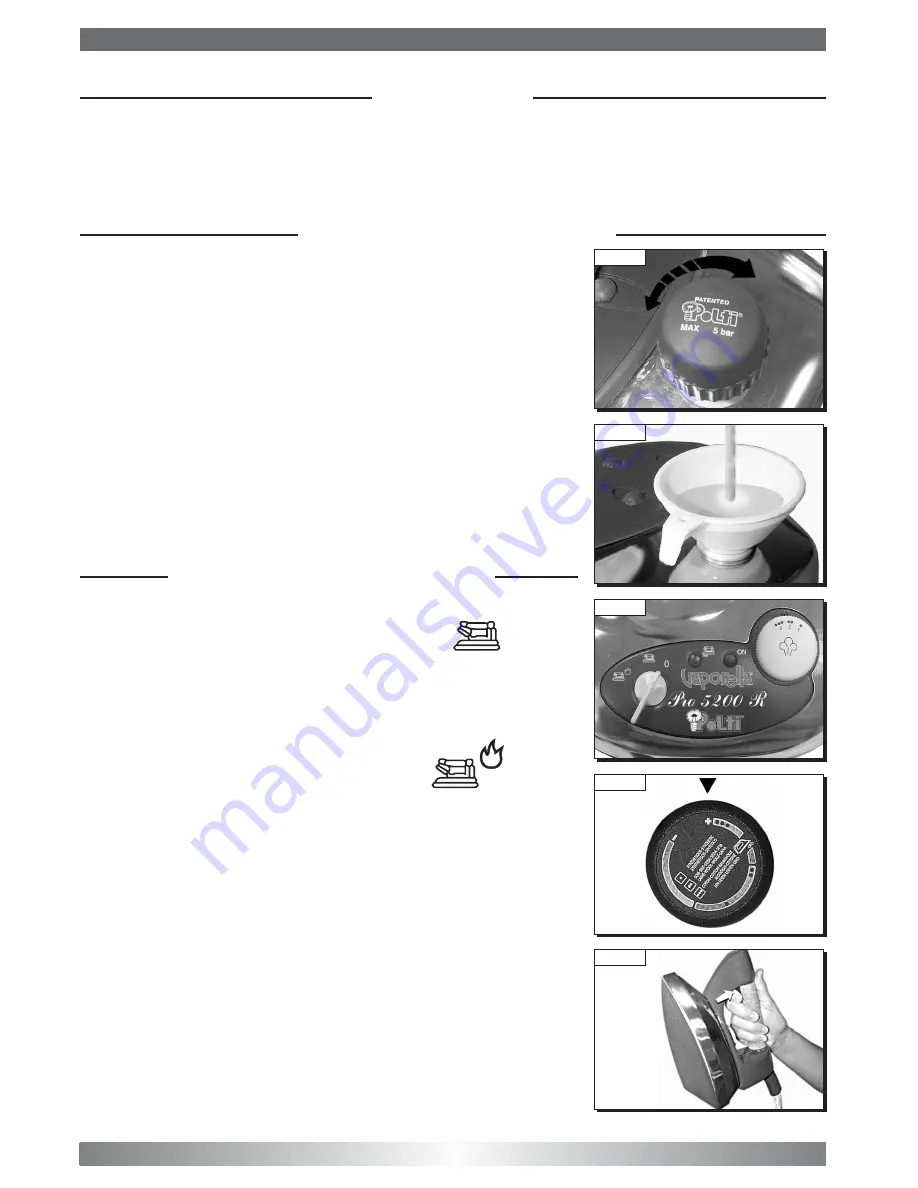
1a. Unscrew the patented safety cap (
1
) (fig. 1) and fill the
boiler with about 1.5 litres of water using the special fun-
nel (
13
) making sure that it does not overflow (fig. 2).
Normal tapwater can be used. However, as hard water
by its nature contains limestone, which may cause a
build-up of limescale in the tank, we recommend the use
of a 50% tap water and 50% demineralised water. In
hard water areas we recommend the use of our natur-
al-base decalcifier
KALSTOP FP 2003
.
2a. Retighten the cap fully and carefully (fig. 1).
3a. Connect the power supply cable (
9
) into an earthed
power supply of the correct voltage.
II
II
N
N
N
N
S
S
S
S
T
T
T
T
R
R
R
R
U
U
U
U
C
C
C
C
T
T
T
T
II
II
O
O
O
O
N
N
N
N
S
S
S
S
F
F
F
F
O
O
O
O
R
R
R
R
U
U
U
U
S
S
S
S
E
E
E
E
DRY IRONING
1b. Turn the switch (
2
) (fig. 3) on position
the indi-
cator lights will light up (
3
) (
4
).
Regulate the temperature of the iron by turning the
knob (
7
) to the required temperature for the fabric
shown on the knob itself.
STEAM IRONING
1c. Turn the switch (
2
) (fig. 3) on position
the indi-
cator lights will light up (
3
) (
4
) (
5
).
Set the iron temperature to the “COTTON - LINEN”
steam position (fig. 4), by turning the knob (
7
). For
steam ironing, all types of fabric can be ironed at this
temperature.
2c. Wait for the steam pressure indicator light (
5
) and the
“iron heating” indicator light (
3
) to switch off (about 15
minutes). Push button (
10)
on the iron to release bursts
of steam from the holes on the soleplate. Release the
button and the steam will stop (fig. 5).
NOTE:
during initial operation of the iron, a few drops
of water mixed with steam may come out of the sole-
plate until the temperature stabilises. It is advisable to
direct the first jets of steam onto an old cloth until a uni-
form stable jet of steam is obtained.
IIM
M P
P O
O R
R T
TA
A N
N T
T E
E
P
P R
R E
E P
PA
A R
R A
A Z
Z IIO
O N
N E
E
U
U T
T IIL
L IIZ
Z Z
Z O
O
IIM
M P
P O
O R
R T
TA
A N
N T
T E
E
P
P R
R E
E P
PA
A R
R A
A Z
Z IIO
O N
N E
E
U
U T
T IIL
L IIZ
Z Z
Z O
O
IIM
M P
P O
O R
R T
TA
A N
N T
T E
E
P
P R
R E
E P
PA
A R
R A
A Z
Z IIO
O N
N E
E
U
U T
T IIL
L IIZ
Z Z
Z O
O
Fig. 1
Fig. 2
Fig. 3
Fig. 4
Fig. 5