12
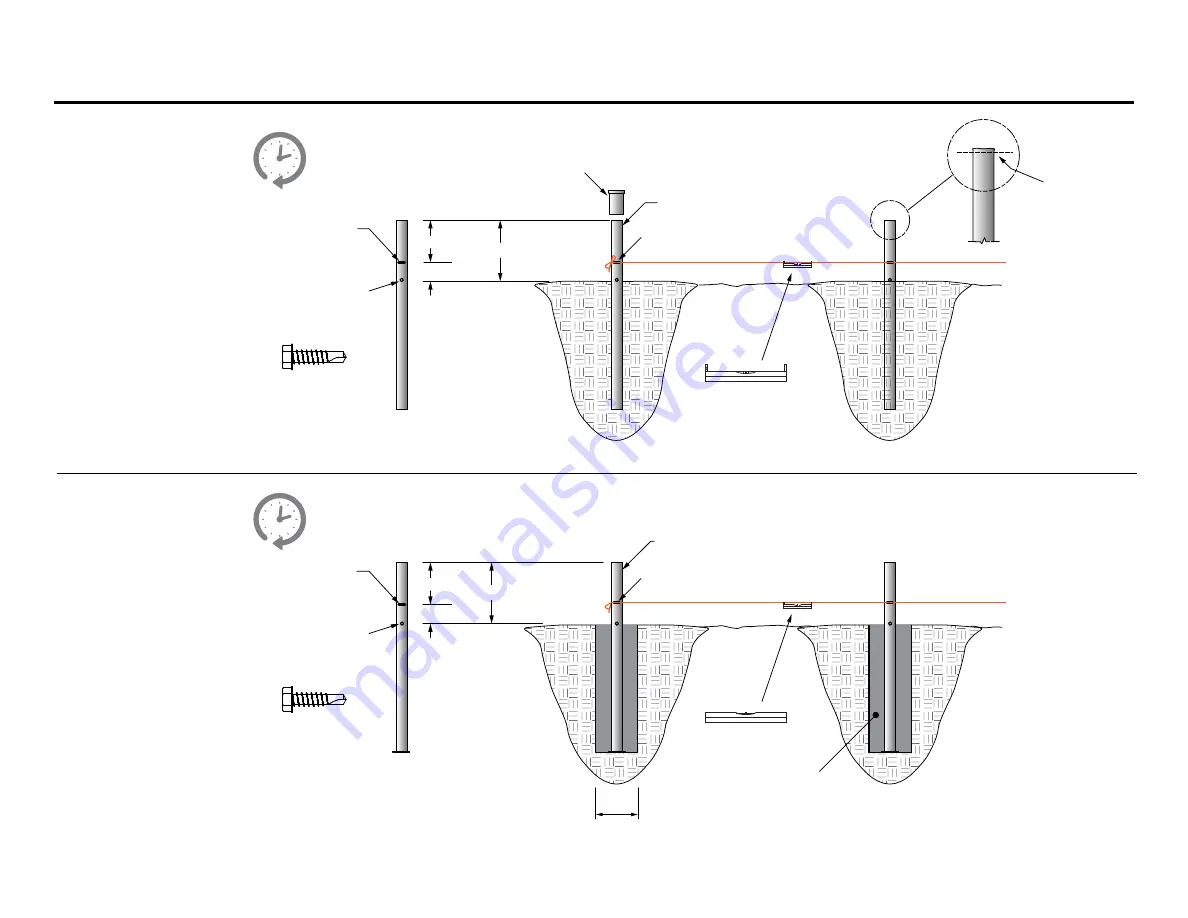
Ground Stake and Ground Stand Installation
Driving Tool
HT1000
Masons Line
Line level
4
8
12
Driven Ground Stake
Ground Stand in Compacted Soil
Ground Stake GS2404
Note:
If the top of the stake
becomes deformed
from driving in the stake,
cut off damaged
section from
top of stake.
Ground Stake GS2404 Preparation
Ground Stand GS2405 Preparation
To save time, you can
prep all the stakes
ahead of time.
To save time, you can
prep all the stakes
ahead of time.
Place a mark 8
from top of stake.
Install self-drilling
screws before driving
in the stake.
NB1809 1/4
-14 x 1
Self-Drilling Screw
4
8
12
Masons Line
Ground Stand GS2405
6
Min. hole
Compacted Fill
Ground stakes are driven
into the ground using the
Driving Tool (HT1000)
until the top of the
ground stake is 12
above
the soil line.
A masons (twisted) line is
attached between all four
corner stakes 8
from the
top of stakes. Use a line
level to line up all the
stakes at the 8
mark.
For longer structures, the
masons line may need to
be supported every 50
to prevent sagging. Sight
down the line visually to
check the straightness of
the line.
Ground stands are
placed into a 6
diameter
(min.) hole. The top of the
ground stand will be 12
above the soil line.
Ensure that the ground
stands remain plumb
while compacting the soil
all around.
A masons (twisted) line is
attached between all four
corner stakes 8
from the
top of stakes. Use a line
level to line up all the
stakes at the 8
mark.
For longer structures, the
masons line may need to
be supported every 50
to prevent sagging. Sight
down the line visually to
check the straightness of
the line.
Line level
Mark
Mark
Place a mark 8
from top of stake.
Install self-drilling
screws before driving
in the stake.
NB1809 1/4
-14 x 1
Self-Drilling Screw


