23
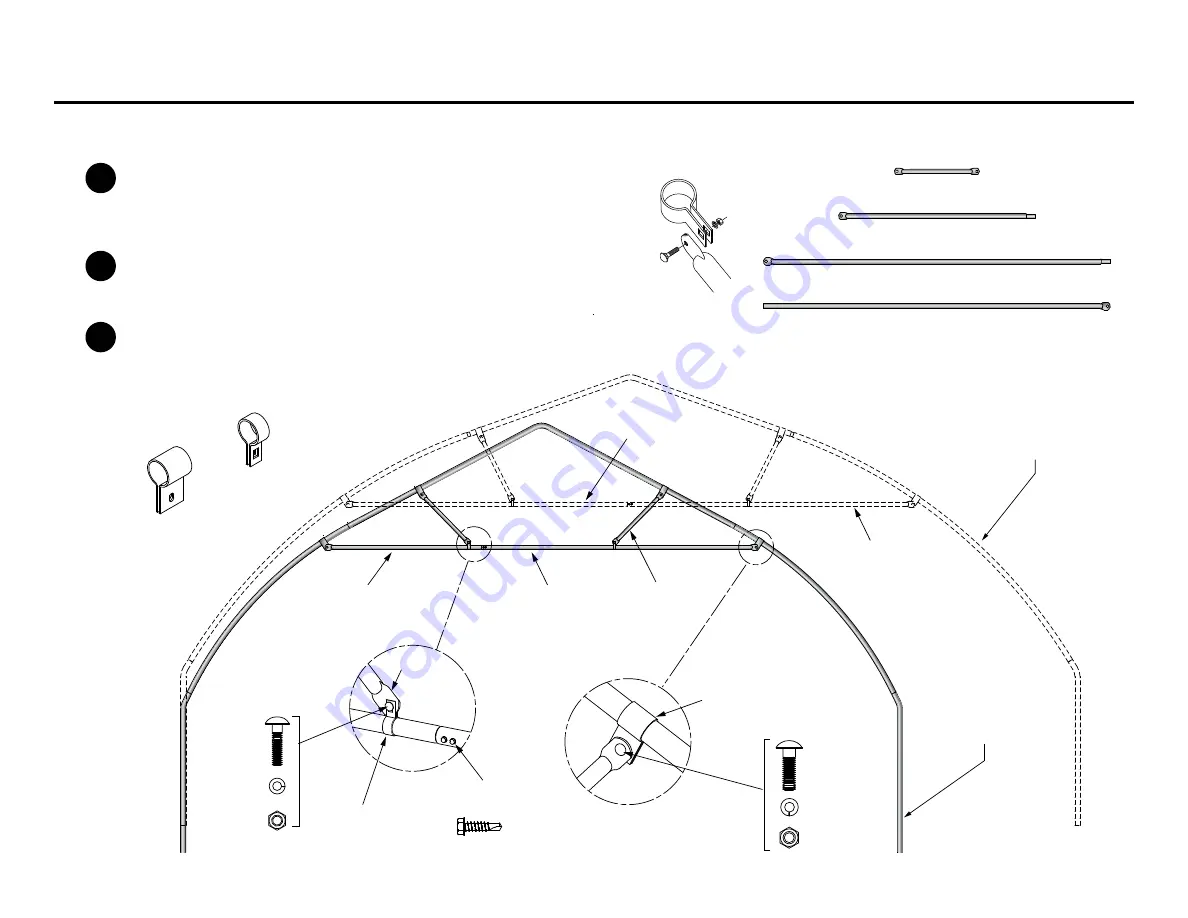
Truss Frame Assembly – Attaching Truss Chords & Struts
Chord HT1075
for 20
Strut HT1028
for 20
and 24
Main Frame Assembly
20
FieldPro
Main Frame Assembly
24
FieldPro
NB1809
Chord HT1016
for 24
HT1016 Chord w/ swaged end (92-3/4
)
(24
Units)
HT1015 Chord w/o swaged end (92-3/4
)
(20
& 24
Units)
HT1075 Chord w/ swaged end (54-1/2
)
(20
Units)
HT1028 Strut (23-5/8
)
(20
& 24
Units)
Chord HT1015
for 20
and 24
Chord HT1015
for 20
and 24
Two, (2) 1/4
-14 x 1
Self-Drilling Screws
Band Brace
FT4041
1 .375
Band Brace
FT4054
1.66
Important:
Components attached to
Brace Bands must be
mounted on the outside
of the tabs. NEVER
install any components
between the tabs.
NB1832
5/16
X
1-1/4
Carriage Bolt
NB1862
5/16
Lock Washer
NB1872
5/16
Hex Nut
NB1837
3/8
x 1-1/4
GRD5
Carriage Bolt
NB1864
3/8
Lock Washer
NB1874
3/8
Hex Nut
Strut
Detail A
Detail B
FT4041
1.375
Brace Band
FT4054
1.66
Brace Band
Assemble the Chord Sections on a flat surface. Make
sure that the tabs on each end are facing the same
direction. Secure the Chord Sections together using
1/4
-14 X 1
self-drilling screws (NB1809) as shown
in Detail A.
Mount the assembled Chord assembly to the prepo-
sitioned Brace Brackets on the Main Frame using the
3/8
x 1-1/4
Carriage bolts, 3/8
Lock Washers, and
3/8
Hex Nuts.
Attach the Struts HT1028 to the Brace Brackets on
the Main Frame and the assembled horizontal Chord
Section. Each end of the Strut uses a different Brace
Bracket and Carriage Bolt/Washer/Hex Nut. See
Details A and B.
1
2
3
Instructions on this page apply to 20
& 24
FieldPro Models


