32
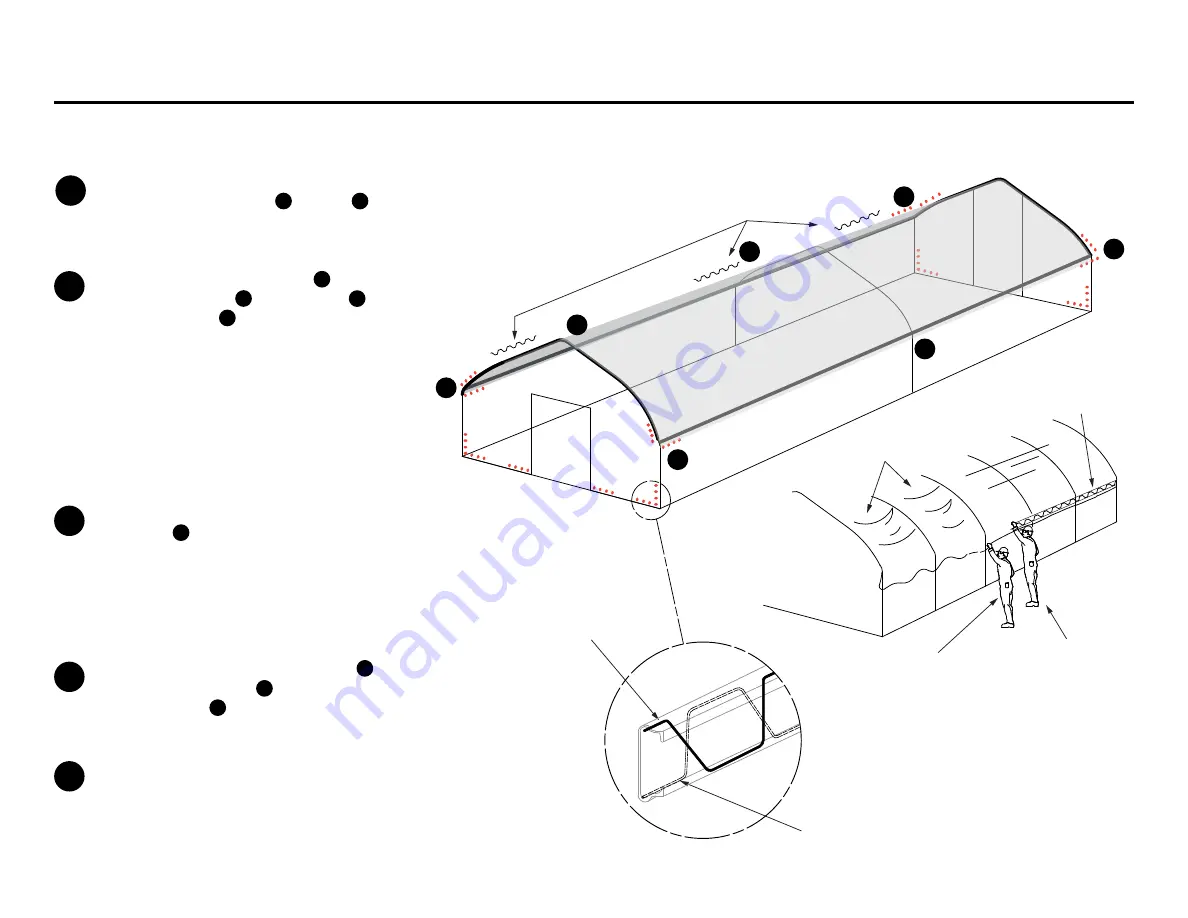
Installing Roof Poly on FieldPro with Roll-Up Side Curtain
Instructions on this page apply to 20
& 24
FieldPro Models
Poly Droop
Wiggle Wire
Installed
Worker #1
Tensioning the Poly
ahead of Worker #2
Detail 1
Worker #2
Installing the
Wiggle Wire
1st piece of Wiggle Wire
Second 12
piece of
Wiggle Wire to be flipped.
Detail 2
Temporary Wiggle Wire Pieces
Work this section first
4
3
7
1
1
Note: These instructions are for a FieldPro that will
feature the Roll-Up Poly Curtain. See page 33 for the
Ground-to-Ground Roof Poly Installation.
2
3
4
5
Once the Poly is in position, place a couple of temporary sections
of Wiggle Wire between Point
4
and Point
6
to help prevent
the Poly from shifting while the Wiggle Wire is installed on the
first side.
Begin installing Wiggle Wire at Point
2
(center of the FieldPro)
and work down to Point
1
. Return to Point
2
and install
Wiggle Wire to Point
3
. Be sure to let the Poly edge
overhang 3 to 6 inches on all sides.
It helps to have two workers install the Wiggle Wire
to prevent drooping and main proper tension down the
entire length. One worker tensions the Poly while the
second worker follows along inserting the Wiggle Wire.
Using a helper in this manner while installing the
Wiggle Wire will make the wrinkles disappear. See Detail 1.
Now go to the other side of the FieldPro. Begin Installing Wiggle
Wire at Point
5
working one side at a time same as the first side.
Use a helper again to help tension the Poly as the Wiggle Wire
is inserted.
Be sure the Wiggle Wire is seated properly into the Wiggle Wire
Base. Adjust the Poly and Wiggle Wire as required.
Starting at the top of the End Frame at Point
7
, begin installing
Wiggle Wire down to Point
4
. Go back to top and install Wiggle
Wire down to Point
1
. Next do the same on the other End Frame
of the FieldPro.
After all the Wiggle Wire has been installed on both sides and
along the top of both End Frames of the FieldPro, the corners
(see red dots in illustration) need to be reinforced with additional
12
pieces of Wiggle Wire. Also note Detail 2 showing proper way
to install the Wiggle Wire at the corners.
6
2
5


