35
24
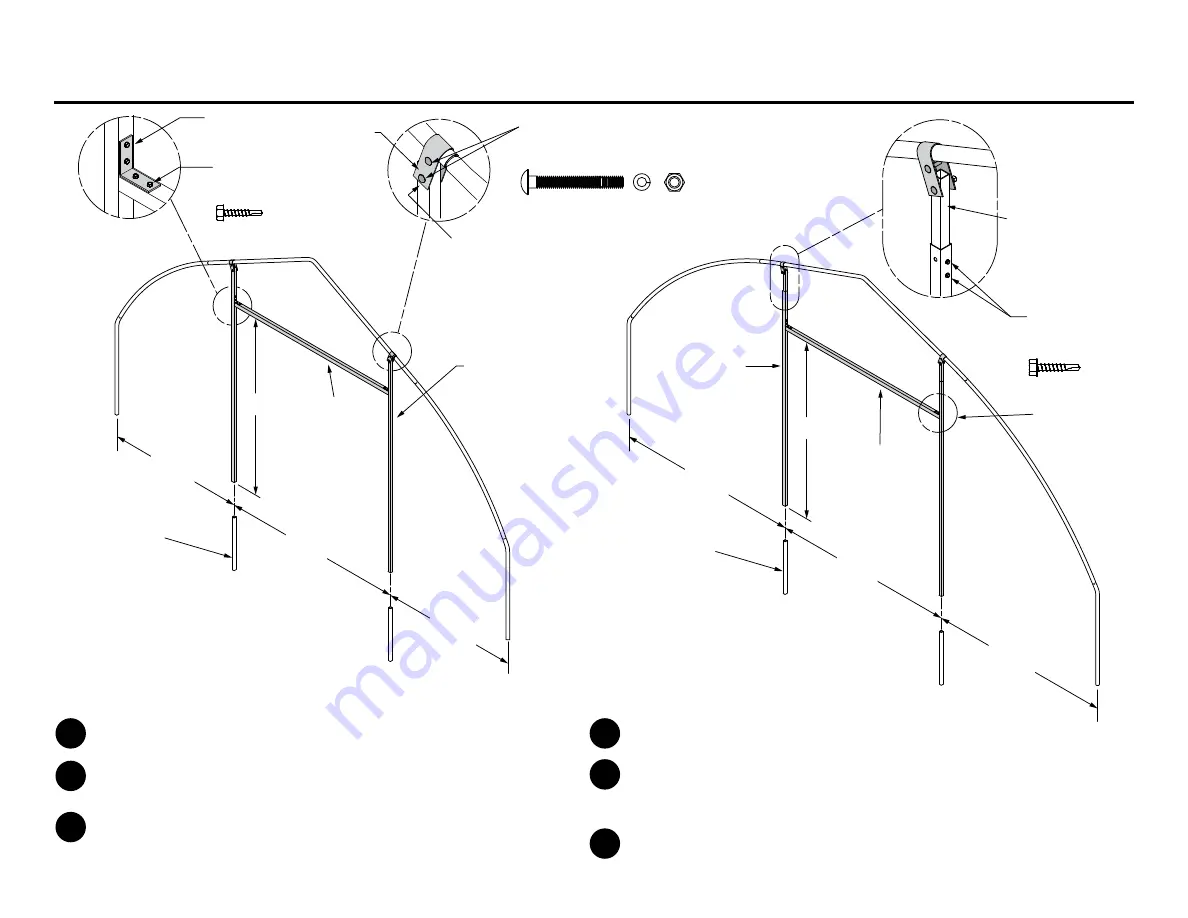
FieldPro Door Kit HT3002
Drive in Ground Stakes (GS2408) at the locations shown above.
Slide Door Frame Verticals (HT1004) over the Ground Stakes.
Insert a Door Jamb Extension (HT1080) into the top of each Door Frame
Vertical. Attach the Door Frame Extensions to the End Frame using the
U-Brackets (FT4053) and carriage bolts. Secure the assembly using self-drill-
ing screws. Make sure the jamb pieces are plumb. See Detail C above.
Attach the Door Frame Header (HT1010) using L-Brackets (FT1990) and
self-drilling screws as shown in Detail A.
Door Kit Installation – Part 1
20
FieldPro Door Kit HT3000
Drive in Ground Stakes (GS2408) at the locations shown above.
Slide Door Frame Verticals (HT1004) over the Ground Stakes.
Attach the tops of the Door Frame Verticals to the End Frame using
the U-Brackets (FT4053) and carriage bolts. See Detail B above.
Make sure both Door Frame Verticals are plumb.
Attach the Door Frame Header (HT1010) using L-Brackets (FT1990)
and self-drilling screws. See Detail A above.
1
1
2
2
3
3
Note:
Make sure hole in Door Frame
Vertical is oriented to the top
of door jamb assembly
L-Bracket
FT1990
U-Bracket
FT4053
Detail B
Detail C
Detail A
Door Frame Vertical
HT1004
Door Frame Vertical
HT1004
Door Frame Header
HT1010
3/8
x 3
Grade 5 Carriage Bolt NB1841
3/8
Lock Washer NB1864
3/8
Hex Nut NB1874
1/4
-
14 x 1
Self-Drilling Screws
NB1809
8'
8' 1-1
/2"
Ground Stake
GS2408
Ground Stake
GS2408
5' 11-1
/4"
5' 11-
1/4"
8'
8' 1-1
/2"
7 ' 11-
1/4"
7' 11-
1/4"
Door Frame Header
HT1010
See Detail A
Door Jamb Extension
HT1080
(FieldPro 24
only)
1/4
-
14 x 1
Self-Drilling Screws
NB1809


