37
Door Kit Installation – Part 3
20
&
24
models both use Door Kit (HT1013)
Refer to the door kit for contents.
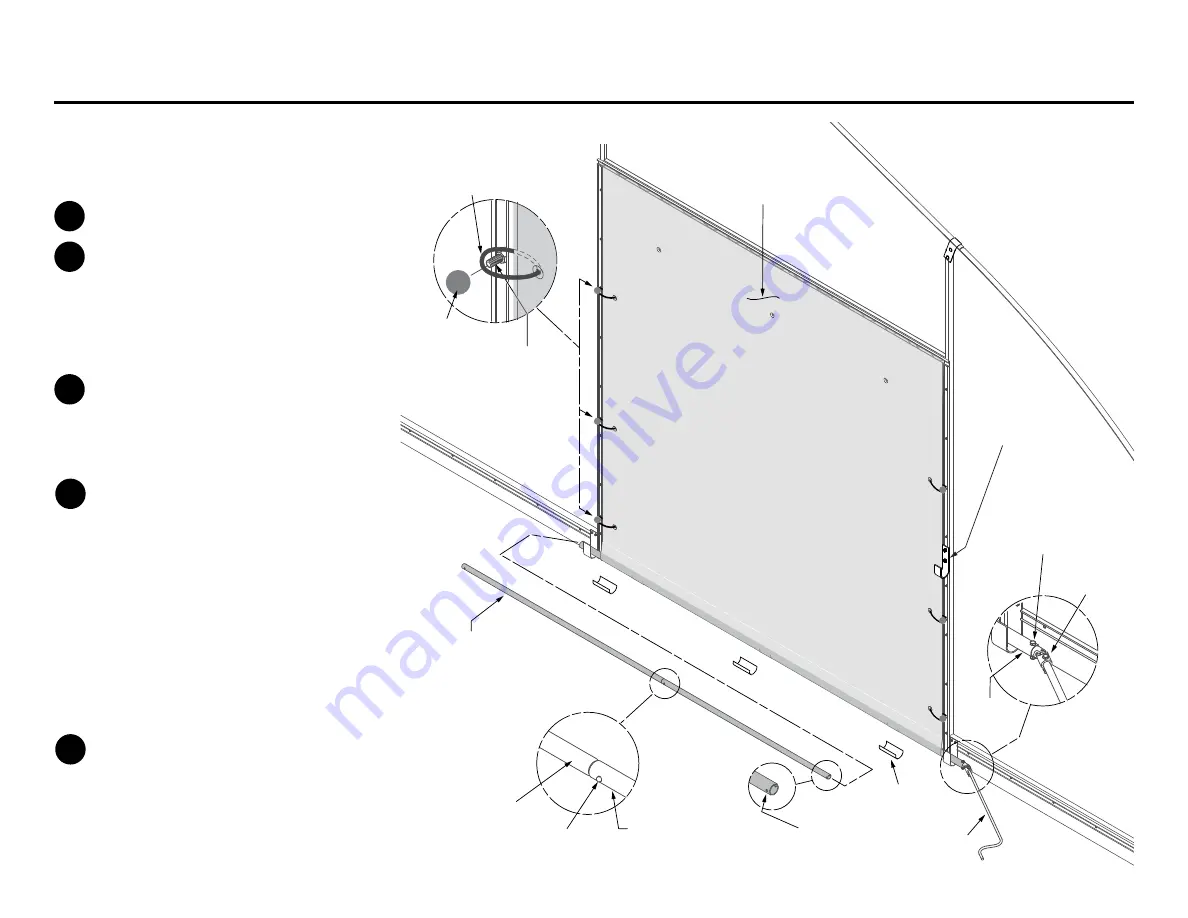
Lay out the Reinforced Poly Door on a flat
surface.
Insert the Roll-Up Tube w/Snap Button (RC1007)
into the Tube Bottom Extension (RC1026). Slide
the assembled tubes into the sleeve at the bottom
of the Poly Door. See Detail 1.
Secure the Poly Door to the Door Tube using
Roll-Up Tube Clips (RC1010) approximately every
36
. Set the Poly Door with Tube in the Cradles.
Lift the free end free end of the Poly Door to the
top of the door frame and secure with Wiggle
Wire. Be sure to center the door over the open-
ing. Note: It is important that the Roll-Up Door
Tube is still resting in the Cradles after the Wiggle
Wire has been installed along the top.
Using the Grommets in the Poly Door as a guide,
drill three 3/8
holes through the Wiggle Wire
Base and Wood Jamb on each side of the Door.
Insert a 3
Grade 5 Carriage Bolt (NB1841) with
the threaded end facing outside. Add lock washer
and hex nut and tighten. Install a Ball Knob on
threaded ends. Loop the Bungee Cords over
the Ball Knobs. See Detail 2.
Install U-Joint (RC1303) onto the end of the
Roll-Up Tube using a 5/16
x 1-3/4
hex bolt and
lock nut through the hole. Attach Roll-Up Crank
(RC1314) to the end of the U-Joint using a 5/16
x
1-3/4
hex bolt and lock nut. Install door “J” Hook
(FT2071) to retain the Roll-Up Crank when door
is rolled up. See Detail 3.
Check the operation of the Poly Door by unhook-
ing the Bungee Cords and rolling up the Poly
Door to the top grommet elevation. Insert a loose
Bungee Cord into the center hole of the Door.
Wrap the cord around the rolled up part of the
door and insert the Ball through the loop of the
cord. Do same at left and right grommets.
Roll-Up Tube
w/Snap Button
RC1007
Tube Bottom Extension
RC1026
Larger hole
on this end.
Snap Button
Reinforced Poly Door (8
x 8
)
Roll-Up Crank
RC1314
Tube Clips
RC1010
U-Joint
RC1303
Roll-Up Door
Tube
Roll-Up Door Tube
(assembled)
Hex Bolt & Lock Nut
included w/ U-Joint
Detail 1
Detail 3
Detail 2
3
Grade 5 Carriage Bolt NB1841,
Lock Washer NB1864,
Hex Nut NB1874
Six, (6) places
Bungee Cord wraps around
threaded carriage bolt
Threaded
Ball
Door “J” Hook
FT2071
1
2
3
4
5
Instructions on this page apply to 20
& 24
FieldPro Models


