6
6
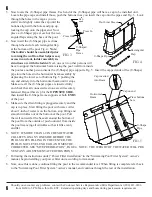
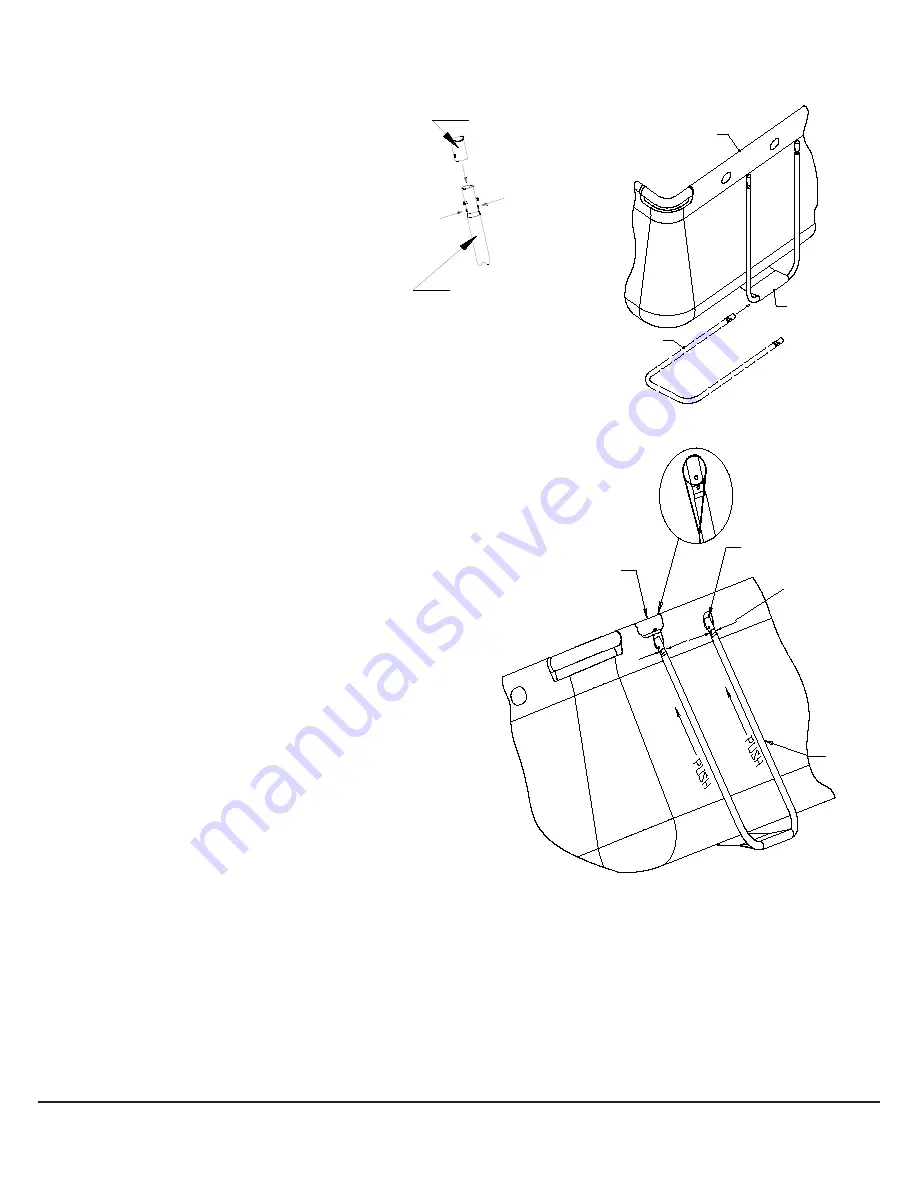
3. Now locate the (U-Shape) pipe frames. Each end of the (U-Shape) pipe will have a cap to be installed on it.
Locate the pipe caps and install those, push the buttons in as you insert the cap onto the pipes end Fig. 3. Look
through the holes in the cap as you in-
stall it and slightly rotate the cap until the
buttons align with the holes and pop up,
locking the cap onto the pipes end. Now
place a (U-Shape) pipe at each of the rect-
angular flaps along the base of the pool.
4. Now insert the (U-Shape) pipe sections
through the end of each rectangular flap
at the bottom of the pool Fig. 4.
Note:
The ladder should be assembled prior
to raising the wall to allow helpers easy
access in and out, ladder assembly in-
structions are with the ladder.
Next, one or two other persons will
have to support the horizontal beam raising the pool wall from inside
the pool as another person inserts the (U-Shape) pipe supports Fig. 5. Insert the capped ends of the (U-Shape)
pipe into the holes in the horizontal beam assembly by
depressing the lower set of buttons Fig. 5 pushing the
cap end entirely into the horizontal beam until it stops.
Make sure all the (U-Shape) pipes are inserted fully
and check that all connected sections are still securely
fastened. Repeat this step for the
OPPOSITE SIDE
,
then install the U-Shape frame supports at both
ENDS
of the pool.
5. Make sure the drain fitting is plugged securely and the
cap is in place. Start filling the pool with water. After
about 1-inch of water is on the bottom, stop filling and
smooth wrinkles out of the bottom of the pool. Pull
the wall outward at the base all around the bottom of
the pool from the outside or push outward from inside
the pool removing all wrinkles so that it fills evenly
and flat.
6. NOTE: IF MORE THAN 1-2 INCHES OF WATER
COLLECTS ON ANY ONE SIDE BEFORE THE
POOL STARTS FILLING IN THE CENTER, THE
POOL IS NOT LEVEL ENOUGH, AND MUST BE
CORRECTED, SEE “SITE PREPARATION”, PAGE 4. NOTE: THE WEIGHT OF THE WATER WILL PRE-
VENT ANY ADJUSTMENT AFTER THIS POINT.
7. Following the instructions under “Power Filter Installation” in the “Swimming Pool Filter System” owner’s
manual, begin installing your power filter unit according to its manual.
8. Now, once this is done, continue filling the pool to the recommended level. When filling is complete refer back
to the “Swimming Pool Filter System” owner’s manual, and continue through the rest of the installation.
FIG. 3
FIG. 4
FIG. 5
Rectangular
Flap
Pool Liner Sleeve
U-Shape Pipe
U-Shape
Pipe
Press buttons
here
Cap on end
Horizontal
Beam
Cap inserted
into Beam
Cap
U-Shaped
Pipe
Frame
Press In
Press In
Should you encounter any problems, contact the Customer Service Representative/Parts Department at (800) 813-0206
from 8 AM to 5 PM Mon. thru Fri. EST. Extended operating days and hours during peak season requirements.


