background image

Connect the      tubes.

1

2

3

4

5

6

Should you encounter any problems, contact the Customer Service at (888) 919-0070.

Extended operating days and hours during peak season requirements.

5

6

7

L

L

L

L

L

S

S

S

S


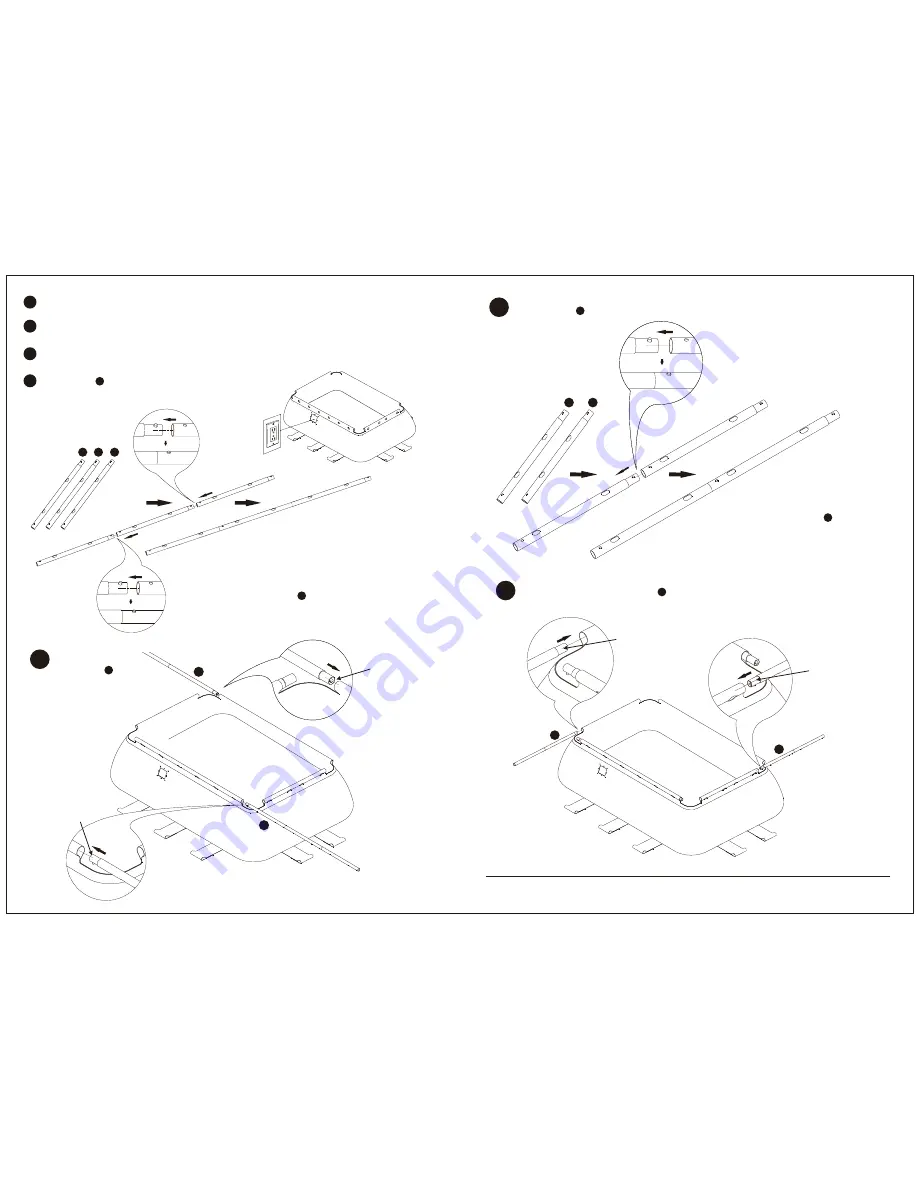
 Locate a level and flat area to setup the pool.  Make sure the ground is free from sharp 

objects as it may puncture the pool.


LIFT

 the pool liner across the ground.  

DO NOT

 drag the liner from one location to 

another location.  

   Locate the pool so that the pump opening is 10 to 21 feet away from the electrical
   outlet.
   Connect the      Tubes.

NOTE:

  Refer to the part list on page 4 for the 

exact quantity of      tubes.  Connect half the 

total quantity to form the horizontal beams 

on the long sides of the pool.

Swedged 

End

Swedged 

End

Swedged 

End

Swedged 

End

S

L

L

10~21’

Carefully slide the 

connected      tubes 

into the sleeves on the 

long sides of the pool.

L

NOTE: 

Refer to the part list on page 4 

for the exact quantity of      tubes.  

Connect half the total quantity to form 

the horizontal beams on the short 

sides of the pool.

S

Carefully slide the connected      tubes into the sleeves on the short 

sides of the pool.  

S

Summary of Contents for SUMMER WAVES PS23-081436

Page 1: ...OVER POOL WALL AVOID ENTRAPMENT You can be permanently injured Stay away from suction fittings You may drown WARNING 1 Children especially children younger than five years are at high risk of drownin...

Page 2: ...cedures For Infants Layers of Protection and the ANSI NSPI 8 Model Barrier Code for Residential Swimming Pools Spas and Hot Tubs Competent supervision and knowledge of the safety requirements is the o...

Page 3: ...t the pump opening is 10 to 21 feet away from the electrical outlet Connect the Tubes NOTE Refer to the part list on page 4 for the exact quantity of tubes Connect half the total quantity to form the...

Page 4: ...919 0070 Extended operating days and hours during peak season requirements 7 8 10 11 8 9 U Align the holes of with the sleeve openings S L and x4 T T T T U U U U U U U U U U Make sure all the swedged...

Page 5: ...emoving all wrinkles so that it fills evenly and flat IF MORE THAN 1 2 INCHES OF WATER COLLECTS ON ANY ONE SIDE BEFORE THE POOL STARTS FILLING IN THE CENTER THE POOL IS NOT LEVEL ENOUGH AND MUST BE CO...

Page 6: ...URED COVERS ARE A HAZARD FAILURE TO FOLLOW ALL INSTRUCTIONS MAY RESULT IN INJURY OR DROWNING THIS IS NOT A SAFETY COVER TYPE OC COVER CLASSIFICATION INSTALL COVER WITH LABELS FACING UP LAY COVER ON TO...

Page 7: ...e la date d achat cettegaranties appliquant l acheteurinitialuniquement L acheteurinitialdoitconserverlejustificatifd achatsousformedeticketdecaissed origineetdoitle pr senter la demande de Polygroup...

Page 8: ...4 3 AVIS LES CLIENTS AYANT ACHET DES PISCINES PEUVENT TRE REQUIS PAR LA LOI PROVINCIALE OU LOCALE D ENGAGER DES D PENSES SUPPL MENTAIRES LORS DE L INSTALLATION DE LA PISCINE AFIN DE SE CONFORMER AUX L...

Page 9: ...de courant Connectez ensemble les tubes REMARQUE Pour conna tre la quantit exacte des tubes r f rez vous la liste des pi ces page 11 Connectez ensemble la moiti du total pour former les entretoises h...

Page 10: ...on de pointe 7 8 10 11 8 9 U Alignez les trous perc s dans les entretoises et avec les ouvertures dans les fourreaux S L x4 T T T T U U U U U U U U U U Assurez vous que les extr mit s swedged des entr...

Page 11: ...n d assurer un remplissage uniforme et un fond plat SI VOUS CONSTATEZ PLUS DE 2 5 A 5 CM D EAU A D UN C TE OU AUTRE DE LA PISCINE AVANT QUE LE MILIEU NE SOIT RECOUVERT CECI INDIQUE QUE LA PISCINE N ES...

Page 12: ...UR COUVERTURE BULLES AVERTISSEMENT VITEZ LE RISQUE DE NOYADE RESTEZ LOIN DE LA B CHE NE SUPPORTERA PAS LE POIDS LOIGNEZ LES ENFANTS ENFANTS OU OBJETS NE PEUVENT PAS TRE VUS SOUS LA B CHE D BARRASSEZ L...

Reviews: