background image

POOL MAINTENANCE

NOTE :

1. Hot weather/heavy use may require pH and chlorine levels to be maintained on the upper side of the scale and superchlorination of the pool every week.

2. Using a pool cover and/or solar cover (available at polygroupstore.com) will assist in maintaining your pH and chlorine levels by reducing the amount of

evaporation from your pool.

CAUTION -


Concentrated chlorine levels and low pH levels will damage pool.  You must follow the instructions for the pool chemicals you use, as to quantity and 

recommended usage.  NEVER drop lumps or pellets of chemicals in pool; this may present a hazard to swimmers and/or damage your liner.

1. The following items are required and readily available from your local pool supply store:

•  TEST KIT - Used to check chlorine and pH levels.

• 1” CHLORINE TABLETS - Used to disinfect pool water and help control the growth of algae.

• pH CONTROL CHEMICALS - Used to adjust pH levels Up (Soda Ash) or Down (Acid).

• ALGAECIDES - Used to eliminate algae.

• SUPERCHLORINATOR - Used to destroy combined chlorine, ammonia, nitrogen, and organic compounds.

• LEAF NET with handle - Used to remove leaves, trash, insects, etc. from pool. This item can be purchased at

polygroupstore.com.

• CHLORINE DISPENSER (Supplied with Polygroup

®

’s patented Filter Cartridge U.S. Pat. 7,005,062) - Used to

dispense 1” chlorine tablets ONLY.

2.  Use test kit daily to check pH and chlorine levels.  Adjust accordingly using the required chemicals.

NOTE :  Excessive levels of chlorine or low pH levels will damage pool liner.

3. The pool can be cleaned using a garden hose powered vacuum from Polygroup®. This item can be purchased at polygroupstore.com.

4.  Using a foot bath near the pool to wash off your feet prior to entering the pool will assist in keeping the pool clean.

5.  Well water often presents special problems with water chemistry.  If you must use well water, take a sample to your local pool chemical supplier for analysis before

6.  Refer to the retail package box or visit the support pages at support.polygroupstore.com for the capacity of your pool.  You will need this information to determine the

7.

IMPORTANT

 - We cannot over-stress the importance of proper and adequate daily chemical treatment.  Chlorine and pH levels must be properly maintained at all

times.  

PUMP  AND FILTER ALONE WILL NOT PREVENT ALGAE FROM GROWING IN POOL WATER; THIS CAN ONLY BE DONE BY MAINTAINING PROPER

CHLORINE AND pH LEVELS AT ALL TIMES.

• Maintain pH level between 7.3 and 7.8.

• Maintain chlorine level between 1.0 and 1.6 ppm (parts per million).

• Superchlorinate your pool at least every other week.

POOL WATER CARE

6. Suntan oils, body oils, and algae can form a coating on the filter pleats which may not be thoroughly removed by hosing.  Such films of oils and/or algae will rapidly

clog up the filters’ pores, greatly reducing filtration.  Therefore, it is imperative to remove such materials from the filter element as soon as possible.  To remove oils,

we recommend soaking the cartridge in a solution of 1 pound of tri-sodium phosphate (TSP or any other strong detergent) to 5 gallons of water for up to 12 hours.

Tri-sodium phosphate is available in many supermarkets, hardware stores, or janitorial supply stores.  After the oils have been removed, rinse the filter cartridge to

remove any dirt.  If algae is a problem, add 1/2 pint of pool chlorine or 1 pint of liquid household bleach to the cleaning solution, 1 hour before removing the filter 

cartridge from the solution.  Thoroughly rinse the filter cartridge before replacing it in the filter case. Check the pool chemistry to determine the cause of algae growth.

7. Excessive calcium and/or mineral deposits may build up on a filter cartridge and should be handled differently.  Contact your local pool supply store to ask about

additional filter cartridge cleaners or treatment for calcium or mineral deposits. Check pool chemistry for high pH or alkalinity; this may cause a calcium or  mineral

build-up.

8.  A spare “stand-by” Filter Cartridge  

20

  is an excellent investment.  It provides a convenient way to continue filtration of your pool while cleaning or replacing a

dirty Filter Cartridge  

20

 .  Also, a well-maintained, clean cartridge assures you that your filter will always be ready to operate at peak efficiency.

9. Filter cartridges may be purchased at the store you purchased your pool from, or ordered from Polygroup

®

 at polygroupstore.com. Always replace with

genuine Polygroup

®

 SUMMER WAVES

®

 filter cartridges.

13

OWNER’S MANUAL

Should you encounter any problems, contact Customer Service at (888) 919-0070 from 8 AM to 5 PM Mon. thru Fri.

MST. Extended operating days and hours during peak season requirements.

1. Check and adjust pH and chlorine levels daily using required chemicals. See Section “POOL WATER CARE.”

2. Check filter pump output daily. If flow is reduced, see Symptom 2 in Section “TROUBLE SHOOTING GUIDE.”

3. Check filter pump, hoses, fitting for leaks. If a leak is found, see Symptom 4 in Section “TROUBLE SHOOTING GUIDE.”

4. Run the pump for the recommended number of hours daily. If you are unsure of the time frame please refer to support.polygroupstore.com for the recommended

"Pump Operation Hours" bases on pool types and sizes.

See Section "FILTER PUMP IMPORTANT NOTES" on page 7.

adding ANY chemicals.

amount of chemicals you will need to correct the pool water. NOTE:  It is recommended to use a 5 gallon bucket of water to mix and dissolve your chemicals and then

applying directly to the pool water. Follow manufacturer’s label directions on all chemicals.*Most pool supply stores will test your pool water for free and advise you of

what chemicals you need, and the correct amount to use for your pool.   You will need to tell them the pool capacity in gallons.

Chlorine Tablets

Summary of Contents for SUMMER WAVES RX1000

Page 1: ...arrants to the original purchaser only the RX type Electric Filter Pump against defects in material and workmanship for 180daysfromthedateofpurchase Original Purchaser must retain proof of such purcha...

Page 2: ...Guide Pump Disassembly and Storage Pump Removal Instructions for Troubleshooting Rotor Inspection and Replacement Instructions Pump Replacement Instructions Replacement Parts Ordering Information ASME...

Page 3: ...al Electrical Code NEC Article 680 Swimming pools fountains and similar installations and any state or local code Filter Pump Awareness 1 WARNING Risk of Electric Shock Connect only to a grounding typ...

Page 4: ...a drain or suction outlet cover is missing or broken do not use the pool Suction can cause body part entrapment hair and jewelry entanglement evisceration or drowning Repair or replace the drain or su...

Page 5: ...ing severe weather conditions i e electrical storms tornadoes etc 12 Be aware of overhead power lines when vacuuming your pool or using a telescoping pole 13 Check regularly for signs of wear that cou...

Page 6: ...ms shall be positioned so as to prevent their being used as a means of access to the pool by young children See the latest published edition of ANSI APSP 8 Model Barrier Code for Residential Swimming...

Page 7: ...with a central core mesh divider See page 9 to use the chlorine dispenser FILTER PUMP MODEL RX 600 RX 1000 RX 1500 WATTAGE 65 watts 105 watts 175 watts AMPERAGE 1 7amps 1 4amps 3 1amps FILTER PUMP POW...

Page 8: ...UCTION FITTING Press RESET Button To Start Pump Operation How to use the GFCI plug Do not connect to a timer device 27 8 Should you encounter any problems contact Customer Service at 888 919 0070 from...

Page 9: ...12 9 OWNER S MANUAL Should you encounter any problems contact Customer Service at 888 919 0070 from 8 AM to 5 PM Mon thru Fri MST Extended operating days and hours during peak season requirements THE...

Page 10: ...ilter Pump Assembly 11 Hoses a 9 nd Hose Clamp 10 s WARNING CLIMBING HAZARD PLEASE PREVENT CHILDREN FROM CLIMBING ON THE FILTER CANISTER TO GAIN ACCESS TO THE POOL Before assembling your product pleas...

Page 11: ...rew 12 at the top of the pump by turning it counter clockwise The water pressure will force out all the trapped air inside the Filter Pump system Tighten the Vent Screw 12 when you see water flowing o...

Page 12: ...dered from Polygroup at polygroupstore com 6 To turn off the filter pump press the test button and unplug the GFCI power cord 27 1 Turn off unplug the Filter Pump Remove the RF Diverter 7 from the Ret...

Page 13: ...log up the filters pores greatly reducing filtration Therefore it is imperative to remove such materials from the filter element as soon as possible To remove oils we recommend soaking the cartridge i...

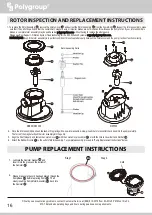
Page 14: ...k O ring 13 for damage Replace if needed Tighen the Vent Screw 12 C Check Canister Gasket 16 for damage Replace if needed Tighten the Seal Top 14 D 1 Check the Canister Gasket 16 for damage Replace if...

Page 15: ...he filter pump up side down The Base 15 is now locked by a latch pin To release the lock push the latch pin down and then turn left Detach the Base 15 from the Canister 17 by turning counter clockwise...

Page 16: ...nded operating days and hours during peak season requirements sure that it has all of its parts and that the center shaft magnetic axle or impeller blades are not broken as this will cause the pump to...

Page 17: ...the indentation is pointing to the matching indentation on the canister and make sure that the Rubber Nozzle is aligned with the water Outlet on the Canister There is a groove on the pump that needs t...

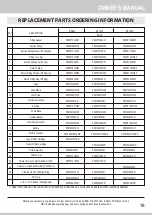
Page 18: ...8182201W05 P58182501K01 P58PP1853W05 P58183901W05 P58164800K01 P58PP1840W05 P58185201K01 P58X1500C000 RX P581041080PR P58050506001 P58184501K01 P5800400080A P58037000K01 P584150006W1 P58PF5620P01 REPL...

Page 19: ...ch pump 4 Do not locate this suction outlet on sitting areas or on the backrest for such seating area 5 Install this outlet at location recommended by the pool manufacturer 6 The maximum allowable flo...

Page 20: ......

Page 21: ...elante Polygroup garantiza solo al comprador original la bomba el ctrica de tipo RX ante defectos en el material y mano de obra durante 180 d as desde la fecha de compra El comprador original debe con...

Page 22: ...aje Funcionamiento de la bomba de filtraci n Protecci n del motor y Limpieza y sustituci n del cartucho filtrante Mantenimiento de la piscina y Tratamiento del agua Gu a de resoluci n de problemas Des...

Page 23: ...o casi ahogamiento Las vallas no sustituyen la vigilancia constante de los ni os Consulte las normas y c digos estatales y locales antes de instalar la piscina Equipamiento de la piscina 1 El uso de i...

Page 24: ...permanente hasta la pared interior de la piscina Sistemas de circulaci n 1 Los instaladores deber n seguir las instrucciones escritas relativas a la posici n de todos los equipos conectados a los sist...

Page 25: ...a de la piscina 8 El consumo de alcohol no es compatible con las actividades de piscina No deje que nadie nade bucee o se deslice bajo la influencia del alcohol o las drogas 9 Existe riesgo de descarg...

Page 26: ...manera que los ni os no lo puedan usar como medio de acceso a la piscina V ase la ltima edici n publicada del C digo sobre dispositivos de seguridad ANSI APSP 8 para piscinas spas y ba eras de hidroma...

Page 27: ...ro de control de ETL 4000608 y 4006317 con doble aislamiento y conexi n a tierra 120 VCA y 60 Hz Todas las unidades deben contar con 105 VCA como m nimo para empezar a funcionar correctamente 20 20 20...

Page 28: ...RIO DE SUCCI N Pulse el bot n RESET para arrancar la bomba No conectar a un temporizador C mo utilizar el tap n del GFCI 8 En caso de problemas p ngase en contacto con el servicio de atenci n al clien...

Page 29: ...6 12 13 14 20 16 17 19 18 15 16 12 13 14 20 16 17 19 18 15 16 12 9 MANUAL DEL USUARIO En caso de problemas p ngase en contacto con el servicio de atenci n al cliente en el 888 919 0070 de L a V de 8h...

Page 30: ...s mangueras y las abrazaderas 9 10 11 11 9 10 7 6 1 4 4 3 1 2 Orificio de Entrada Orificio de Salida INSTRUCCIONES DE MONTAJE ADVERTENCIA COLOQUE ESTE PRODUCTOAPARTADO DE LAPISCINAAFIN DE EVITAR QUE L...

Page 31: ...el tornillo blanco 12 que est en la parte superior de la bomba gir ndolo en sentido antihorario La presi n del agua har salir todo el aire atrapado dentro del sistema de la bomba de filtraci n Apriet...

Page 32: ...o sustituir el cartucho filtrante varias veces al principio hasta lograr un nivel correcto de cloro y pH Le recomendamos que tenga siempre a mano al menos un cartucho filtrante de repuesto Puede comp...

Page 33: ...UIDADO El nivel de cloro concentrado y el nivel de pH da ar n la piscina Debe seguir las instrucciones de cantidad y uso recomendado de los productos qu micos que utiliza para la piscina NUNCA deje ca...

Page 34: ...est da ado E Flujo de agua es lento F Hacen falta otros productos qu micos G El agua de la piscina est muy sucia B Orificio de entrada salida atascado C El cartucho filtrante est sucio A Manguera de...

Page 35: ...la bomba del filtro boca abajo Ahora la base 15 est bloqueada por una palanca de seguridad Para desbloquearla empuje la palanca de seguridad hacia abajo y luego g rela hacia izquierda Suelte la base 1...

Page 36: ...mente en el motor puede detenerse y no funcionar corectamente Tap n del Asta Arandela Paletas del Impulsar Eje Magnetico Asta Central Debe ser una pieza atravesando todas las partes incluyendo los d s...

Page 37: ...or Salida de la caja de filtro alineada con la boquilla de goma de la bomba motor 19 19 3 Por favor aseg rese que la boquilla de goma este alineada con la apertura donde se conecta la manguera Si no e...

Page 38: ...P58PF1430W05 P58PF2820P01 P58PF7780W05 P58PF7790W05 P58PF0620K01 P58150036W01 P58219221W05 P58182201W05 P58182501K01 P58PP1853W05 P58183901W05 P58164800K01 P58PP1840W05 P58185201K01 P58X1501C000 P5810...

Page 39: ...iones de montaje detalladas 9 El orificio de salida de succi n PSF 100A o PSF 100B debe sustituirse cada 5 a os 10 No es necesario utilizar herramientas para la instalaci n 11 Instrucciones de manteni...

Reviews: