background image


User Manual 

v017 

Table of Contents 

Safety: 

PolyPrinter Operation 
Part Cleaning 

Computer Requirements 

Video 
CPU 
RAM 
Operating System 

System Specifications 

Parts of the PolyPrinter 

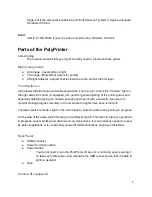
Main Components 
Front Switches 
Rear Panel: 
Camera (if equipped) 

Adjustments 

Z Height 

How to tell if it’s correct: 
Procedure: 
Adjustment: 


Summary of Contents for 229-FW-2

Page 1: ... Operation Part Cleaning Computer Requirements Video CPU RAM Operating System System Specifications Parts of the PolyPrinter Main Components Front Switches Rear Panel Camera if equipped Adjustments Z Height How to tell if it s correct Procedure Adjustment ...

Page 2: ...Nozzle problems Clogged Nozzle Worn out Nozzle How to measure the nozzle diameter Replacing the Nozzle Software Installation Power Saver Settings Computer Update Settings Computers with Extremely Slow Graphics Windows 8 Finding Parts Slicer Settings Kisslicer Slicing Parts NOTE Steps Scaling Orientation Do the actual slicing Saving the GCODE Printing Multiple Different Parts Making a Bed of Parts ...

Page 3: ... Filament Troubleshooting Connection Problems Check the Port Problems and Solutions Printing Stopped no messages Head Contacting Bed Error When starting a print General Head height checking Can t Connect to Printer Parts are not sticking to the bed My small parts tend to get knocked loose during printing Tips Warranty After the Warranty Expires Continuous Improvement vs New Models and Versions Ope...

Page 4: ...ust be used only on a cool bed and never poured or spilled The room must have adequate ventilation to disperse the vapors Acetone on a heated bed will vaporize rapidly forming an explosive mixture The ABS or other plastics used for printing may give off fumes In general these are not deemed very toxic but some people may develop a reaction after intense or long term exposure Keep small children th...

Page 5: ...rd cardboard wood or a magazine Try to orient the part being cleaned so that you are generally putting downward pressure on the tool such that the desk surface takes all the force and is also what is hit by the tool when you cleave the plastic Use finger guards or leather gloves to protect against minor nicks and cuts Use tools that are just sharp enough to do the job Sometimes a slightly duller t...

Page 6: ... information when they process the files Like the number of cores this can be exchanged for time but sometimes and it is again much more of an issue with the larger parts the amount of time required can rise dramatically if the computer is bogged down moving information back and forth between hard drive and RAM because there is not enough RAM to work on it all at once Aim for at least 6 GB if you ...

Page 7: ... of the printing area and especially helpful in giving the camera enough light to work with especially if you want to monitor printing progress remotely in a room where the lights have been turned off The lower switch controls a light on the X Carriage to better be able to see printing in progress On the side of the same switch housing is a red Reset switch This will interrupt any operations in pr...

Page 8: ...ant to successful prints It sets the thickness of the first printed layer It needs to be in a fairly narrow range of height for that first layer to stick properly Once you have it set correctly it usually stays the same for quite a while until something changes The PolyPrinter ships out only after it has been adjusted properly and has successfully printed a number of objects However it may have ha...

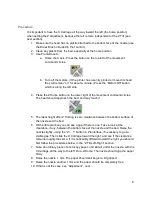
Page 9: ...roach the bed and may touch it 5 The ideal height after Z Homing is zero clearance between the bottom surface of the nozzle and the bed 6 With a little practice you can see a gap if there is one Take a look at the clearance if any between the bottom face of the nozzle and the bed Raise the nozzle slightly using the Z 1 buttton in Pronterface if necessary to get a visible gap Then slide the X Carri...

Page 10: ...above the paper will still be gripped a bit or a lot even after raising the nozzle 2 mm or more 1 Move the X carriage or the Y carriage by hand Motors Off and see if the head leaves marks on the bed tape It s generally well adjusted if it just barely makes marks If it s tearing up the tape or digging into it at all it s definitely adjusted too low Turn the knob clockwise to increase the clearance ...

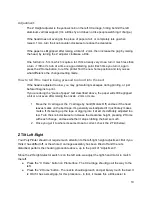
Page 11: ...the overall height adjustment described above in Adjustment You will need to loosen the two setscrews that couple the right hand Z rod to the belt drive assembly at the top of the printer They are a bit hard to see They are opposite each other so if one is easy to see the other will be harder to see Use the 1 5mm smallest sized hex driver tool Once you do that you can make fine adjustments by slig...

Page 12: ...ar it away occasionally The one thing to watch out for is the bottom surface of the nozzle which has the tiny hole the plastic extrudes through The nozzle is brass which is quite soft compared with any steel utensil you might be tempted to use Never allow a steel object to touch the bottom face of the nozzle We have a Brass Brush in the toolkit so that you can more safely snag bits of plastic off ...

Page 13: ...s wrinkles in it you may need to use a fresh piece of tape If it just has some bubbles in it you can pick up one end peel it back halfway and use the card to push it back down to the bed while keeping the end up away from the bed so there s a clean line of contact You may need to this for each half When you re satisfied with the first row of tape do the same thing with the next and continue on tow...

Page 14: ...ide garbage if you can to avoid a buildup of the vapor in your work or living area Nozzle problems You can expect to replace the print head extruder nozzle once in a while It may clog It wears out enlarging the orifice and reducing print quality Clogged Nozzle If it is clogged you will be unable to make plastic come out of the nozzle This can happen usually near the end of a large part if Murphy s...

Page 15: ...placement due to wearing too large If you see a section of some of your prints where layer after layer typically on the right rear corner or wherever filament has begun to be laid down on the outside after travel the plastic just doesn t seem to fill in properly consistently and perhaps curls up in place on the outside it may be due to the nozzle diameter Failing to fill well is another indication...

Page 16: ...and whom you can blame if there is trouble afterwards Required Items 10 mm wrench open end is used to counter torque 7 mm nut driver 1 Paper towel Optionally one or two disposable gloves to avoid skin irritation from glass fibers Steps Removing the nozzle Let the head and the bed cool down to 45 C or lower Raise the head most of the Z travel e g at least 150 mm so that there is room for the nut dr...

Page 17: ...a plastic in order to put the wrench on it properly the circular or box end Try it now when the head is cold and you can clean it before going on to the next steps where you ll actually be using it If you cannot clean it well enough to fit the wrench on while the head is cold you ll need to clean it with the brush while it s hot Once you are able to test fit the 13mm wrench onto the aluminum block...

Page 18: ...do is keep it from trying to twist You will therefore resist the nozzle twisting force with a matching force If you take a long time with these next steps the wrench will become too hot to work with and you will need to remove it and wait for it to cool down before trying again The nut driver on the nozzle needs to rotate with the near side traveling toward your left Slowly apply a twisting torque...

Page 19: ... tighten it so that it seals to the aluminum block Remember to balance the torque you apy to the nozzle with counter torque on the 13 mm wrench Let the head cool again to 40C or below Replace the sock You will probably need to start it on all four corners and then pull it up on each corner in turn It should hang a bit below the block but not as low as the nozzle Carefully fold the paper towel up s...

Page 20: ...much that printing speed is reduced If the printer seems sluggish stopping briefly or going half speed at times during a print you may need to use Mini Mode which closes most of the Pronterface window That button will change to Full Mode so you can open it up fully again to check progress or start another print Windows 8 There is a problem installing the standard USB driver under Windows 8 You nee...

Page 21: ... of this quick guide Use Part Add from the menu 3 Make sure the orientation is the best for printing Many STLs are oriented to make their designing convenient but that is not necessarily the best way to print it There are two important aspects to the orientation 1 Amount of support required This affects printing time cleaning time and surface finish 2 Strength Printed parts are stronger within the...

Page 22: ...eate GCODE from STL files We at Polyprinter much prefer the use of Kisslicer over Slic3r But either can be used for slicing the file for a Polyprinter print The control program Pronterface can read either STL files or GCODE files If a STL file is read then Pronterface has built in functionality to call Slic3r to create the GCODE file before printing the file The Settings menu lets you set up Slic3...

Page 23: ...t if you are not sure You can see Kisslicer s time estimate vary if you have already sliced the object once For scaling look at the menu up top All Models Inch mm is a shortcut to 25 4 conversion As a general rule if you print with no support and have steep overhangs you should also change the Style to have Loops go from Inside to Perimeter checked It will do much better on overhangs Objects with ...

Page 24: ... can adjust the size of the model to something you think is appropriate by typing over the Height field in the model s thumbnail window on the right hand side You can also use the menu All Models Scale By X function Orientation Make sure the orientation is the best for printing Many STLs are oriented to make their designing convenient but that is not necessarily the best way to print it There are ...

Page 25: ...inting Multiple Different Parts The Pro version of Kisslicer 42 allows loading many different parts onto the bed to print them in one batch If you do not want to spend that money you can still create a bedful of dissimilar parts using the Slic3r program that is included in the PolyPrinter install package yellow icon NOTE Slic3r is not set up to actually slice models and create correct gcode for th...

Page 26: ...ase Connected If it does not see below in Troubleshooting Connection Problems Installing the Filament If it s a new reel you will have to unpack it and find the end which should normally be threaded through a hole in the rim of the reel taking care not to let it slip under any of the other turns of filament Make sure you can loosen the end but don t let it unravel If there is no hole in the rim to...

Page 27: ...nch Push the filament still holding the lever down until it won t easily go any further It should go in about two inches 5 cm and if the head is up to temperature continued steady pressure will make melted filament ooze out of the nozzle Let go of the lever Closing the Filament Detector Hook the filament over the pulley and move the pulley and filament together up toward the switch Its magnets sho...

Page 28: ...it pause for a few seconds and then printing should begin Getting parts off the bed A good general procedure is to watch Pronterface for the bed temperature to drop about 65 C and only then try to release the part The bed will cool down fastest if the hood is opened and the Y carriage is pulled forward all the way Parts remain bendable until they have cooled down below about 70 C so you risk defor...

Page 29: ... the removed filament can burn you watch out If it does not want to come out and you have only just heated the head up wait a minute or so for the heat to fully warm the filament You may set the head temperature to 260 C if necessary for a very stubborn one Once you have the filament out of the extruder hold onto it and remove the spool with your other hand and insert the free end into one of the ...

Page 30: ...he displayed COM port text directly to match what s shown in Device Manager If you do have the correct port and nothing happens open the front cover and press the red Reset button on the Polyprinter and then try the Connect again If still nothing happens disconnect the USB cable open the front cover and press the red Reset button on the Polyprinter reconnect the USB cable and then try the Connect ...

Page 31: ...e or tear Otherwise possibly someone adjusted the head too low and it needs to be raised But only do that if there s no other apparent reason for the message General Head height checking A basic test is to position the X and so the head is in the middle and let it with nozzle hot pinch a piece of paper Check for messages at that point Raise 2 to 3 mm and the paper should be virtually free by 3mm C...

Page 32: ...sing acetone Some parts simply don t have enough area on the bottom layer to stick well See below My small parts tend to get knocked loose during printing First see above for parts not sticking in general But if all of that is in order Thin Parts Some parts have almost no contact with the bed If they also don t require much support then there maybe so little bed contact that they come loose or tip...

Page 33: ...gaps a bit Acetone all by itself works well too if the parts fit closely together Brush it on both push hold and they just melt together Any type of krazy glue Cyanoacrylate works well too but can make a white film that shows up on dark or clear parts For strong yet flexible bonds one of the goop type products will work well e g Automotive GOOP Kiwi Shoe Patch is the best 33 ...

Page 34: ...ist with advice or instruction in replacing the parts The entire PolyPrinter can be disassembled and reassembled with hand tools If you prefer to have PolyPrinter perform the labor then you may send your machine to us at your expense both ways and we will do the repair with no labor charge Alternatively only at our discretion we may deem that there is some reason why the printer must be returned t...

Page 35: ...ur PolyPrinter has a defect that must be covered by the warranty The warranty only covers things that were not manufactured correctly or could not fulfil their intended function to the degree they were specified to at the time That being said however this does not preclude us from offering customers the ability to self upgrade their machines by printing replacement parts or purchasing updated repl...

Page 36: ...with several open source packages The installation puts the license files in place at the time Access to source code is available upon request The Gcode M115 gives information on the open source software that is part of the PolyPrinter itself 36 ...

Reviews: