background image

FR

Descriptif & Contenu

F

x4

C

E

H

x2

D

G

x2

A

x2

B

Joint d’étanchéité

Ø 38mm

Poignée amovible

Raccords PAC / UC

longueur 6m / Ø 30mm

Transformateur

AC 230V / AC 12V (Fusible 1A)

Kit de fixation

Adaptateur PAC 1″½

Ø 30mm - 38mm

Poolex UConnect

et son câble d’alimentation (8m)

Joint d’étanchéité

Ø 30mm

CONTENU

CARACTéRiSTiqUES

Poolex UConnect

La solution la plus rapide et la plus simple pour raccorder votre pompe à chaleur à 

votre bassin.

• 

Alimentation 230V

• 

Moteur pompe 12V / 85W

• 

Protection IPX8

• 

Débit min. 3,8 m³/h

• 

Débit max. 5,2 m³/h

•  Connecteur 1″½

Dimensions en mm

Ligne d’eau min.

300

Summary of Contents for UConnect

Page 1: ...GUIDE D INSTALLATION INSTALLATION MANUAL Le raccord universel pour pompes à chaleur piscine The universal connector for swimming pool heat pumps ...

Page 2: ......

Page 3: ...naler tout dommage éventuel Avant de brancher la pompe assurez vous que les données fournies sont compatibles avec les conditions d installation réelles et ne dépassent pas les limites maximales auto risées pour le produit en question En cas de défaut et ou de dysfonctionnement de la pompe l alimentation électrique doit être isolée et aucune tentative de réparation de la panne ne doit être entrepr...

Page 4: ...on Adaptateur PAC 1 Ø 30mm 38mm Poolex UConnect et son câble d alimentation 8m Joint d étanchéité Ø 30mm CONTENU Caractéristiques Poolex UConnect La solution la plus rapide et la plus simple pour raccorder votre pompe à chaleur à votre bassin Alimentation 230V Moteur pompe 12V 85W Protection IPX8 Débit min 3 8 m h Débit max 5 2 m h Connecteur 1 Dimensions en mm Ligne d eau min 300 ...

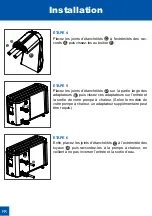
Page 5: ...oolex UConnect F au bord de votre piscine La partie inférieure doit être immergée jusqu à hauteur de la buse de refoulement Assurez vous d être à moins de 4 mètres de votre pompe à chaleur Pour plus de stabilité le Poolex UConnect peut être fixé au bord de votre piscine à l aide de deux vis fixées de chaque coté de la partie supérieure étape 1 étape 2 étape 3 F F H ...

Page 6: ...urs B puis vissez ces adaptateurs sur l entrée et la sortie de votre pompe à chaleur Selon le modèle de votre pompe à chaleur un adaptateur supplémentaire peut être requis étape 4 étape 5 B D F A C F Enfin placez les joints d étanchéités C à l extrémitée des tuyaux A puis raccordez les à la pompe à chaleur en veillant à ne pas inverser l entrée et la sortie d eau étape 6 A C ...

Page 7: ...ar asservissement reportez vous à la notice d installation de votre pompe à chaleur Finalisez l installation en reliant le câble électrique du Poo lex UConnect au transformateur L installation est terminée votre Poolex UConnect doit maintenant fonctionner Fixez la poignée G sur le dessus du boîtier à l aide des vis fournis étape 8 étape 7 Attention l étape suivante doit être réalisée par un profes...

Page 8: ...e vente Poolstar garantit au propriétaire d origine les défauts matériels et les défauts de fabrication du kit Poolex UConnect pendant une durée de 2 ans à compter de la date de facturation du premier utilisateur La garantie ne s applique pas dans les cas suivants Dysfonctionnement ou dommage résultant d une installation d une utilisation ou d une réparation non conforme aux consignes de sécurité ...

Page 9: ...ts packaging please check it thoroughly in order to detect any possible damage Before plugging the Connector please insure that the provided data is compatible with the actual installation process and that actual conditions do not surpass the maximum authorized limits In case of product defect or dysfunction the electrical connection must be isola ted and no attempt to repair the dysfunction or br...

Page 10: ...kit Heat pump adapter 1 Ø 1 2 1 5 30mm 38mm Poolex UConnect with a 8yd m cable 8m Seal Ø 1 2 30mm CONTENT FEATURES Poolex UConnect The fastest and easiest solution to connect your heat pump to your swimming pool Power Supply 230V Warter Pump 12V 85W IPX8 Protection Min water flow 3 8 m h 836 gal hr Max water flow 5 2 m h 1 144gal hr 1 Adaptor Inch dimensions Min Water level 12 ...

Page 11: ...Place the Poolex UConnect F on the side of your swim ming pool The bottom part must be immersed up to the delivery nozzle Make sure to be at least 4 yards away from your heat pump For better stability the Poolex Uconnect may be attached to the side of your pool with 2 screws placed on each side of the upper part STEP 1 STEP 2 STEP 3 F F H ...

Page 12: ...on the large side of the adaptors B then screw these adaptors on the entrance and the exit of your heat pump According to the heat pump you may need an additional adaptor STEP 4 STEP 5 B D F A C F Then place the waterproofing seals C at the end of the pipes A then connect them to the heat pump making sure not to reverse the water entrance and exit STEP 6 A C ...

Page 13: ... please refer to your heat pump manual Finalize the installation by linking the Poolex UConnect electric cable to the transformer The installation is now finished and your Poolex UConnect is ready to function Install the handle G on top of the body of Poolex UConnect using the supplied screws STEP 8 STEP 7 WARNING THE FOLLOWING STEP MUST BE MADE BY A QUALIFIED PROFES SIONAL WITH THE ELECTRICITY SH...

Page 14: ...ir supplier and consult the contract conditions Poolstar warranties to the original owner all material defects and manufacturing defects of the Poolex UConnect kit for two years following the billing date of the first user Warranty is not extended in the following cases Malfunction or damages resulting from the installation use or repair not conform to security instructions Malfunction or damages ...

Page 15: ......

Page 16: ...Distribution POOLSTAR FRANCE www poolstar fr ZA les Pielettes 13740 LE ROVE FRANCE Assistance Technique SUPPORT 04 91 51 01 99 www poolex fr ...

Reviews: