background image

8

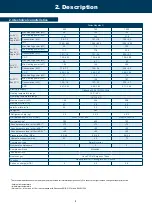
2.4 technical caracteristics

2. Description

The technical specifications of our heat pumps are provided for information purposes only. We reserve the right to make changes without prior notice.

Ambient air temperature

Initial water temperature

3

 Noise at 1 m, at 4 m and at 10 m in accordance with Directives EN ISO 3741 and EN ISO 354

Poolex Megaline Fi

500

750

1000

Air 26°C 

Eau 26°C 

Hygro 80%

Max. Heating power (kW)

68

102

135

Min. Heating power (kW)

16,1

24,3

31,9

 Consumption (kW)

9.8~1.2

14.7~1.8

19.3~2.3

COP

13.54~6.93

13.56~6.95

13.59~6.98

Air 15°C 

Eau 26°C 

Hygro 70%

Max. Heating power (kW)

50

75

100

Min. Heating power (kW)

11,7

17,8

23,6

 Consumption (kW)

10.1~1.6

15.1~2.4

20.0~3.1

COP

7.52~4.93

7.55~4.96

7.58~4.99

Air 6°C 

Eau 26°C

Max. Heating power (kW)

45

67

90

Min. Heating power (kW)

10,2

15,3

20,5

 Consumption (kW)

11.4~1.7

16.9~2.6

22.6~3.5

COP

5.84~3.96

5.85~3.97

5.88~3.99

Air 35°C 

Eau 27°C

Max. Heating power (kW)

37

55

74

Min. Heating power (kW)

9,1

13,5

18,1

 Consumption (kW)

10.2~1.4

15.1~2.0

20.3~2.7

EER

6.67~3.63

6.68~3.64

6.71~3.65

 Electricity supply

Triphasée 380-415V/3N~50Hz

 Heating temperature range

15°C~40°C

 Operating temperature range

-15°C~43°C

 Maximum power (kW)

14,9 

22,4 

29,8 

 Maximum current (A)

27

39

53

water flow rate (m³/h)

20 

30 

40 

Refrigerant

R32

 Réfrigérant charg (kg)

4.5

2.6 *2

4.5*2

 Unit dimensions L x W x H (mm)

1252×1076×1865

2148×1076×2176

 Unit weight (kg)

380

450

760

 Sound pressure level at 1m (dBA) 

(3)

<70

<72

<74

 Sound pressure level at 4m (dBA) 

(3)

<58

<60

<62

 Sound pressure level at 10m (dBA) 

(3)

<50

<52

<54

Pressure mini / Max (MPa)

0.2/4.4

0.2/4.4

0.2/4.4

 Hydraulic connection (mm)

63

63

75

Compressor type

Rotatif Inverter

Number of compressors

1

2

2

Compressor brand

Mitsubishi

 Équivalent CO2
Heat exanger

Cuve PVC et Serpentin Titane

Fonction

Heating Inverter / Cooling Inverter / Silence

Pertes en charge (mCE)

4

4,2

4,8

Summary of Contents for Poolex MEGALINE FI

Page 1: ...INSTALLATION AND USER MANUAL de votre pompe à chaleur www poolstar fr MEGALINE FI ...

Page 2: ...released into the surrounding area Before starting work the environment of the equipment should be checked to ensure that there is no risk of flammability No smoking signs must be posted 6 Ventilated area Make sure the area is in the open air or is properly ventilated before working on the system or performing hot work Some ventilation must be maintained during the duration of the work 7 Controls ...

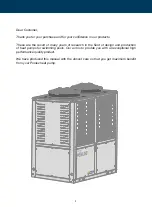
Page 3: ...the result of many years of research in the field of design and production of heat pumps for swimming pools Our aim is to provide you with an exceptional high performance quality product We have produced this manual with the utmost care so that you get maximum benefit from your Poolex heat pump ...

Page 4: ... 4 2 Operating mode selector 19 4 3 Mode Veille 18 4 4 Operating modes 18 4 5 Clock Setting 18 4 6 On Off synchronization adjustment 18 4 7 Activation deactivation of On Off groups 19 4 8 Setting the set temperature 19 4 9 Main parameters 19 4 10 State values 20 4 11 System parameters 21 5 Operation 22 5 1 Operation 22 5 2 Servo control of circulating pump 23 5 3 Using the pressure gauge 23 5 4 An...

Page 5: ...rvicing the person responsible must be aware of all the instructions in the heat pump s installation manual as well as the technical specifications Under no circumstances install the equipment close to a source of heat combustible materials or a build ing s air intake If installation is not in a location with restricted access a heat pump protective grille must be fitted To avoid severe burns do n...

Page 6: ...s stopped Check the water flow rate every month and clean the filter if necessary During cleaning Switch off the equipment s electricity supply Close the water inlet and outlet valves Do not insert anything into the air or water intakes or outlets Do not rinse the equipment with water During repairs Carry out work on the refrigerant system in accordance with current safety regulations Brazing shou...

Page 7: ...nt and environmentally friendly R32 refrigerant Reliable high output leading brand compressor Wide hydrophilic aluminium evaporator for use at low temperatures User friendly intuitive remote control Designed to be silent Dual antifreeze system to avoid frost damage Revolutionary exchanger with patented antifreeze system Asmart monitoring system to preserve the pipework and liner without emptying t...

Page 8: ...on kW 11 4 1 7 16 9 2 6 22 6 3 5 COP 5 84 3 96 5 85 3 97 5 88 3 99 Air 35 C Eau 27 C Max Heating power kW 37 55 74 Min Heating power kW 9 1 13 5 18 1 Consumption kW 10 2 1 4 15 1 2 0 20 3 2 7 EER 6 67 3 63 6 68 3 64 6 71 3 65 Electricity supply Triphasée 380 415V 3N 50Hz Heating temperature range 15 C 40 C Operating temperature range 15 C 43 C Maximum power kW 14 9 22 4 29 8 Maximum current A 27 3...

Page 9: ...ns 2 Description A A B B C C G G F D E E D F Dimensions en mm Modèle Megaline Fi 500 750 Megaline Fi 1000 A 1865 2176 B 1252 2148 C 1076 1076 D 150 190 E 430 640 F 242 242 G 1317 2224 Megaline Fi 500 750 Megaline Fi 1000 ...

Page 10: ...ompressor 9 Electric transformer 10 Bottom panel 11 Logic board box 12 Electrical box cover 13 Front panel 14 Water Flow Switch 15 Pressure gauge 16 Electrical terminal block 2 Description 1 3 4 2 1 3 15 15 15 16 16 16 3 4 4 7 7 7 8 8 8 9 9 9 10 10 11 11 12 12 13 13 14 14 6 6 6 5 5 5 2 14 Megaline Fi 500 Megaline Fi 750 Megaline Fi 1000 ...

Page 11: ...ion Please comply with the following rules concerning the choice of heat pump location 1 The unit s future location must be easily accessible for convenient operation and maintenance 2 It must be installed on the ground fixed ideally on a level concrete floor Ensure that the floor is sufficiently stable and can support the weight of the unit 3 A water drainage device must be provided close to the ...

Page 12: ...e kit Install the heat pump raising it at least 10 cm with solid water resistant pads then connect the drainage pipe to the opening located under the pump Valves 1 2 and 3 Bypass valves Valves 4 and 5 Regulating valves Recommended for facilitating adjustments close to the machine Half open valve Open valve Key Heat pump Water outlet Water intake Elevating studs Drain plug Condensation draining Val...

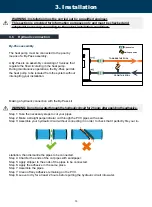
Page 13: ... 8 Leave to dry for at least 2 hours before putting the hydraulic circuit into water 3 6 Hydraulic connection WARNING Installation must be carried out by a qualified engineer This section is provided for information purposes only and must be checked and adapted if necessary according to the actual installation conditions WARNING Do not run water through the hydraulic circuit for 2 hours after appl...

Page 14: ...rly cleared so that the water in the system is clean thus avoiding the operational problems associated with dirt or clog ging in the filter Half open valve Half open valve Open valve Open valve Key Key TOWARDS THE POOL Filtration Pump Filtration Pump Automated treatment system Automated treatment system TOWARDS THE POOL FROM THE POOL POOL POOL FROM THE POOL ...

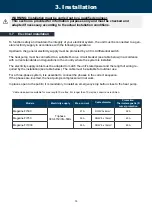
Page 15: ...oor use For a three phase system it is essential to connect the phases in the correct sequence If the phases are inverted the heat pump s compressor will not work In places open to the public it is mandatory to install an emergency stop button close to the heat pump 1 Cable cross section suitable for max length 10 metres For longer than 10 metres consult an electrician 3 7 Electrical installation ...

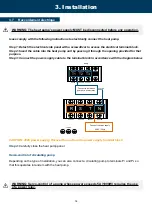
Page 16: ...type of installation you can also connect a circulating pump to terminals P1 and P2 so that this operates in tandem with the heat pump 3 Installation 3 7 Raccordement électrique WARNING The heat pump s power supply MUST be disconnected before any operation WARNING Servo control of a pump whose power exceeds 5A 1000W requires the use of a power relay T N S R T3 Pump T2 T1 PHASE A PHASE A PHASE B PH...

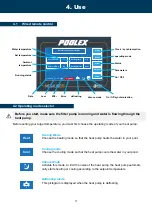
Page 17: ...t pump heats the water in your pool Defrosting mode This pictogram is displayed when the heat pump is defrosting 4 1 Wired remote control On OFF Date Set temperature Ambiant temperature Running status Water temperature hour WiFi Error defrosting silence mode On Off synchronisation Clock synchronisation operating mode Status Parameters Before you start make sure the filter pump is running and water...

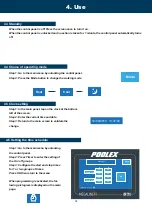
Page 18: ...rn to the main screen to validate the change Step 1 Go to the main menu by unlocking the control panel Step 2 Press Timer to enter the setting of the On off groups Step 3 Configure the start and stop times for 1 or two groups of times Press OK then return to the menu When programming is activated the fol lowing pictogram is displayed on the main page 4 5 Clock setting 4 6 Setting the time schedule...

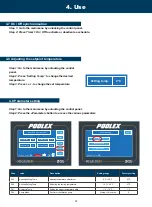
Page 19: ...arameter setting Code value Description Setting range Factory setting P05 Heating Setting Temp Heating temperature adjustment 8 C 28 C 27 C P04 Cooling Setting Temp Adjusting the cooling temperature 15 C 40 C 27 C P01 Hystersis Temp Setting the trigger temperature delta 1 C 18 C 1 C P28 Pump Mode Control of the filtration pump 0 stop 1 Non stop 0 Step 1 Go to the main menu by unlocking the control...

Page 20: ... exchanger outlet temperature 1 1 DC Voltage DC power supply voltage 1 1 Operating Freq Operating frequency 1 2 Fan Speed Fan speed 2 2 Exhaust Temp Compressor 2 outlet temperature 0 125 C 2 Suction Temp Compressor 2 inlet temperature 30 99 C 2 Coil Temp Heat exchanger 2 inlet temperature 30 99 C 2 Inside Coil Temp Exchanger 2 outlet temperature 30 99 C 2 Opening of EEV Opening of electronic valve...

Page 21: ...ost Ambient Temp P17 EEV Cycle P18 Heating Overheat Overheating heating mode P19 Adjust EEV Temp Opening temperature of the expansion valve P20 Defrost EEV Opening Opening of the defrost mode expansion valve P21 EEV minimum opening Minimum opening of the expansion valve P22 EEV Mode Selection of the expansion valve mode P23 EEV Manual Steps Manual step expansion valve P24 Cooling Overheat Overheat...

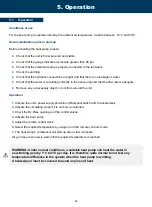
Page 22: ...ny unnecessary object or tool from around the unit Operation 1 Activate the unit s power supply protection differential switch and circuit breaker 2 Activate the circulating pump if it is not servo controlled 3 Check the By Pass opening and the control valves 4 Activate the heat pump 5 Adjust the remote control clock 6 Select the required temperature by using one of the remote control s mode 7 The...

Page 23: ...d you must call a qualified technician to recharge it Control mode of the circulation pump When you turn on your heat pump the circulation pump starts up and then 1 minute later the heat pump compressor activates When the heat pump stops working its compressor and fan shut off then after 30 seconds the circulation pump shuts off During a defrost cycle the circulation pump will continue to operate ...

Page 24: ...04 error is displayed if the water outlet temperature is less than 2 C This code disappears when the outlet water temperature exceeds 4 C In the main interface tap on the WiFi logo Smart configure this mode allows you to intelligently configure the WiFi connection Once this mode is activated the WiFi logo flashes Launch your Tuya Smart application on your phone and connect to your heat pump AP Con...

Page 25: ...ocation essential For more information go to the Help section of the Tuya Smart application Tuya Smart application and services are provided by Hangzhou Tuya Technology Company The Poolstar company owner and distributor of the Poolex brand cannot be held responsible for the operation of the Tuya Smart application The Poolstar company has no visibility on your Tuya Smart account 5 5 1 Download Inst...

Page 26: ...phone number and click Send verification code Step 2 Enter the verification code received by email or phone to validate your account Congratulations You are now part of the Tuya Smart community 5 5 2 Setting up the app WARNING Before you begin make sure you have downloaded the Tuya Smart app connected to your local WiFi network and that your heat pump is electrically powered and running Step 3 Rec...

Page 27: ...ing to the following Push Note The blinking will stop when the box is connected to WiFi Step 6 Now activate the pairing Choose the WiFi network to use enter its password and click Confirm ATTENTION The Tuya Smart application only supports 2 4GHz WiFi networks If your WiFi network uses the 5GHz frequency go to the interface of your home WiFi network to create a second 2 4GHz WiFi network available ...

Page 28: ...e Congratulations You can now control your heat pump from your smartphone 5 5 3 Controlling 1 2 3 4 5 6 7 5 Operation 1 Current pool temperature 2 Temperature setpoint 3 Current operating mode 4 Switch the heat pump on off 5 Change the temperature 6 Change the operating mode 7 Set the operating range ...

Page 29: ...Step 2 To delete a time slot press on it and hold For Inverter heat pumps You can choose between Inverter Heating Cooling Eco Silent or On Off Manual modes Configure the operating ranges for the heat pump Choice of operating modes 5 Operation Inverter heating Inverter cooling Eco Inverter Available modes ...

Page 30: ...ce of refrigerant WARNING Before undertaking maintenance work on the unit ensure that you have disconnected the electrical power supply In the winter months when the ambient temperature is lower than 3 C a shut down heat pump must be winterised to avoid any frost damage Winterising in 4 steps 6 2 Winter storage Step 1 Disconnect the heat pump from the power supply Step 3 Unscrew the drain plug and...

Page 31: ...imming pool by 1 C to 2 C per day It is therefore quite normal to not feel any temperature difference in the system when the heat pump is working A heated pool must be covered to avoid any loss of heat In the event of a problem the heat pump s screen displays a fault symbol instead of temperature indi cations Please consult the table opposite to find the possible causes of a fault and the actions ...

Page 32: ...k that the filtration pump is working and that the water flow is sufficient bypass adjust ment Water inlet sensor failure 1 The sensor is not properly connected 1 Reconnect the sensor 2 The sensor is defective 2 Replace the sensor 3 The electronic card is defective 3 Replace the electronic board Outside coil sensor 1 failure Outside coil sensor 2 failure Exhaust sensor 1 failure Exhaust sensor 2 f...

Page 33: ...2 and main Program board Module disconnected or defective Reconnect or replace the Module Defective module Replace the module Failure of frequency conversion module 1 Failure of frequency conversion module 2 Module disconnected or defective Reconnect or replace the Module Defective module Replace the module ...

Page 34: ... new pur chase Your heat pump has reached the end of its life and you wish to dispose of it or to replace it Do not throw it in the rubbish bin A heat pump must be disposed of separately with a view to its reuse recycling or upgrading It contains substances that are potentially hazardous to the environment but which will be eliminated or neutralised by recycling YOU HAVE THREE SOLUTIONS 8 1 Recycl...

Page 35: ...chemical agent that is unsuitable for the pool Malfunction or damage arising from conditions that are unsuitable for the equipment s purposes of use Damage arising from negligence accident or force majeure Malfunction or damage arising from the use of unauthorised accessories Repairs undertaken during the warranty period must be approved prior to being carried out by an authorised technician The w...

Page 36: ...oil temperature Ambient temperature Exhaust temperature Filter Plate RD Electronic Expansion Valve CN4 CN9 CN1 Low pressure switch 1 High pressure switch 1 Four way valve Crankcase heater Cooling fan Null Null Null Com Com Water flow switch BK BN BU Programming port FAN M1 PUMP CIRCULATION PUMP 380V 3 50Hz M1 RD BK WH FAN Y GN Y GN VSP GND FG VCC 1 0 4 3 12 10 14 XT1 20 N T1 T2 T3 T4 T5 T6 T7 21 2...

Page 37: ...g temperature 2 Filter Plate RD Electronic Expansion Valve 1 Electronic Expansion Valve 2 CN4 CN9 CN1 Low pressure switch 1 High pressure switch 1 Low pressure switch 2 High pressure switch 2 Four way valve Crankcase heater Cooling fan Null Null Null Com Com Com Water flow switch BK BN BU BK BNBU 15V HGND 310V FG2 VSP2 Programming port FAN1 L1 L2 L3 M1 U V W PUMP FAN2 M2 L1 L2 L3 CIRCULATION PUMP ...

Page 38: ...www poolstar fr MEGALINE FI TECHNICAL ASSISTANCE www poolex fr 09 2020 ...

Reviews: