UNPACK AND SET-UP
BATTERY PACK AND CHARGING
CAUTION:
The charger for this product should be protected by a leakage current device
(rated at 30mA or less).
7KHSXUFKDVHGEDWWHU\ZLOOEHVKLSSHGLQDORZFKDUJHFRQGLWLRQDQGUHTXLUHVFKDUJLQJSULRUWRXVH$OORZVHYHUDOF\FOHVRIFKDUJLQJDQG
discharging (through use of the tool) for the battery to reach its optimum performance/runtime.
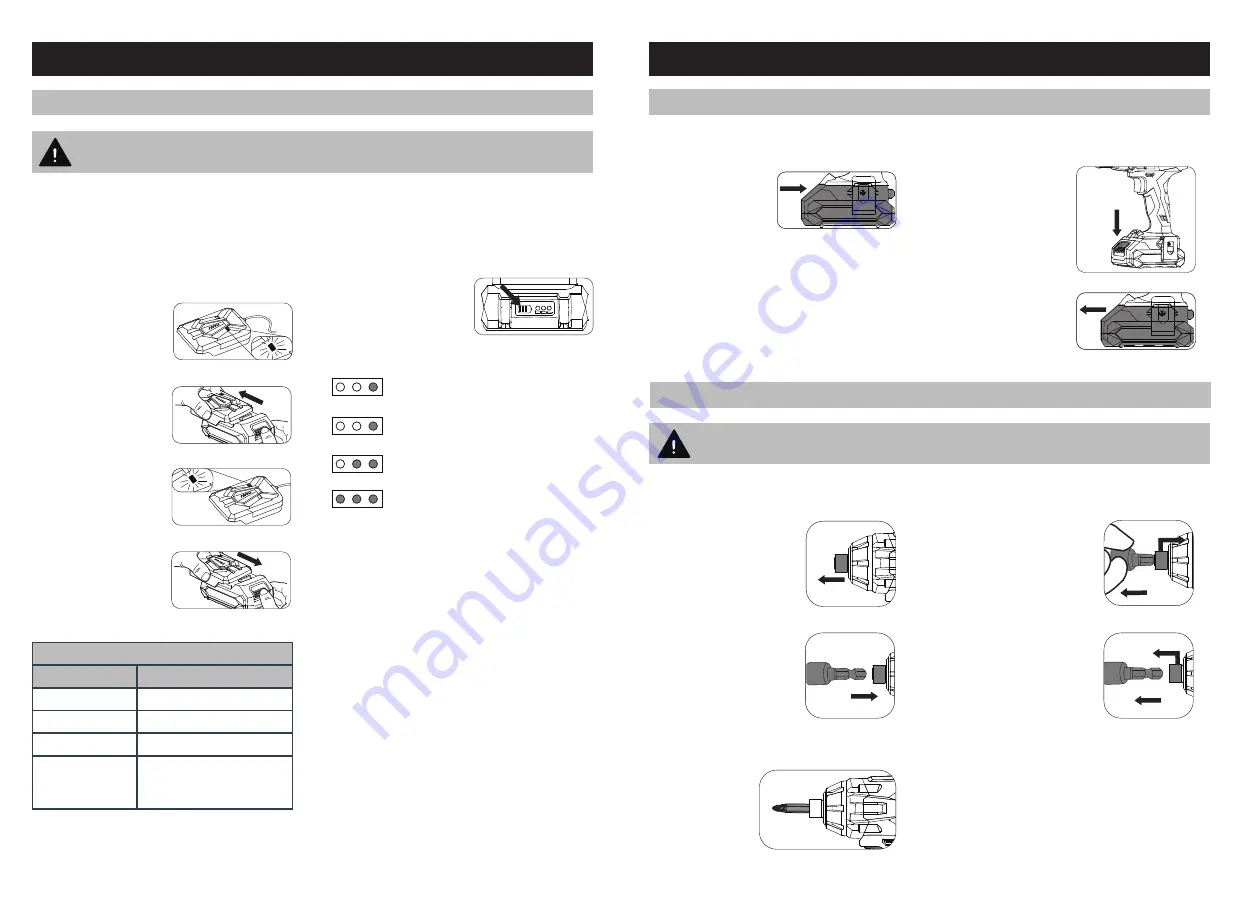
Charging Your Lithium-ion Battery
The purchased battery is
HTXLSSHGZLWKDEDWWHU\JDXJH
indicator to show the charged
state of the battery. Press the
indicator button and look to see
which LED illuminate.
5HGLOOXPLQDWHGEDWWHU\UHTXLUHVLPPHGLDWH
charging
.
*UHHQLOOXPLQDWHGORZVWDWHRIFKDUJH
UHTXLUHVFKDUJLQJVRRQ
*UHHQLOOXPLQDWHGPLGVWDWHRIFKDUJH
*UHHQLOOXPLQDWHGIXOO\FKDUJHG
NOTE:
The battery needs to be removed from the tool to check
the state of charge.
*5((1
Stand by (no battery pack is inserted)
RED (illuminated)
Battery is charging (low charge)
*5((1LOOXPLQDWHG
Battery is fully charged
*5((1LOOXPLQDWHG
Battery or charger fault (If charging a
SDUWLDOO\GUDLQHGEDWWHU\WKHFKDUJHU
LED indicator could not turn from
green to red.)
LED Indicator
Situation
Charger LED Indicator (on the charging base)
Battery Gauge Indicator
&RQQHFWWKH$&'&FKDUJLQJ
adaptor into a mains power
outlet.
2. The charger LED will
illuminate green showing power
is being supplied to the
charger.
:LWKWKHEDWWHU\SDFNVLWWLQJ
RQDWIODWVXUIDFHDOLJQWKH
raised ribs on the battery with
the recess in the charging base
and slide onto the battery
ensuring a firm connection.
4. The charger LED will
illuminate red signifying that the
battery is charging.
:KHQUHPRYLQJWKHFKDUJLQJ
EDVHIURPWKHEDWWHU\ILUVW
press the battery release
EXWWRQWKHQVOLGHWKHFKDUJLQJ
base from its position.
DESEMPAQUE Y CONFIGURACIÓN (CONT.)
INSTALACIÓN/EXTRACCIÓN DE LA BATERÍA
MONTAJE
Instalación de la Batería
'HVOLFHODEDWHUtDHQODEDVH
del atornillador de impacto
KDVWDTXHHQFDMHHQVXOXJDU
Extracción de la Batería
0DQWHQJDSUHVLRQDGR
el botón que libera el
paquete de batería.
'HVOLFHODEDWHUtDKDFLD
afuera.
Colocar y Quitar Accesorios
1. Tire del anillo de retención de la
unidad hacia adelante.
,QVHUWHHOH[WUHPRKH[DJRQDO
de la tuerca de accionamiento
KH[DJRQDODSURSLDGDGH
6XHOWHHODQLOORGHUHWHQFLyQGH
ODXQLGDG\OXHJRKDOHODWXHUFDGH
accionamiento para asegurarse de
que esté firmemente en su lugar.
3DUDTXLWDUKDOHGHODQLOORGH
retención de la unidad hacia
DGHODQWH\UHWLUHODWXHUFDGH
DFFLRQDPLHQWRKH[DJRQDO
PRECAUCIÓN:
1RPDQLSXOHORVDFFHVRULRVVLQJXDQWHV\DTXHVRQILORVRV\SXHGHQFDOHQWDUVHGHVSXpVGHOXVRORTXHSRGUtDFDXVDU
lesiones personales.
NOTA:
$QWHVGHLQVWDODURH[WUDHUODEDWHUtDDVHJ~UHVHGHTXHHOJDWLOORLQWHUUXSWRUHVWpEORTXHDGR
a
b
a
b
¡ADVERTENCIA!
Asegúrese de que la herramienta esté apagada y que la batería se haya
retirado antes de realizar cualquiera de las siguientes tareas.
'HODPLVPDIRUPDVHSURFHGHSDUDFRORFDURTXLWDUODSXQWDDWRUQLOODGRUDFRPRODWXHUFDGHDFFLRQDPLHQWRTXHVHPXHVWUDDUULED


