background image

10- ENG 

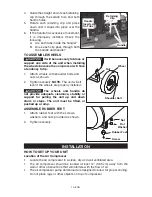
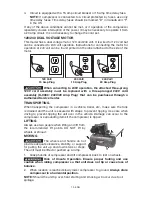
4.  Guide the straight end of each retaining 

Handle 

Inserted 

On Tabs

Retaining 

Clip

Handle

clip  through  the  saddle  hole  and  both 

handle holes.

5.  Rotate  each  retaining  clip  and  press 

down until it snaps into place over the 

handle.

6.  If the handle has excessive movement, 

it  is  improperly  installed.  Check  the 

following.


A.   Are both tabs inside the handle?


B.   Does each clip pass through both 

the saddle and handle?

TO ASSEMBLE WHEELS

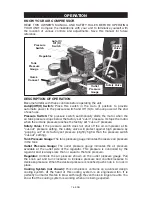
It will be necessary to brace or 

Wheel

Shoulder Bolt

Nut

support  one  side  of  the  unit  when  installing 

the wheels because the compressor will have 

a tendency to tip.
1.  Attach wheels with shoulder bolts and 

nuts as shown. 

2.  Tighten securely. 

NOTE: The unit will sit 

level if the wheels are properly installed.

The  wheels  and  handle  do 

not  provide  adequate  clearance,  stability  or 

support  for  pulling  the  unit  up  and  down 

stairs  or  steps.  The  unit  must  be  lifted,  or 

pushed up a ramp.

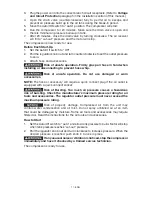
ASSEMBLE RUBBER FEET                        

Screw

Nut

Flat 

Washer

Rubber Foot

1.  Attach rubber feet with the screws, 

washers, and nuts provided as shown.

2.  Tighten securely.

INSTALLATION

HOW TO SET UP YOUR UNIT

Location of the Air Compressor

• 

Locate the air compressor in a clean, dry and well ventilated area. 

• 

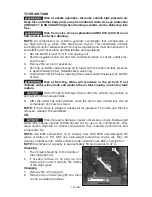
The air compressor should be located at least 12" (30.5 cm) away from the 

wall or other obstructions that will interfere with the flow of air. 

• 

The air compressor pump and shroud are designed to allow for proper cooling. 

Do not place rags or other objects on top of compressor.

Summary of Contents for C5512

Page 1: ...ERACI N CENTROS DE SERVICIO Y P LIZA DE GARANT A L ASE ESTE INSTRUCTIVO ANTES DE USAR EL PRODUCTO Fran ais Page 29 Espa ol P gina 59 Air Compressor Compresor de aire Compresseur d air Instruction manu...

Page 2: ...oduct contains chemicals known to the State of California to cause cancer and birth defects or other reproductive harm Wash hands after handling Some dust contains chemicals known to the State of Cali...

Page 3: ...he compressed air directly from your compressor is not safe for breathing The air stream may contain carbon monoxide toxic vapors or solid particles from the air tank Breathing these contaminants can...

Page 4: ...to prevent it Failure to properly drain condensed water from air tank causing rust and thinning of the steel air tank Drain air tank daily or after each use If air tank develops a leak replace it imme...

Page 5: ...nqualified personnel can result in serious injury or death by electrocution Any electrical wiring or repairs required on this product should be performed by authorized service center personnel in acco...

Page 6: ...urns Never touch any exposed metal parts on compressor during or immediately after operation Compressor will remain hot for several minutes after operation Do not reach around protective shrouds or at...

Page 7: ...uct Equip area of operation with a fire extinguisher Do not op er ate machine with missing broken or un au tho rized parts HAZARD Risk of Falling What can happen How to prevent it A portable compress...

Page 8: ...nute a unit of measure of air delivery PSIG Pounds per square inch gauge a unit of measure of pressure Code Certification Products that bear one or more of the following marks UL CUL ETL CETL have bee...

Page 9: ...essor see Check Oil under Maintenance To Install Handle The wheels and handle do not provide adequate clearance stability or support for pulling the unit up and down stairs or steps The unit must be l...

Page 10: ...ts and nuts as shown 2 Tighten securely NOTE The unit will sit level if the wheels are properly installed The wheels and handle do not provide adequate clearance stability or support for pulling the u...

Page 11: ...modify the plug provided If it does not fit the available outlet a correct outlet should be installed by a qualified electrician Repairs to the cord set or plug MUST be made by a qualified electricia...

Page 12: ...ed 240V cord assembly K 0080 240V 20 Amp Plug that can be purchased through a Authorized Service Center Transporting When transporting the compressor in a vehicle trailer etc make sure the tank is dra...

Page 13: ...ystem NOTE Compressedairfromoillubeaircompressorswillcontainwa tercondensation and oil mist Several drains traps and filters will be needed to supply air without water including aerosols or oil to spr...

Page 14: ...rain legs preventing it from entering feeder lines REGULATOR BALL FILTER FLEXIBLE COUPLING DRAIN VALVE TYPICAL COMPRESSED AIR DISTRIBUTION SYSTEM AIR FLOW AIR FLOW FEEDER LINES SLOPE WITH AIR FLOW AIR...

Page 15: ...pressure switch does not shut off the air compressor at its cut out pressure setting the safety valve will protect against high pressure by popping out at its factory set pressure slightly higher tha...

Page 16: ...reaches cut out pressure Motor Overload Protector The motor has a thermal overload protector If the motor overheats for any reason the overload protector will shut off the motor The motor must be all...

Page 17: ...ose whip Risk of unsafe operation Do not use damaged or worn accessories NOTE The hose or accessory will require a quick connect plug if the air outlet is equipped with a quick connect socket Risk of...

Page 18: ...ure To ensure efficient operation and longer life of the air compressor outfit a routine maintenance schedule should be prepared and followed The following routine maintenance schedule is geared to an...

Page 19: ...l condense in the air tank If not drained water will corrode and weaken the air tank causing a risk of air tank rupture Risk of Property Damage Drain water from air tank may contain oil and rust which...

Page 20: ...to make sure it is clean and in place If it is dirty replace it with a new filter 1 Using a pair of needle nose pliers or a screwdriver pull or pry out the old filter and carefully clean the filter ar...

Page 21: ...and A2 in figure The difference between measurements should be no more than 1 16 1 6 mm 5 If the difference is greater than 1 16 1 6 mm loosen the set screw holding the motor drive pulley to the shaft...

Page 22: ...ve 5 Unscrew the check valve turn counterclockwise using a 7 8 open end wrench Note the orientation for reassembly 6 Using a screwdriver carefully push the valve disc up and down NOTE The valve In clo...

Page 23: ...4 Store the air compressor in a clean and dry location SERVICE REPLACEMENT PARTS REPLACEMENT PARTS Use only identical replacement parts For a parts list or to order parts visit our service website at...

Page 24: ...f motor when compressor reaches cut out pressure Move Auto Off lever to the Off position if the unit does not shut off contact a Trained Service Technician Pressure switch cut out too high Contact a T...

Page 25: ...amount of air usage Compressor is not large enough for air requirement Check the accessory air requirement If it is higher than the SCFM or pressure supplied by your air compressor you need a larger c...

Page 26: ...cian Paint spray on internal motor parts Have checked by a Trained Service Technician Do not operate the compressor in the paint spray area See flammable vapor warning Pressure release valve on pressu...

Page 27: ...ed by a Trained Service Technician Belt too tight Loosen wingnut and then tighten wingnut until it contacts the washer plus one turn Excessive belt wear Loose belt Loosen wingnut and then tighten wing...

Page 28: ...SPRAYING USE NSHA NIOSH APPROVED MASK RESPIRATOR FOR PROTECTION IN A WELL VENTILATED AREA DO NOT USE COMPRESSED AIR FOR BREATHING LEER EL MANUAL DEL OPERADOR ANTES DE ARRANCAR EL COMPRESOR LEER LAS I...

Reviews: