Flange Machine
Part Number 6Z8303
Installation and Setup
17
Connecting the Pneumatic Power
After the electrical connection is established, connect the pneumatic power.
Locate all air lines for the sewing head, then do the following:
1
To connect the air lines to the sewing head, match corresponding numbers
printed on air fittings to each air line.
Pneumatic Power
Energy for the machine’s
parts, which is provided
by compressed air.
2
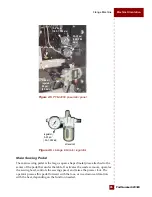
Locate the pneumatic panel. When properly seated at the machine, the
operator will see this panel located beneath the sewing table on the right
side.
3
Attach the main air line to the main air regulator located at the bottom of the
pneumatic panel.
4
Verify that the main air regulator is set at 80 psi (5.5 bars).
Performing an Initial Checkout
After installing the flange machine for the first time or after moving the machine
to a new location, perform the following steps:
1
Verify that the sewing head contains the proper amount of oil.
2
Verify that air pressure is available. Connect the air supply.
3
Properly ground the machine.
4
Connect the receptacle to the outlet.
The flange machine is ready for operation.
Making a Safety Check
Before operating the PFM-4000 Flange Machine, walk around the perimeter and
Obstruction
Something
that seriously hinders
action or progress.
visually check for obstructions. Clear all moving parts and all surfaces of tools,
equipment, fabric, and debris. Remove tools and unnecessary objects from the
machine table. Ensure no unauthorized people are in the area. Always follow the
principles outlined in
IMPORTANT!
Verify that the air lines are properly connected. Each air
line has a number printed on it. Match the numbers on the
air lines with the corresponding numbers printed on the air
fittings. The air fittings are found at the top of the sewing
head.


