background image

7

ASSEMBLY INSTRUCTIONS

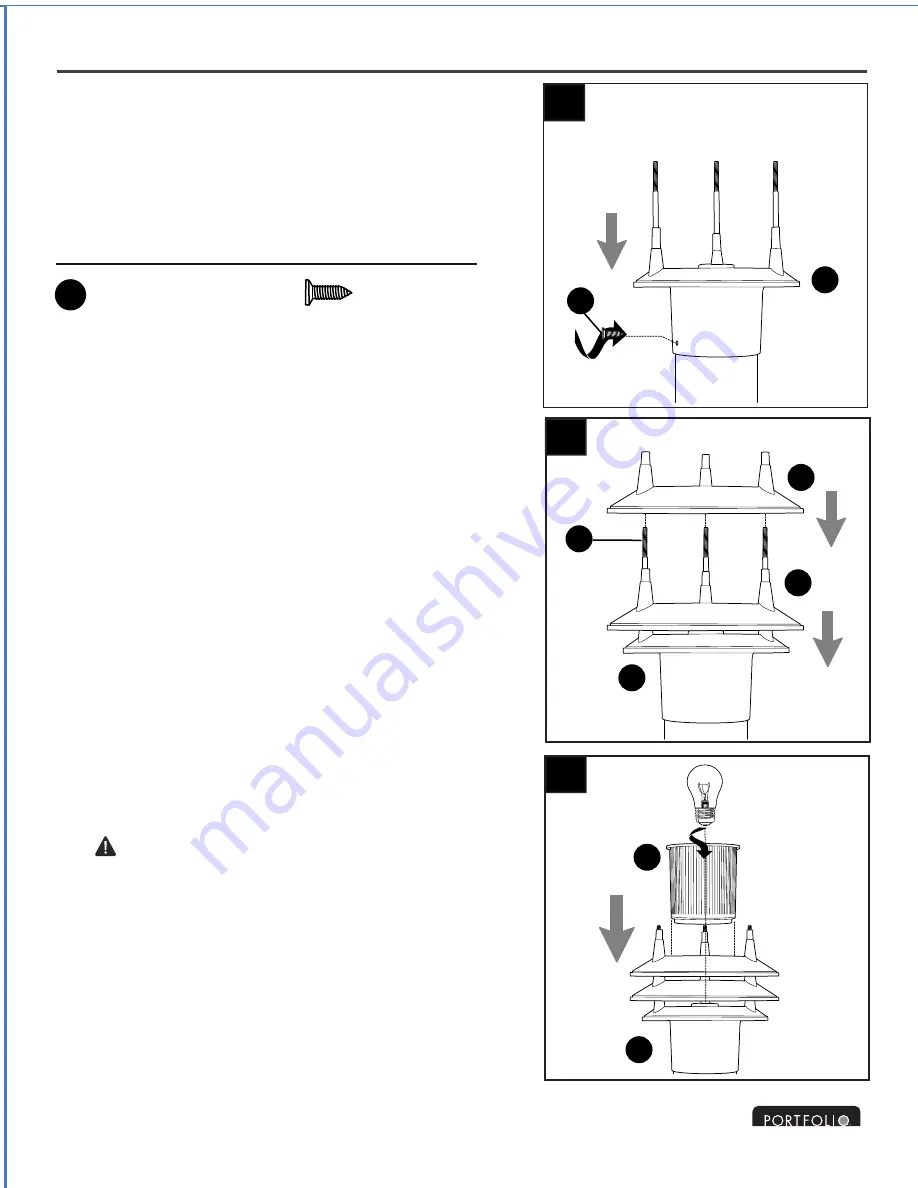
6.

8.

Install one standard-base bulb (not included). 
Use either a 60-watt max. incandescent bulb 
or a 13-watt CFL.  

      CAUTION

: When replacing bulb, please 

allow bulb and shade (D) to cool down before 
touching them.

Carefully place shade (D) over bulb.

Carefully push excess wiring and wire 
connectors (AA) inside top of post or pier 
base (neither included).

Place fixture (A) onto the mounting surface 
and secure with the mounting screw (BB).  

6

64

4

6

6

8

Bulb

A

A

BB

Hardware Used

 Mounting Screw

BB

  x 1

7.

Align the three holes on underside of spacer 
(C) with the fixture screws (DD) in fixture (A). 
Push down on spacer (C) to secure in place. 
Repeat for the remaining spacer (C).

6

7

A

C

C

D

DD

Lowes.com/portfolio

Summary of Contents for 0398487

Page 1: ...to your retailer call our customer service department at 1 800 643 0067 8 a m 6 p m EST Monday Thursday 8 a m 5 p m EST Friday ITEM 0398487 0398489 MODEL PL126BK PL126WW Fran ais p 10 Espa ol p 19 POS...

Page 2: ...le install or operate this product Failure to do so could lead to electrical shock fire or other injuries that could be hazardous or even fatal B SAFETY INFORMATION A Fixture 1 PART DESCRIPTION QUANTI...

Page 3: ...s injury or death from electrical shock WARNING All electrical connections must be in agreement with local codes and ordinances the National Electric Code NEC and ANSI NFPA 70 1999 Contact your munici...

Page 4: ...on may result in serious injury or death 1 1 PREPARATION CAUTION TURN OFF ELECTRICITY at main fuse box or circuit breaker box before beginning installation by removing the fuse or switching the circui...

Page 5: ...ure screws DD into the three holes in outer edge on the underside of fixture A Tighten fixture screws DD with a Phillips screwdriver not included IMPORTANT Fixture screws DD must be screwed completely...

Page 6: ...clockwise direction WARNING Never connect ground wire to white or black power supply wires WARNING To reduce the risk of fire electrical shock or personal injury wire connectors AA provided with this...

Page 7: ...er bulb Carefully push excess wiring and wire connectors AA inside top of post or pier base neither included Place fixture A onto the mounting surface and secure with the mounting screw BB 6 6 4 4 6 6...

Page 8: ...ectrical malfunction or electrical shock A A Align three posts on underside of fixture cover B with three fixture screws DD on fixture A Push down on fixture cover B until fixture screws DD come throu...

Page 9: ...damages As some states do not allow exclusions of limitations on an implied warranty the above exclusion and limitation may not apply This warranty gives you specific rights and you may also have oth...

Reviews: