background image

Printed in China

4

Fuse blows or circuit 

trips when fixture is 

turned on

Light will not turn on

Defective switch

Wrong wiring or power 

wire is grounding out

Consult a certified professional electrician

Consult a certified professional electrician

Replace bulb

Bulb is burned out

CARE AND MAINTENANCE

TROUBLESHOOTING

If you have any questions regarding the product, please call our customer service department at 

1-800-643-0067, 8 a.m. - 6 p.m., EST, Monday - Thursday, 8 a.m. - 5 p.m., EST, Friday. 

LIMITED WARRANTY

Manufacturer warrants all of its lighting fixtures against defects in materials and workmanship for one (1)

year from the date of original purchase.

This warranty does not cover parts becoming defective due to misuse, accidental damage, improper

handling and/or installation and specifically excludes liability for indirect, incidental or consequential

damages. Product found to be defective may or may not be replaced with same or like type product,

contingent on the nature of the defect, and or replacement availability and or compensated for at a pro

rated value. Some states do not allow limitations on how long an implied warranty lasts, and/or the

exclusion or limitation of incidental or consequential damages, so the above limitations or exclusions

may not apply to you. This warranty gives you specific rights and you may also have other rights,

which vary from state to state. Proof of purchase is required to exercise the warranty.

PROBLEM

POSSIBLE CAUSE

CORRECTIVE ACTION

ASSEMBLY INSTRUCTIONS

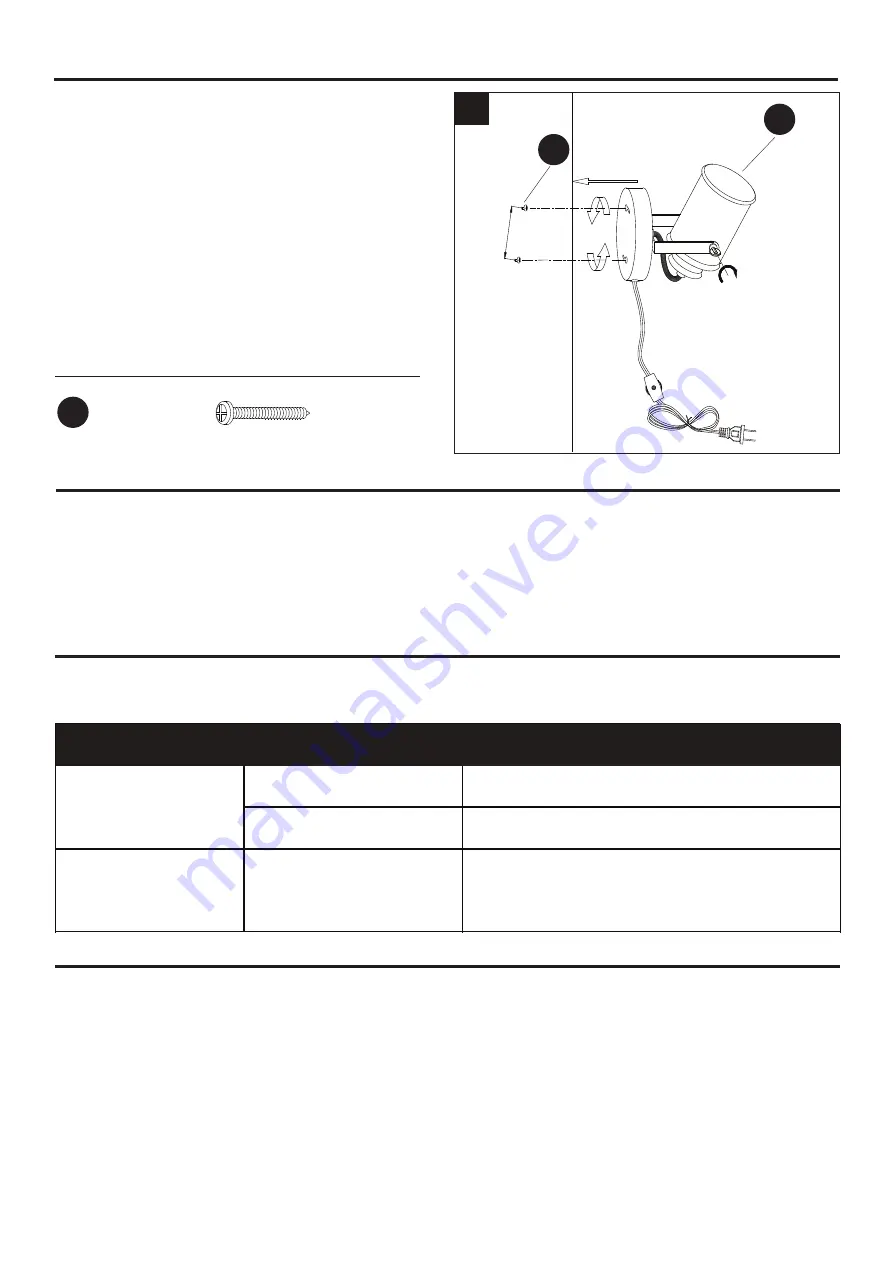
2. If installing fixture assembly (A) on wall, with a

    pencil mark the location on the wall for the top

    screw. Note: The cord should be oriented

    down. Measure 2-5/8 in. (68 mm) from the first

    mark and mark the second screw location.

    Using appropriate hardware (not included) for

    the wall type, set the screws (AA) into the wall

    at marked points, leaving enough exposed to

    set into the keyhole slots on the fixture

    assembly (A). Install the fixture assembly (A)

    onto screws (AA). See Fig. 2.

2

A

AA

Hardware Used

AA

 Screw

x 2

• This unit is suitable for indoor use only.

• To avoid risk of electric shock or fire, do not modify this lamp; if any modification is made it may 

   render the product unsafe.

• Clean this unit periodically. Clean the surface finish only using water and mild soap; dry with a 

  soft cloth. Never use rough cloth, abrasives or chemical cleaners containing acids or harsh 

  solvents.

Summary of Contents for 17837-001

Page 1: ...EL 17837 001 SINGLE SPOTLIGHT Français p 5 Español p 10 Questions problems missing parts Before returning to your retailer call our customer service department at 1 800 643 0067 8 a m 6 p m EST Monday Thursday 8 a m 5 p m EST Friday ATTACH YOUR RECEIPT HERE Serial Number Purchase Date ...

Page 2: ...PACKAGE CONTENTS B A 2 PART DESCRIPTION A B Fixture Assembly QUANTITY 1 1 Bulb HARDWARE CONTENTS Screws Qty 2 AA ...

Page 3: ...ng when placed in a wall application CAUTION Risk of Fire use maximum 13 Watt CFL type bulb do not exceed recommended wattage A 13 watt CFL bulb is the equivalent to a 40 watt incandescent bulb AA 3 ASSEMBLY INSTRUCTIONS 1 B A 1 Install the bulb B into socket of fixture assembly A See Fig 1 PREPARATION Before beginning assembly of product make sure all parts are present Compare parts with package ...

Page 4: ...t allow limitations on how long an implied warranty lasts and or the exclusion or limitation of incidental or consequential damages so the above limitations or exclusions may not apply to you This warranty gives you specific rights and you may also have other rights which vary from state to state Proof of purchase is required to exercise the warranty PROBLEM POSSIBLE CAUSE CORRECTIVE ACTION ASSEMB...

Page 5: ...837 001 PROJECTEUR Des questions des problèmes des pièces manquantes Avant de retourner l article au détaillant appelez notre service à la clientèle au 1 800 643 0067 entre 8 h et 18 h HNE du lundi au jeudi ou entre 8 h et 17 h HNE le vendredi JOIGNEZ VOTRE REÇU ICI Numéro de série Date d achat HOMOLOGUÉ ...

Page 6: ...CONTENU DE L EMBALLAGE B A 6 PIÈCE DESCRIPTION A B Luminaire QUANTITÉ 1 1 Ampoule QUINCAILLERIE INCLUSE Vis Qté 2 AA ...

Page 7: ...SE EN GARDE Attention Risque de Feu employez Maximum 13 watts type CFL ampoule Ne dépassez pas la puissance recommandée Une ampoule fluocompacte de 13 watts équivaut à une ampoule incandescente de 40 watts AA 7 INSTRUCTIONS POUR L ASSEMBLAGE 1 B A 1 Vissez l ampoule B dans la douille du luminaire A Consultez la figure 1 PRÉPARATION Avant de commencer l assemblage du produit assurez vous d avoir to...

Page 8: ... façon à pouvoir les insérer dans les encoches en trou de serrure du luminaire A Fixez le luminaire A aux vis AA Consultez la figure 2 2 A AA Quincaillerie utilisée AA Vis A Cet appareil est conçu pour être utilisé à l intérieur seulement Pour éviter les risques de choc électrique et d incendie ne modifiez pas ce luminaire Toute modification pourrait rendre son utilisation dangereuse Nettoyez péri...

Page 9: ...ges accidentels ou d une manipulation ou d une installation inadéquate et elle exclut expressément toute responsabilité pour des dommages indirects accessoires ou consécutifs Tout produit qui s avère défectueux sera remplacé ou non par un produit de type semblable ou identique selon la nature du défaut la disponibilité d un produit de remplacement ou le dédommagement accordé selon la valeur au pro...

Page 10: ...OR SIMPLE Preguntas problemas piezas faltantes Antes de volver a la tienda llame a nuestro Departamento de Servicio al Cliente al 1 800 643 0067 de lunes a jueves de 8 a m a 6 p m hora estándar del Este y los viernes de 8 a m a 5 p m hora estándar del Este ADJUNTE SU RECIBO AQUÍ Número de serie Fecha de compra HOMOLOGADO ...

Page 11: ...CONTENIDO DEL PAQUETE B A PIEZA DESCRIPCIÓN A B Ensamble de la lámpara CANTIDAD 1 1 Bombilla ADITAMENTOS Tornillos Cant 2 AA 11 ...

Page 12: ... pared de panel de yeso PRECAUCIÓN Riesgo de Fuego use bombilla typo CFL de 13 vatios maximo no exceda el vataje recomendado Una bombilla CFL de 13 vatios equivale a una bombilla incandescente de 40 vatios AA 12 INSTRUCCIONES DE ENSAMBLAJE 1 B A 1 Instale la bombilla B en el portalámparas del ensamble de la lámpara A Consulte la Fig 1 PREPARACIÓN Antes de comenzar a ensamblar el producto asegúrese...

Page 13: ...ando expuesta una parte que encaje en las ranuras con forma de cerradura del ensamble de la lámpara A Instale el ensamble de la lámpara A en los tornillos AA Consulte la Fig 2 2 A AA Aditamentos utilizados AA Tornillo A Esta unidad está diseñada sólo para uso en interiores Para evitar el riesgo de descargas eléctricas o incendio no modifique esta lámpara Si realiza cualquier tipo de modificación e...

Page 14: ...de la fecha de compra original Esta garantía no cubre piezas dañadas debido al mal uso daño accidental manipulación y o instalación inadecuada y excluye toda responsabilidad por daños indirectos accidentales o resultantes Un producto defectuoso puede o puede no ser reemplazado por el mismo tipo de producto o uno similar dependiendo de la naturaleza del defecto y o la disponibilidad de repuestos y ...

Reviews: