background image

2

Lowes.com/portfolio

SAFETY INSTRUCTIONS/CONSIGNES DE SÉCURITÉ/INSTRUCCIONES DE SEGURIDAD

Please read and understand this entire manual before attempting to assemble, operate or install the product.


WARNING

•  


This power pack is for use with low-voltage landscape lighting systems ONLY. 

•  


This power pack is suitable for outdoor use ONLY.

•  

 NOT 

suitable for use with submersible luminaries and pumps.

•  


DO NOT

 submerge the power pack in water.

•  


DO NOT

 use the power pack with a dimmer switch.

•  


DO NOT

 mount the power pack upon combustible material.

•  


Always disconnect the power pack from the electrical outlet when working on the lighting system.

•  


DO NOT

 connect two or more power suppliers in parallel.

CAUTION


 Power pack MUST be installed at least 20 in. above ground level.


DO NOT

 mount power pack or luminaires within 10 ft. of a swimming pool or spa.


DO NOT

 bury the connectors or cables at depth greater than 6 in.


DO NOT

 exceed the maximum wattage of the power pack’s terminal.

 For use only on a branch circuit protected by a Class A-type ground fault circuit interrupter (GFCI).


The supply circuit for the landscape lighting system shall be protected by a Class A-type GFCI, unless it is provided with 

the landscape lighting system.


DO NOT

 repair or tamper with cord or plug.

 A cord-connected landscape lighting system shall not be used with an extension cord.


DO NOT

 mount power pack indoors or in an enclosed area. 

NO

 garages, crawl spaces or beneath ground level decks.


This device is accepted as a component of a landscape lighting system where the suitability of the combination shall be 

determined by UL or CSA or local inspection authorities having jurisdiction.


Risk of 

 Do not place insulation under terminal plate. 

 The power pack has a 2

0

0-watt circuit that powers up to 2

0

0 watts of light.

 Cable distance, total wattage and spacing of the light 

 affects the light output of each 

 along the run.


Lower gauge cable, such as 12 AWG (recommended for all runs), allows for the highest wattage 

 at the beginning of 

the run.

Lité de ce manuel avant de tenter d’assembler d’installer ou d’utiliser le produit.


AVERTISSEMENT


Ce bloc d’alimentation doit être utilisé avec des éclairages pour aménagement paysager à basse tension  

UNIQUEMENT.


Ce bloc d’alimentation est conçu pour un usage à l’extérieur 

SEULEMENT.


NON

 destiné à un usage avec des luminaires ou des pompes submersibles.

 N’immergez 

PAS

 le bloc d’alimentation dans l’eau.

 N’utilisez 

PAS

 le bloc d’alimentation avec un gradateur.

 N’installez 

PAS

 le bloc d’alimentation sur des matériauxcombustibles.

 Débranchez toujours le bloc d’alimentation de la prise de courant avant de manipuler le système d’éclairage.

 Ne reliez pas deux alimentations d’énergie ou plus en parallèle.


This equipment has been tested and found to comply with the limits for a Class-B digital device, pursuan to Part 15 of the FCC 

Rules. These limits are designed to provide reasonable protection against harmful interference in a residential installation. This 

equipment generates, uses and can radiate radio frequency energy and, if not installed and used in accordance with the 

instructions, may cause harmful interference to radio communications. However, there is no guarantee that interference will not 

occur in a particular installation. If this equipment does cause harmful interference to radio or television reception, which can be 

determined by turning the equipment off and on, the user is encouraged to try to correct the interference by one or more of the 

following measures: 

– Reorient or relocate the receiving antenna.  

– Increase the separation between the equipment and receiver. 

– Connect the equipment into an outlet on a circuit different from that to which the receiver is connected.   

– Consult the dealer or an experienced radio/TV technician for help.

MISE EN GARDE

 Le bloc d’alimentation DOIT être installé à un minimum de 50,80 cm au-dessus du sol.

 N’installez 

PAS

 le bloc d’alimentation ou les luminaires à moins de 3,04 m d’une piscine ou d’un spa.

 N’enterrez 

PAS

 les connecteurs et les câbles à une profondeur supérieure à 15,24 cm.

 Ne dépassez 

PAS

 la puissance maximale en watts des bornes du bloc d’alimentation .


À utiliser uniquement sur un circuit de dérivation protégé par un disjoncteur différentiel de classe A.

Summary of Contents for 475578

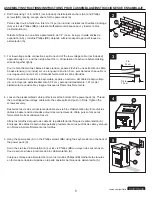
Page 1: ...CIBO AQUI Power Pack Bloc d alimentation Bloque de alimentación x 1 A Note Hardware shown actual size Remarque La quincaillerie est illustrée en grandeur réelle Nota Los aditamentos se muestran en tamaño real Mounting template not shown to size Gabarit de montage grandeur non réelle Plantilla para montaje no se muestra en tamaño real x 2 AA BB Plastic anchor Cheville d ancrage en plastique Ancla d...

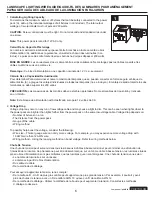
Page 2: ...anuel avant de tenter d assembler d installer ou d utiliser le produit AVERTISSEMENT Ce bloc d alimentation doit être utilisé avec des éclairages pour aménagement paysager à basse tension UNIQUEMENT Ce bloc d alimentation est conçu pour un usage à l extérieur SEULEMENT NON destiné à un usage avec des luminaires ou des pompes submersibles N immergez PAS le bloc d alimentation dans l eau N utilisez ...

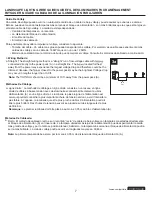
Page 3: ...mentación en interiores o en un área cerrada NO instale en garajes espacios debajo del piso ni plataformas por debajo del nivel del suelo Este dispositivo está aceptado como componente de un sistema de iluminación para jardín donde la aptitud de la combinación será determinada por UL CSA o por las autoridades de inspección locales que tengan jurisdicción Riesgo de incendio No coloque el aislamient...

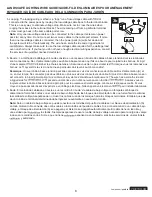
Page 4: ... 50 80 cm au dessus du niveau du sol Remarque Ce bloc d alimentation A est muni d une cellule photoélectrique intégrée près des boutons de contrôle Choisissez l emplacement pour que l appareil capte la lumière du soleil pendant le jour Ne PAS le bloc d alimentation A à un endroit où il pourrait être exposé à la lumière comme celle des luminaires de rue ou d une lampe de véranda car le système d éc...

Page 5: ...es de bajo voltaje separe un extremo del cable de bajo voltaje no se incluye de aproximadamente 5 08 cm y pele aproximadamente 1 91 cm del aislamiento de cada cable y luego enrosque los filamentos firmemente 4 Loosen the preassembled cable port screws at the bottom of the power pack A Thread the pre stripped low voltage cables into the cable ports and push in firmly Tighten the screws securely Des...

Page 6: ...s de tipo sólido y trenzado en un tornillo Nota Este bloque de alimentación está clasificado solo para 12 voltios de CA 2 Voltage Drop Voltage drop may occur on any run of low voltage cable and may cause a light to dim This can be seen when lights closer to the power pack are brighter than lights further from the power pack on the same low voltage cable Voltage drop depends on Number of fixtures o...

Page 7: ...the dimmest likewise the closest to the power pack may be the brightest Voltage drop may occur in lengths longer than 100 ft Note The should be a minimum of 10 ft away from the power pack A 10 ft 3 m 3a Ligne droite La méthode de câblage en ligne droite consiste en un réseau en ligne droite de câbles à basse tension avec des luminaires connectés directement au bloc d alimentation A en une ligne dr...

Page 8: ... must go back in the same cable port screw Note Only one low voltage cable can be connected to the cable port screws on power pack A at any time Do not connect two or more cables to the cable port screws If more than one low voltage cable is connected then the power pack A will shut down and the system will turn off automatically The wire has a smooth side and a rigged side for Always make sure to...

Page 9: ...qu il fait clair 1 à 9 MINUTERIE les lumières s allument automatiquement lorsqu il fait sombre et s éteignent après le nombre d heures choisi E LE CIRCUIT DOIT ÊTRE VÉRIFIÉ Si cette lettre s affiche l alimentation en électricité du bloc d alimentation est interrompue ou trop de lumières sont installées Débranchez immédiatement l appareil de la prise électrique et vérifiez les éléments suivants Le ...

Page 10: ...xture To clean the fixture use a dry or slightly dampened clean cloth DO NOT use any cleaners with chemicals solvents or harsh abrasives as damage to the fixture may occur Check periodically the screws connecting the cable to the power pack terminals are tight to prevent overheating CAUTION A loose wire increases the risk of fire tighten all connections securely Avant de nettoyer coupez l électric...

Page 11: ...us disposiez également d autres droits qui varient d un État ou d une province à l autre El fabricante garantiza la ausencia de defectos en los materiales o en la fabricación de todos sus accesorios de iluminación durante un período de un año a partir de la fecha de compra Si dentro de este período el producto presenta defectos en el material o la fabricación se debe devolver el producto junto con...

Reviews: