English
- 15 -
Cleaning coated or painted surfaces.
Never aim the steam at glued edges as the strips may become
detached. Do not use the appliance on unsealed wooden or
parquet floors.
Take care when cleaning kitchen or domestic furniture, doors,
parquet, painted surfaces or surfaces coated with synthetic
products.
If prolonged use is made of steam, wax, French polish, synthetic
coatings or paint may become detached, deteriorate or be
marked. You are recommended to clean these surfaces with a
steamed cloth only, or steam them briefly using a double layer of
cloth.
Cleaning glazed surfaces.
To avoid damaging frame seals, avoid aiming the flow of steam
directly towards the sealed points of the glazed surfaces.
When outside temperatures are low, particularly during winter,
heat the surface of the glass by lightly steaming the entire surface
before cleaning. This compensates for the difference in tempera-
ture between the internal and external surfaces, reducing the
surface tensions which might otherwise cause the glass to break.
USING THE STEAM GENERATOR
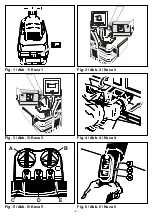
Control panel (fig. 5)
A - Main switch 0-I-II
B - Steam flow adjustment I-II-III
C - Power on indicator light
D - Clean water tank level indicator.
E - Steam ready indicator.
Controls on hand grip (fig. 6)
F - Wet vacuum switch
G - Steam switch
H - Solution injection pump button (works only when the steam
switch is on).
Turning the steam generator on:
The steam generator is turned on via the main switch A. In the I
position (fig. 5), the steam production boiler filler pump is
activated.
The appliance can be used to vacuum up liquids by turning the
suction motor on via the switch F on the hand grip (fig. 6).
Make sure the wet vacuum switch on the head is in the I position
and the power cable is connected to the plug on the electrical
panel of the appliance.
Steam phase
Place the main switch in the II position. This turns on the power
to the steam production boiler. The appliance is ready to use
when the indicator light E on the control panel lights up (fig. 5).
To activate steam emission, use the switch G on the hand grip
(fig. 6).
Filling the cleaning product circuit.
Before the appliance reaches the steam ready state, activate
the cleaning product button H with the steam switch G
activated until the solution comes out of the attachment (this
operation must be repeated each time the solution tank runs out).
The cleaning product circuit cannot be refilled when the
boiler is under pressure.
To release pressure in the boiler, activate the vapour switch G
with the main switch in the I position.
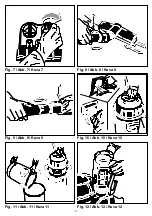
The quantity of steam delivered can be adjusted using the knob
B placed on the gear control panel:
- pos. I minimum delivery
- pos. II medium delivery
- pos. III maximum delivery (fig. 7).
The absence of water in the tank is indicated by the indicator
light D (fig. 5) with the main switch in the II position.
Delivery of cleaning product is obtained by activating the button
H on the hand grip (fig. 6).
Press the button until the product comes out of the attachment
and then at intervals of a couple of seconds to avoid affecting the
efficiency of the steam.
Combined steam/vacuum phase (plus cleaning solution if
used).
Select the most suitable attachments.
- multipurpose injection/extraction brush with appropriate inserts.
(fig. 8).
- flat injection/extraction lance to be used on its own or with the
proper nozzle.
- glass brush, to be used on its own or with extension hoses.
- if necessary, use the proper extension hoses. It is possible to
use a single extension hose. (fig. 9).
Change the attachments only when all the switches on the hand
grip are off.
Do not change attachments while the appliance is emitting
steam, risk of burns.
Use only original attachments which offer optimum characteris-
tics of quality and safety. Failure to use original attachments
!
!
!
!
!
Summary of Contents for STEAMER JET 7140
Page 2: ... 2 ...
Page 6: ... 6 Fig 13 Abb 13 Kuva 13 Fig 14 Abb 14 Kuva 14 ...
Page 73: ......
Page 74: ......
Page 75: ......


