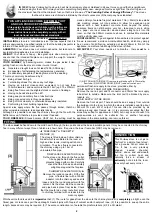
HOT AIR DISTRIBUTION
Hot air can be distributed
from the stove to other
rooms using the
Convented Hot Air Duct
kit available as an extra.
The 125mm alloy
ventilation tube is
connected to one or
other of the opened vents
located to left and right of
the central flue outlet on
the top back of the stove,
using the connectors
provided.
Where this is used, the
following must be VERY
STRICTLY observed:
●
Joins throughout the hot-air duct must be completely and
permanently sealed, using, for instance, a solid aluminium duct-
tape.
●
The hot-air duct must be entirely and permanently separated from
the flue. Smoke and waste gas must
never
be able to contact even
the outside of the hot air duct.
●
The hot-air duct must rise continuously - no falls and no horizontal
lengths.
●
The hot-air duct, and its outlet grille must be entirely unrestricted.
●
The entire duct system and its surroundings, must be capable of
withstanding temperatures up to 350°C.
●
There must be a route for the heated air to return to the front of the
stove. An open doorway or floor vent. Without a clear circulating
route - it just won't work!
●
Fit a CO alarm in the room hot air is being circulated
to
, as well as in
the room with the stove.
CHECK THE INSTALLATION !
Once installed, light the fire, demonstrate it to the householder and
check that:
1) It burns controllably and does not emit fumes to the room
2) The route for gases from the stove to the chimney terminal is
completely airtight, unobstructed and able to be swept.
3) The entire construction is of durable fireproof materials.
4) The flue presents a draught in use of at least 12Pa
5) Fit CO alarms!
LIVING WITH YOUR STOVE
Every fuel, chimney and condition of use is different. Only experience
will show which are the best settings for you.
PREPARING THE FIRE FOR USE
Make sure the flue is clear and that
the liner set is correctly installed (see diagram on back page). The
smaller inner liner set can be fixed in place for a firebox creating about
5kW heat output, or removed to give a larger fuel space suitable for
creating about 7kW heat output.
LIGHTING
If lighting after a period of non-use, do check that the
flueways and chimney are completely clear.
Don't remove ash unnecessarily! The Portway Panoramic is a true flat-
bed woodburner. It will burn best if a layer of ash is maintained.
(1) Fully open the air control - ie. move to the right. Place two or three
firelighters close together, or screwed-up paper, cover with thin, dry
sticks, at the front of the stove and light them. To get the fire going
quickly, it may be helpful to keep the door just a tiny fraction open
When they are burning well, use a poker to distribute the hot embers
and gently add just two or three dry logs, close the door. Once the logs
are burning well, set the air control to the lowest practical setting.
FILLING:
Filling too full will waste fuel, create smoke and reduce
efficiency. Just adding one log every hour or so is all that is needed.
Don't fill above the level shown in the diagram.
CONTROL
How fast the fire burns depends on how much air reaches
the fuel. There is only one control. Slide to the right for higher output,
to the left for lower.
EMPTYING ASHES
The white powder deposited as wood burns is not
ash but cellulose, which this appliance is designed to burn away,
leaving only a slight residue of brownish, gritty, true ash. Help the fire
work best by maintaining a bed of ash and cellulose - it is only
necessary to remove a little if it is actually at risk of overflowing,
normally just once every few weeks.
Remember to let residues cool before disposing in plastic sacks or
dustbins.
KEEPING THE WINDOW CLEAN
Reduce the risk of staining by using
only very dry fuel. Simply operating the stove for a few minutes at high
output will often burn-off any deposits left by tarry or wet fuel. Severe
stains can be removed when cold with plain water and a coarse
scourer. The window is not glass but a transparent ceramic, it may
develop tiny hairline cracks, these are harmless, and a characteristic of
the toughest and most heat-resistant material known.
OPENING THE DOOR
This stove is designed to be operated only with
the door closed. Open the door very slowly to minimise fume emission
and prevent hot fuel falling out. Remember that the whole stove
becomes extremely hot – use a glove when touching hot parts.
SUMMER SHUT DOWN:
Before a long period of non-use, empty fuel
and ash and leave all the air controls open to allow ventilation to
reduce condensation.
FUEL
This appliance is designed to burn dry wood logs only.
SMOKE CONTROL:
In certain areas special rules apply to reduce
smoke nuisance. Check with your local authority.
WOOD
only emits as much carbon to the atmosphere as the tree took
in when growing, so wood is considered the 'carbon neutral' fuel. When
wood is cut down its cells are full of water. Burning such wet or 'green'
wood wastes heat in making steam and produces flammable, acidic
tars which will cling to, and rapidly damage, your stove and chimney.
Split logs will typically take two years to
become reasonably dry, round logs very
much longer. Cracks in the ends, a hollow
sound when tapped and bark falling away
are all signs that a log may be ready for use.
For best performance, and
always
for low
smoke emission:
Split logs lengthways for drying
●
Use logs no bigger than about 100mm x 250mm
●
Ensure logs are absolutely dry (less than 20% moisture)
●
Fill the stove criss-cross, so air can circulate between logs.
3
Air control (circled). Baffle shown at 'B'
Effective loading of just two or three logs.
B
+
-
Example of hot-air duct to a room above - cut-
away diagram ('Free Inset' method)
Air circulating route


