background image

15

ASSEMBLY

Assembling the Chair

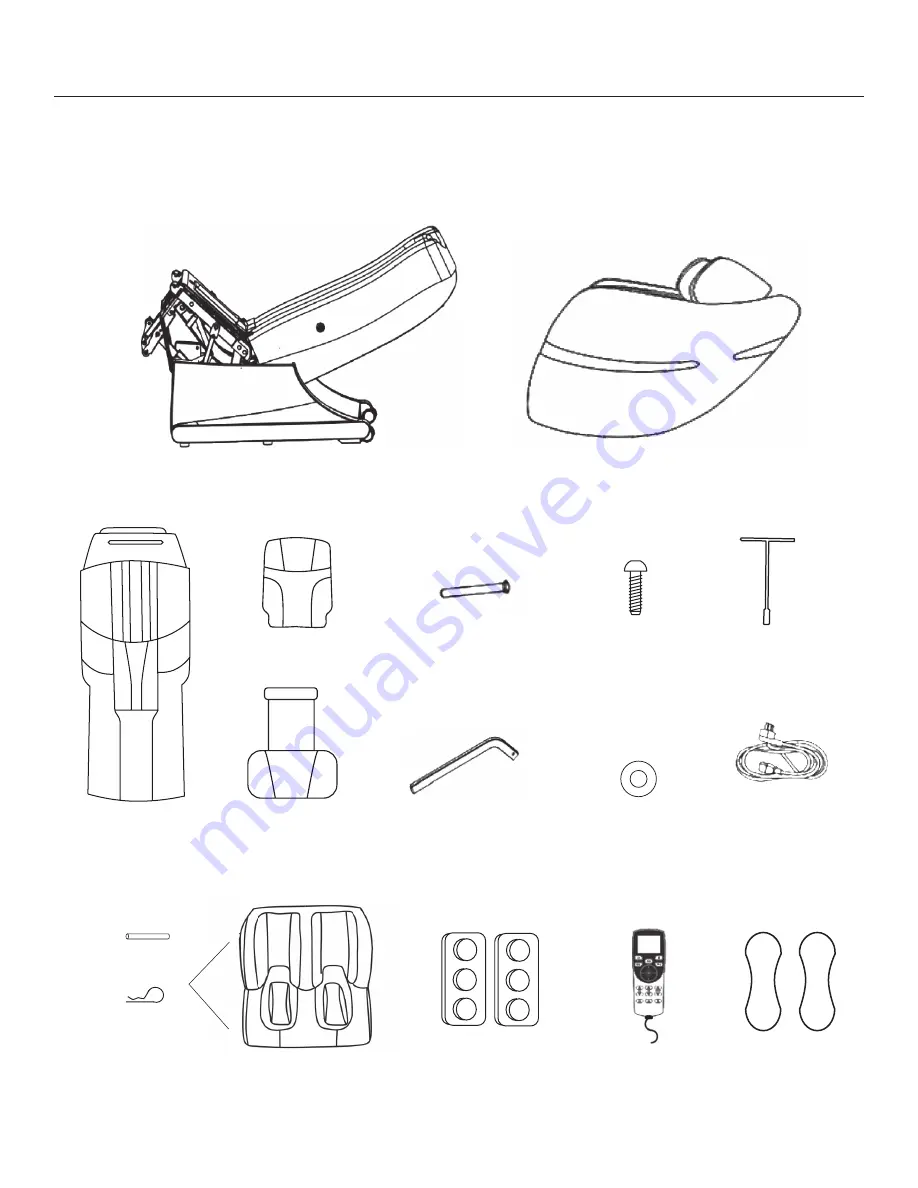
Important: Before starting, check the supplied items to ensure all parts are included in the package.

Base

Back/Seat Pad

Screw (x4)

Washer (x4)

Carry Handle Tool

Carry Handle Bolt

T-wrench

Back Pad Pillow

Head Pillow

Arm (x2)

Power Cord

Remote

Foot Roller

Buffer Pads

Foot rest

Shiatsu Pads

Straight pin

(x2)

Cotter pin

(x2)

Included with

foot rest:

Summary of Contents for PP7913

Page 1: ...your massage chair please read this manual thoroughly for the correct methods of usage especially taking note of the section on safety This manual should be kept on hand for easy reference It is your...

Page 2: ...Functions 21 Sessions 24 Operation Use 25 Care Storage 31 Troubleshooting 32 FAQ 34 Warranty After Sales Service 35 Specifications 36 Note The pictures in this manual are only for reference Please ref...

Page 3: ...that your new massage chair will provide you with many years of relaxation Your new Positive Posture massage chair includes a 3 year limited in home warranty If you have any questions or issues durin...

Page 4: ...UTION Important Safety Precautions Please follow all basic precautions while using this chair Please read all instructions before using this massage chair Refer to your Owner s Manual for important in...

Page 5: ...aged if it is not working properly if it has been dropped or damaged or if it has been exposed to water If this happens contact the service center for examination and repair Do not carry this applianc...

Page 6: ...ric shock Check with a qualified electrician or serviceman if you are in doubt as to whether the product is properly grounded Do not modify the plug provided with the product if it will not fit the ou...

Page 7: ...f the chair can result in the risk of electrical shock If you feel the product is not properly grounded please contact a qualified electrician Please unplug this chair from the electrical outlet after...

Page 8: ...this chair if you have a pacemaker or other electronic medical device if you have been restricted to bed rest or if you are planning to use this chair to treat a specific ailment to recover from surge...

Page 9: ...ion see page 13 Do not move the chair while someone is in it Do not stand on this chair Do not sit on any part of the chair other than the seat Do not sit stand or lean on the foot rest unless you are...

Page 10: ...f an emergency push the Pause button on the remote to stop operation immediately Immediately discontinue use of the chair and seek medical advice if you notice any acute pain or unusual physical disco...

Page 11: ...n do not attempt to repair Contact Positive Posture at 720 616 5000 Do not modify any part of the chair Be sure to include this Owner s Manual when transferring this chair to another party Do not disp...

Page 12: ...tion to stimulate the soles after a long day These have been carefully designed to avoid over stimulating the soles of your feet Heat Relaxing heat can be felt in the lower back and calves Automatic R...

Page 13: ...PARTS FUNCTIONS Right Shoulder Unit Headrest Left Shoulder Unit Left Arm Back Cover Back Pad Seat Leg rest Footrest Reclining Seat Back Main Power Switch Remote Control Remote Control Pocket Right Ar...

Page 14: ...13 PARTS FUNCTIONS Roller Mechanism Shoulder Airbag Arm Airbag Hip Airbag Leg Airbags Calf Airbag Foot Airbags Foot Roller Image shows chair in proper storage position...

Page 15: ...ir is installed on a flat and level surface to avoid tipping over As the chair is heavy please exercise extra care not to damage the floor when positioning the chair CAUTION Assembly Preparation Ensur...

Page 16: ...to ensure all parts are included in the package Base Back Seat Pad Screw x4 Washer x4 Carry Handle Tool Carry Handle Bolt T wrench Back Pad Pillow Head Pillow Arm x2 Power Cord Remote Foot Roller Buff...

Page 17: ...will not inflate as designed CAUTION STEP 1 Unbox chair and place in designated area STEP 2 Standing in front of the chair base locate the seat heat connector found on the right side Ensure the conne...

Page 18: ...wo together Figure A then place onto the chair Figure B STEP 5 Secure each armrest to the base of the chair using a bolt nut and the provided T wrench tool Secure at front and back of each arm Note If...

Page 19: ...as shown below It can be attached to either the left or right side STEP 13 Turn on the main power STEP 11 Screw the remote control connector into the back base of the chair bladders on left and right...

Page 20: ...ter pin and straight pin from foot rest Then lift the foot rest so the foot rest connection point aligns with the foot rest brackets on the base Insert the straight pins through the foot rest brackets...

Page 21: ...rest while a second person lifts holding the sides of the headrest Carry to desired location Attach carry handle as shown slide bolt through carry handle and into frame Hold the foot rest OPTION 1 Wi...

Page 22: ...control Do not pull the remote control cord forcefully Do not operate the remote control using sharp edged or hard objects Power Pause Full Body Massage Right Arrow OK Select Raise Leg rest Raise Rol...

Page 23: ...tically turn on Press this button to activate the Full Body Massage Program NOTE When the Full Body session is activated the heat and foot rollers will automatically turn on Press this button to activ...

Page 24: ...he lower back calves and feet When the heat is on the heat button will illuminate red NOTE The heat will automatically shut off after 20 minutes Press this button to change the intensity of the roller...

Page 25: ...gned around gentle repetitive and hypnotic motions Stretch Offers numerous carefully crafted stretching movements including hip rotation and back extension Designed to help stretch and loosen the musc...

Page 26: ...position before sitting Do not use the arm or shoulder unit for any area other than your arms and shoulders If your arm comes out of the arm or shoulder unit or your leg foot come out of the foot res...

Page 27: ...your arms in the arm unit palms down Place your feet in the leg rest Note When the foot rest raises press out with your feet and the foot rest will adjust to the appropriate length see below Place yo...

Page 28: ...ng the rollers up and down your back The remote control will beep after the acupressure point detection has finished If the position of the rollers is uncomfortable use the Roller Adjustment buttons t...

Page 29: ...te All sessions do not appear on one screen as shown to the right Use the down up arrow to continually scroll through all session options Selecting a Manual Session When Manual Massage is highlighted...

Page 30: ...pressure ranging from Soft 1 to Firm 5 Roller intensity can also be adjusted by pressing the 3D button 4 Width Select one of three widths Narrow Middle or Wide Width cannot be adjusted for Knead Knead...

Page 31: ...e When the massage program finishes the rollers will return to their storage position upper part of the seat back Press Power on the remote control to automatically incline the chair Never get out of...

Page 32: ...the wall outlet When not in use the chair should always be stored in its full upright position backrest fully inclined foot rest to its lowest position The chair should be stored in a place of low hu...

Page 33: ...ssing any programmed or manual massage button on the remote Other issues may include the wires or plug being damaged the fuse having burned out or an issue with the inner circuit Call Positive Posture...

Page 34: ...porarily To test this slightly lift your body or slightly raise the reclining seat back Problem The backrest or leg rest will not go down entirely Possible Cause Solution Ensure there are not any obje...

Page 35: ...e following Turn off the main power switch on the back left of the chair Unplug the power from the wall outlet Contact Positive Posture for assistance Q How do I make the massage stronger A Try any of...

Page 36: ...5000 or service positiveposture com Please have the following information ready Your name address and telephone number Model Number see the specification field on the front cover of this Owner s Manu...

Page 37: ...Pa Program Timer Approximately 15 minutes Foot Rest Adjustment Range Approximately 12 6 32 cm Reclining Angle Approximately 123 degrees to 157 degrees against flat floor Chair Dimensions 59 150 cm L x...

Page 38: ......

Page 39: ......

Page 40: ...elaxation needs If you have any questions at all about the operation of your massage chair please contact a Positive Posture chair expert at 720 616 5000 or service positiveposture com 2017 Positive P...

Reviews: