5
10. Attach both the lap belt and the chest belt across the evacuee (Chest belt should be attached
around both arms and chest) and adjust accordingly so evacuee is securely fastened and
comfortable in the chair - do not let any excess strap trail on the ground.
11. Release the brakes by squeezing, then releasing both brake levers - the locking pins will be
released.
12. NOTE: EVACUEE MUST NOT BE LEFT UNATTENDED WHILST IN THE CHAIR.
Evacuee can now be wheeled to the appropriate location for the next phase of evacuation
13. When ready and positioned at the top of the stairs, re-apply brakes and ‘lock on’
(see instruction B6).
Raise the handle extension
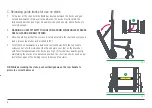
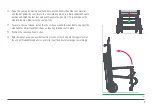
14. At the rear of the chair, with one hand pull the RED coloured bar firmly towards you thus
releasing the locking pins (either side) and simultaneously with the other hand, lift up the top
handle until an audible click is heard to lock this bar in the raised position. Check that this
handle is locked into position - See Fig D.
15. Adjust the head support pillow on the top handle to the desired height.
16. If needed, the extra head retaining strap can be attached around the forehead of the evacuee.
17.
Do not attempt to use the chair on stairs until the slide tracks have been opened and
secured. See section C.
14
Fig D


