Boiler Installation - Page 17
2.3
D.H.W. Supply
a)
The domestic hot water circuit does not need a pressure
relief valve, but it is essential to ensure that the pressure
of the cold water supply does not exceed 10 bar (145
lb/in), if in doubt it is advisable to install a pressure
reducing valve. The minimum pressure needed to
operate the domestic hot water system is 1 bar with a
flow of approximately 2.5 litres per minute.
b)
Flush out all foreign matter from the supply pipe before
connecting to the appliance.
c)
Connect the cold water supply to the 15mm isolating
cock.
Connect the hot water outlet pipe using a 15mm
compression fitting.
Note:
Until hot water is available, the flow will be
restricted.
Note:
The Cold Water Supply Isolating Cock
incorporates an automatic flow limiting device and water
strainer. If a lower flow is required there is a throttle
valve located below the D.H.W mini expansion vessel.
SHOWERS
If a shower control is to be supplied from the Combination
unit it should be of the type which incorporates a pressure
balancing valve (i.e. MIRA 415 EQUAMATIC).
If the shower control is existing and is of a mechanical type,
it may be necessary to fit a drop tight pressure reducing
valve to the mains supply. Refer to the Shower
Manufacturers instructions.
Note:
Showers with a loose flexible hose may require
the fitting of a double check valve, to comply with water
Bye-law 17.
2.4
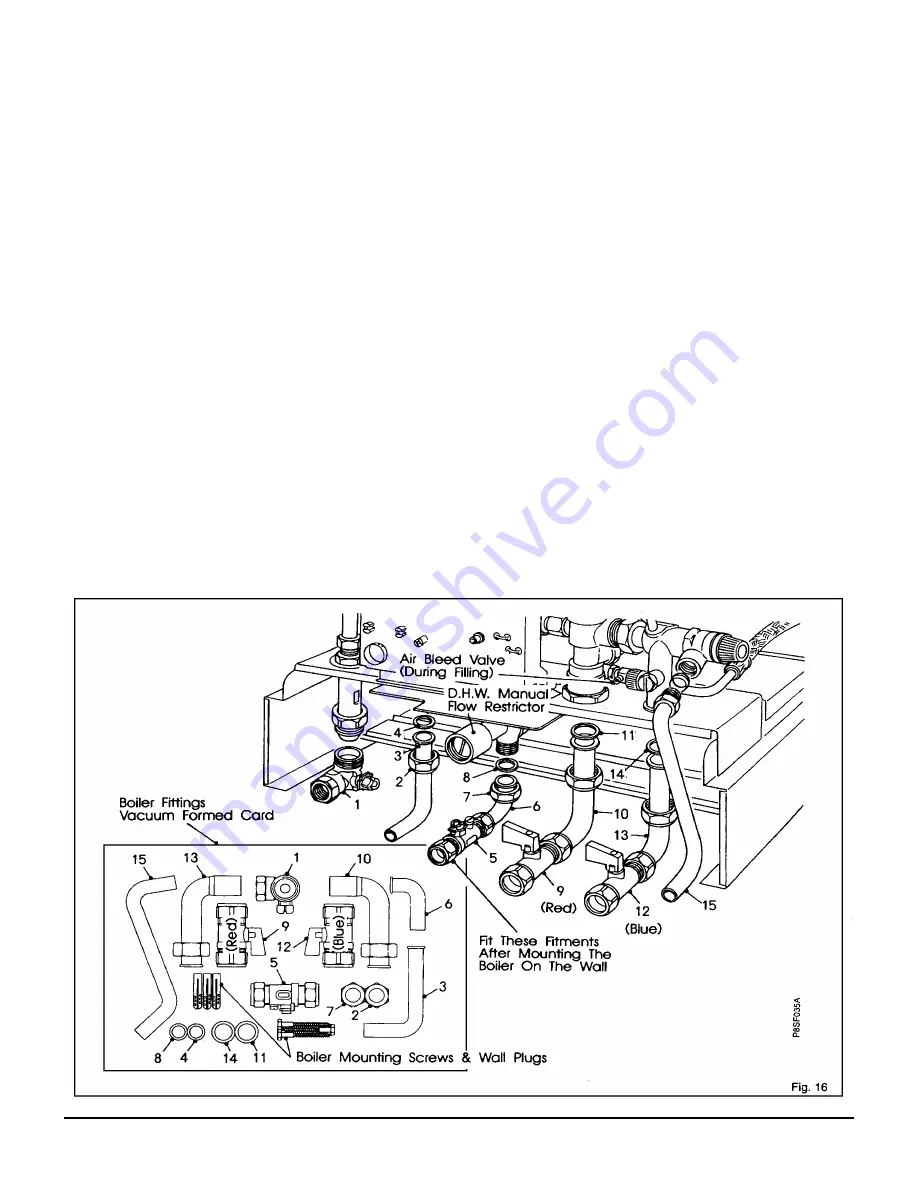
C.H. Water Connections
(Fig. 16)
a)
Before any central heating connections are made to the
combination boiler, all system valves should be opened
and the system thoroughly flushed out with cold water.
b)
Connect the central heating return pipe to the isolating
cock identified by a Blue lever. (right hand of the two
pipes)
c)
Connect the central heating flow pipe to the isolating
cock identified by a Red lever. (left hand of the two
pipes)
Summary of Contents for 80e
Page 5: ...Optional Extras Page 5 ...
Page 6: ...Optional Extras Page 6 Installation instructions included as necessary with each kit ...
Page 7: ...Optional Extras Page 7 Installation instructions included as necessary with each kit ...
Page 12: ......
Page 28: ...Routine Maintenance Page 27 ...
Page 30: ...Routine Maintenance Page 29 ...
Page 34: ...Component Replacement Page 33 ...
Page 35: ...Component Replacement Page 34 ...
Page 43: ...7 1 Control Flow Sequence Permanent Pilot Page 42 ...
Page 44: ...7 2 Functional Flow Permanent Pilot Page 43 ...
Page 45: ...7 3 Fault Finding Permanent Pilot Page 44 ...
Page 46: ...7 4 Electrical Diagram Permanent Pilot Page 45 ...
Page 47: ...8 1 Control Flow Sequence Electronic Page 46 ...
Page 48: ...8 2 Functional Flow Electronic Page 47 ...
Page 49: ...8 3 Fault Finding Electronic Page 48 ...
Page 50: ...8 4 Electrical Diagram Electronic Page 49 ...


