7704679.01 (3-08/18)
8
2. INSTALLING THE BOILER
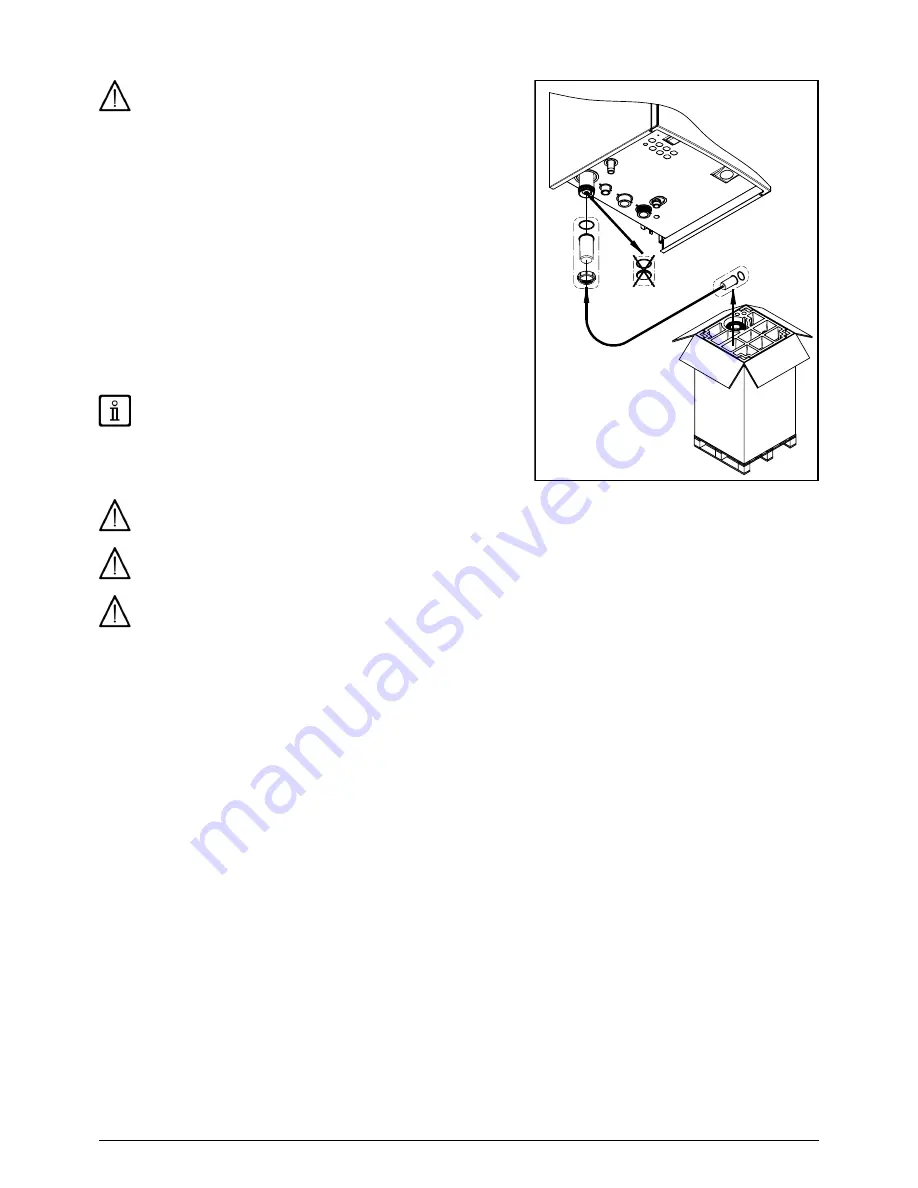
After fixing the boiler on the wall, replace the cap at the bottom of the
siphon with the one in the pack, reusing the ring nut and referring to
the figure. Fill the siphon and check it for any leaks.
The template outline is shown in chap. "
INSTALLING THE BOILER
" .
After deciding the exact location of the boiler, fix the template to the wall.
Connect the system to the gas and water inlets present on the lower bar of
the template. Make sure the rear part of the boiler (back) is as parallel as
possible to the wall (otherwise, shim the lower part). Fit two
G1" 1/2
taps
(flow and return) on the central heating circuit; these taps make it possible to
carry out important operations on the system without draining it completely.
The hydraulic system must comply with BS6644 inrespect to pressure relief
valve rating, size and location. Fit a hydraulic separator, sized according
to maximum boiler and system pressure, downline from the hydraulic
connectors of the boiler. If you are either installing the boiler on an existing
system or replacing one, as well as the above, fit a settling tank under the
boiler on the system return line in order to collect any deposits and scale
circulating in the system after flushing. After fixing the boiler to the template,
connect the flue and air ducts, supplied as accessories, as described in the
following sections. Connect the siphon to a drain trap, making sure the slope
is continuous. Avoid horizontal stretches. The boiler is electronically fitted
out to manage an external storage boiler.
Take special care when filling the heating system. In particular, open
any thermostat valves in the system, ensure the water enters slowly
in order to prevent the formation of air inside the primary circuit
until operating pressure is reached. Lastly, vent any radiators in the system.
POTTERTON COMMERCIAL declines all liability for damage deriving from
the presence of air bubbles in the primary exchanger due to the incorrect or
imprecise observance of the above.
Tighten the boiler water connections with care (maximum tightening torque 30 Nm).
Do not lift the boiler exerting pressure on the plastic parts like the siphon and the flue turret.
Before starting up the boiler, fill the water siphon to prevent the fumes from diffusing in the room.
7221178.01
1
2
3
Summary of Contents for Sirius Three WH-130
Page 1: ...May 2018 Sirius three WH 130 150 kW ...
Page 10: ...7704679 01 3 08 18 10 583 892 600 G 1 1 2 G 1 1 2 G 1 198 100 100 100 102 CR_0775 95 223 24 ...
Page 20: ...7704679 01 3 08 18 20 WEATHER COMPENSATION CURVE GRAPHS QAC34 ...
Page 35: ...35 7704679 01 3 08 18 29 DIAGRAMS AGU 2 550 CR_0349 CR_0349 AVS 75 bis ...
Page 36: ...7704679 01 3 08 18 36 CG_2482 SAFETY THERMOSTAT Tmax 50 C free contact ...
Page 37: ...37 7704679 01 3 08 18 MODIFIED PARAMETERS Nr VALUE NOTE ...
Page 38: ...7704679 01 3 08 18 38 ...
Page 39: ...39 7704679 01 3 08 18 ...


