background image

Date: 2013-Apr. 23                                                                                

Page 4/ 10 

Rev: 


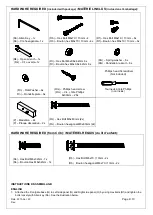
HARDWARE REQUIRED (

included with package) / 

MATÉRIEL INCLUS 

(inclus dans l’emballage

):


HARDWARE REQUIRED (from Crib): / MATÉRIEL REQUIS (du lit d’enfant):


INSTRUCTIONS D’ASSEMBLAGE: 

 
ENGLISH 

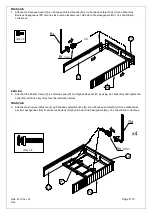
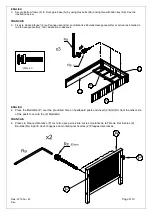
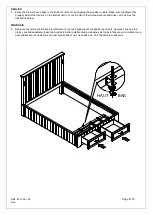
1.  Attached the Frontgate base (G) to Left side panel (N) and Right side panel (O) by using Hex bolts (Rf) and tighten the 

bolts loosely with Allen key (Ra). See the illustration below. 


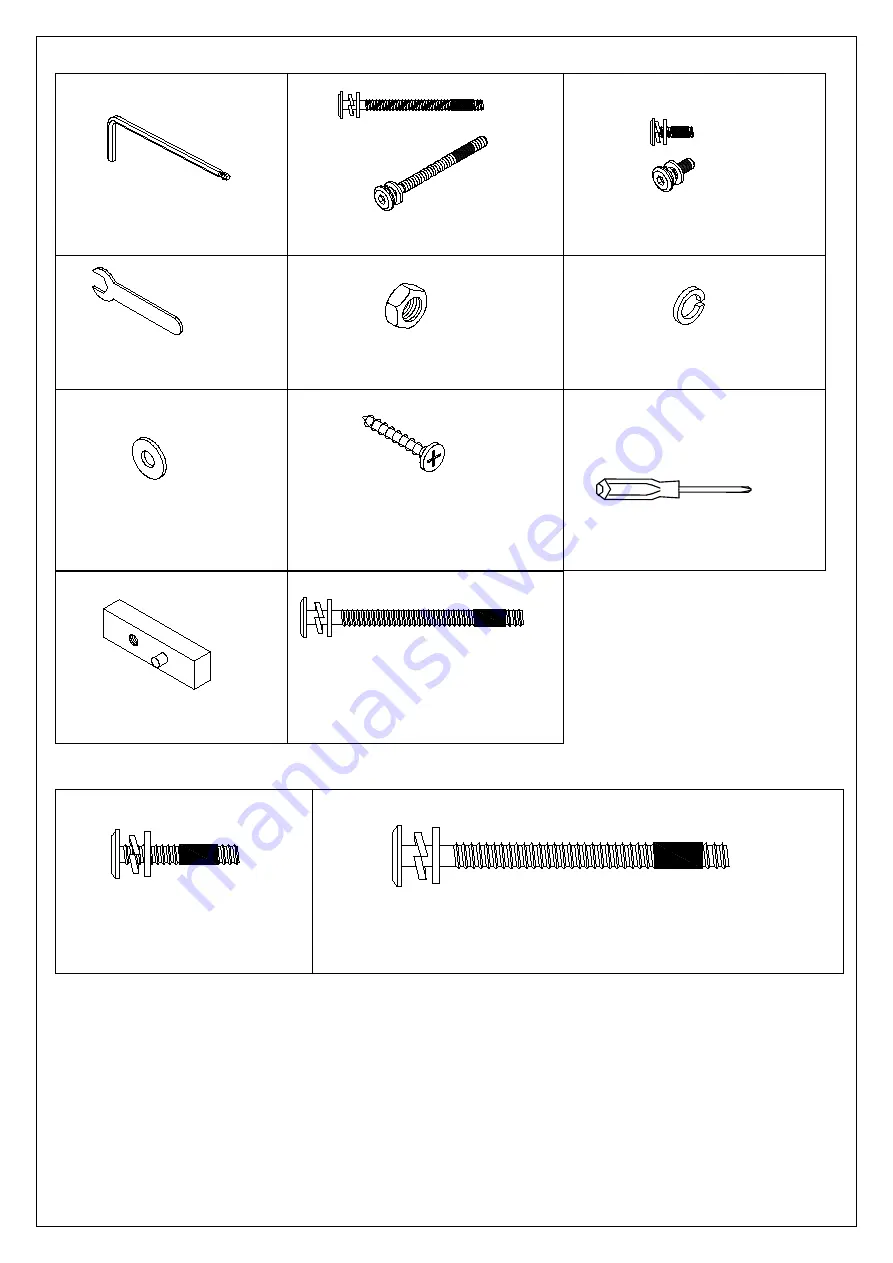
(Ra)- Allen Key – 1x 
(Ra) – Clé hexagonale– 1x


(Rb) – Hex Bolt M6x70

13mm –4   

(Rb) – Boulon hex M6x70

13mm –4x 

(Rf) – Hex Bolt M6x19

13mm – 6x 

(Rf) – Boulon hex M6x19

13mm – 6x 

(Rm) – Spring washer – 6x 
(Rm) - Rondelle à ressort – 6x 


(Rn) - Flat Washer – 6x 

Rn) – Rondelle plate– 6x 

(Rk) – Open wrench– 1x 
  (Rk) – Cl

é

  ouverte– 1x 

(Rl) – Hex Bol M6x9.8x4.2mm 6x 
(Rl) – Boulon hex M6x9.8x4.2mm 6x 

(Rm) – Phillips head screw   
  (Rm) – Vis 

à

  tête Phillips 

8x30mm – 28x 

(P) – Medallion – 2x 
(P) – Plaque décorative – 2x 


(Rb) - Hex Bolt M6x70

13mm -2x 

(Rb)    Boulon hexagonal M6x70

13mm -2x   


  Phillips head Screwdriver 

(Not included) 


Tournevis à tête Phillips 

(non inclus) 

(Re) - Hex Bolt M6x32mm - 7x 
(Re) – Boulon Hex M6x32mm - 7x 

(Rc) - Hex Bolt M6x63mm (2x) 

(Rc) – Boulon hexagonal M6x63mm (2x) 


Summary of Contents for BELDEN 4 IN 1 CRIB FULL BED CONVERSION

Page 1: ...Apr 23 Page 1 10 Rev pottery barn kids BELDEN 4 IN 1 CRIB FULL BED CONVERSION KIT ENSEMBLE DE CONVERSION POUR LIT D ENFANT BELDEN 4 IN 1 ASSEMBLY INSTRUCTIONS INSTRUCTIONS D ASSEMBLAGE www potterybar...

Page 2: ...instructions attentivement avant de commencer l assemblage Pour votre s curit l assemblage devrait tre fait par au moins deux adultes Conservez ces instructions pour r f rence ult rieure Utilisez uniq...

Page 3: ...r s avoir d sassembl le lit d enfant vous y trouverez les pi ces n cessaires l assemblage du lit 2 places num r es ci dessous Note After the crib is being disassemble below are the parts needed in ord...

Page 4: ...x Rb Hex Bolt M6x70 13mm 4 Rb Boulon hex M6x70 13mm 4x Rf Hex Bolt M6x19 13mm 6x Rf Boulon hex M6x19 13mm 6x Rm Spring washer 6x Rm Rondelle ressort 6x Rn Flat Washer 6x Rn Rondelle plate 6x Rk Open w...

Page 5: ...stration ci dessous ENGLISH 2 Attached the Bottom frame F to Left side panel N and Right side panel O by using Hex bolts Re and tighten the bolts Re with Allen key Ra See the illustration below FRAN A...

Page 6: ...Hexagonaux Re et serrez les l aide de la Cl hexagonale Ra Voir l illustration ci dessous ENGLISH 4 Place the Medallion P over the pre drilled hole on headboard posts and insert 2 Bolt Rc from the othe...

Page 7: ...to tighten the bolts loosely See the illustration below FRAN AIS 5 Attachez la T te de lit A au Panneau Lat ral Gauche N et au Panneau Lat ral Droit O en utilisant des Boulons Hexagonaux Rb des Ronde...

Page 8: ...it stand secure and does not rock See the illustration below FRAN AIS 6 Replacez les tiroirs sur la Structure inf rieure F en les alignant avec les glissi res en bois Assurez vous que les tiroirs y so...

Page 9: ...m time to time for safety as the hardware may loosen over time FRAN AIS 7 D posez le rouleau de lattes Q entre la T te de lit A et le Panneau Avant G en utilisant des Vis t te Phillips Ro fixez le Rou...

Page 10: ...luche sec et propre pongez les d versements imm diatement et essuyez les l aide d un linge propre et humide Nous recommandons de ne pas utiliser de nettoyants chimiques d abrasifs ou de poli pour meub...

Reviews: