background image


Date: 21‐Jul‐14 


          www. potterybarnkids.com 


Page 2 of 14


Rev:   


WARNING


Do not use this crib if you cannot exactly follow the accompanying instructions. 


Do not use this crib for a child who can climb out of it or who is taller than 89 cm. 


Do not place in or near this crib any cord, strap or similar item that could become               
wrapped around a child’s neck. 


Do not place this crib near a window or a patio door where a child could reach the cord of a 
blind or curtain and be strangled. 


Ensure that the crib is safe by checking regularly that every part is properly and securely in 
place before placing the child in it. Do not use it if any parts are loose or missing or if there 
are any signs of damage. Do not substitute parts. Contact the Pottery Barn Kids if 
replacement parts or additional instructions are needed. 


Use a crib mattress that is no thicker than 15 cm and is of such a size that, when it is pushed 
firmly against any side of the crib, it does not leave a gap of more than 3 cm between the 
mattress and any part of the sides of the crib. 


Children can suffocate on soft bedding. Do not place pillows, comforters or soft mattresses in 
this crib. 


04-000052-8 


WARNING: 

Failure to follow these warnings and assembly instructions 

could result in serious injury or death. 

 Read 

all 

instructions before assembling crib.      KEEP INSTRUCTIONS FOR FUTURE USE. 


Never use plastic shipping bags or other plastic film as mattress covers because they can 
cause suffocation. 


Infants can suffocate in gaps between the crib sides and a mattress that is too small. 
Never place additional padding under an infant. 


To reduce the risk of SIDS, pediatricians recommend healthy infants be placed on


their 

backs to sleep, unless otherwise advised by your physician. 


STRANGULATION HAZARD: Strings can cause strangulation! Do not place items with a 
string around a child’s neck, such as hood strings or pacifier cords. Do not suspend strings 
over a crib or attach strings to toys. 


To help prevent strangulation tighten all fasteners. A child can trap parts of the body or 
clothing on loose fasteners. 


DO NOT place crib near window where cords from blinds or drapes may strangle a child. 


FALL HAZARD: When child is able to pull to a standing position, set mattress to lowest 
position and remove bumper pads, large toys and other objects that could serve as steps for 
climbing out. 


Stop using crib when child begins to climb out or reaches the height of 35 in. (89cm) 


Check this product for damaged hardware, loose joints, loose bolts or other fasteners, 
missing parts or sharp edges before and after assembly and frequently during use. Securely 
tighten loose bolts and other fasteners. DO NOT use crib if any parts are missing, damaged 
or broken. Contact Pottery Barn Kids for replacement parts and instructional literature if 
needed. DO NOT substitute parts. 


DO NOT use a water mattress with this crib. 


Replace teething rail if damaged, cracked, or loose. NOTE: This is only for cribs with teething 
rails. 

Summary of Contents for CATALINA 3 IN 1 CRIB

Page 1: ...Date 21 Jul 14 www potterybarnkids com Page 1 of 14 Rev pottery barn kids CATALINA 3 IN 1 CRIB...

Page 2: ...or other plastic film as mattress covers because they can cause suffocation Infants can suffocate in gaps between the crib sides and a mattress that is too small Never place additional padding under...

Page 3: ...eep instructions for future use Use only vendor supplied hardware to assemble Using unauthorized hardware could jeopardize the structural integrity of the item Do not remove warning labels from the cr...

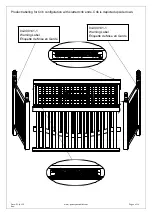
Page 4: ...4 Rev Product labeling for Crib configuration with slatted crib ends Crib is depicted upside down 04 000141 Warning Label 04 000141 Warning Label 04 000141 1 Warning Label tiquette de Mise en Garde 04...

Page 5: ...4 www potterybarnkids com Page 5 of 14 Rev PARTS INCLUDED PART 1 CRIB HEADBOARD 1x PART 2 SPINDLE FOOT 2x PART 3 LEFT CRIB END 1x PART 4 RIGHT CRIB END 1x PART 5 CRIB FRONT 1x PART 6 MATTRESS BASE 1x...

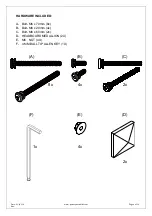
Page 6: ...www potterybarnkids com Page 6 of 14 Rev HARDWARE INCLUDED A Bolt M6 x 70mm 8x B Bolt M6 x 20mm 4x C Bolt M6 x 60mm 2x D HEADBOARD MEDALLION 2X E M6 NUT 4X F 4 MM BALL TIP ALLEN KEY 1X A 1x 2x 2x B 8x...

Page 7: ...Date 21 Jul 14 www potterybarnkids com Page 7 of 14 Rev ASSEMBLY INSTRUCTION STEPS 1 Attach the Spindle Foot PART 2 to the Crib Headboard PART 1 as shown 1 2 2...

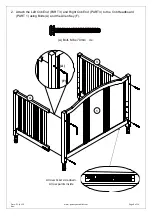
Page 8: ...barnkids com Page 8 of 14 Rev 2 Attach the Left Crib End PART 3 and Right Crib End PART 4 to the Crib Headboard PART 1 using Bolts A and the Allen Key F 1 A 3 4 F A Bolt M6 x 70mm 4x Arrow sticker sid...

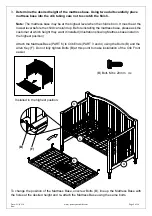
Page 9: ...tress base please ask the customer at which height they want it installed Illustration showing Mattress base install in the highest position Attach the Mattress Base PART 6 to Crib Ends PART 3 and 4 u...

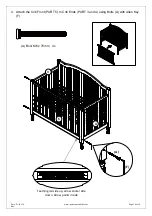
Page 10: ...otterybarnkids com Page 10 of 14 Rev 4 Attach the Crib Front PART 5 to Crib Ends PART 3 and 4 using Bolts A with Allen Key F A Bolt M6 x 70mm 4x Teething rail side up arrow sticker side down Arrow poi...

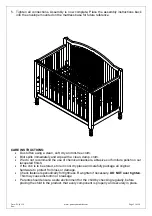
Page 11: ...cloth We do not recommend the use of chemical cleansers abrasives or furniture polish on our lacquered finish If the crib is to be stored store in cool dry place and carefully package all original ha...

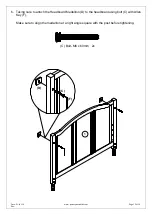
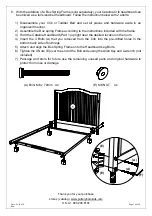
Page 12: ...com Page 12 of 14 Rev 6 Taking care to attach the Headboard Medallion D to the headboard using bolt C with Allen Key F Make sure to align the medallion at a right angle square with the post before tig...

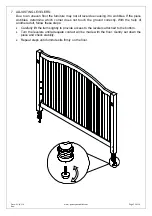
Page 13: ...bbles determine which corner does not touch the ground correctly With the help of another adult follow these steps Carefully lift the item slightly to provide access to the levelers attached to the bo...

Page 14: ...ner 2 Assemble the Box spring Frame according to the instructions included with the frame 3 Hold the Catalina Headboard Part 1 upright near the desired location in the room 4 Insert the 4 Bolts A that...

Reviews: