background image


Date: 21‐Jul‐14 


          www. potterybarnkids.com 


Page 3 of 14


Rev:   


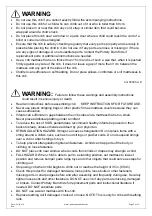
If refinishing, use a non-toxic finish specified for children’s products. 


Do not remove the metal brackets from the mattress base after installation. NOTE: This is 
only for cribs supplied with a wooden mattress base. 


Follow warnings on all products in a crib. 


04-000056-7 


CAUTION:  ANY MATTRESS USED 

IN THIS CRIB MUST BE AT LEAST 27 ¼” 
(69 CENTIMETERS) BY 51 5/8” (131 
CENTIMETERS) WITH A THICKNESS NOT 
EXCEEDING 6” (15 CENTIMETERS)


THIS CRIB CONFORMS TO APPLICABLE REGULATIONS PROMULGATED BY THE 
CONSUMER PRODUCT SAFETY COMMISSION. 


04-000094-3 


IMPORTANT SAFETY INSTRUCTIONS: 

  Please read all instructions carefully before assembling. 

  For your safety, assembly by two or more adults is recommended. 

  Keep instructions for future use. 

  Use only vendor supplied hardware to assemble. Using unauthorized hardware could 

jeopardize the structural integrity of the item. 

  Do not remove warning labels from the cribs. Labels are permanent and not designed to be 

removed 


PRE-ASSEMBLY: 

  Remove all parts and hardware from the box and lay out on a clear carpeted or scratch-free 

work surface, as this will avoid damaging parts during assembly. The shipping box provides 
an ideal work surface. 

  Do not dispose of any packaging or contents of the shipping carton until assembly is 

completed to avoid accidentally discarding small parts or hardware. 

  Use the parts and hardware lists below to identify and separate each of the pieces included. 

  The illustrations provided allow for easier assembly when used in conjunction with the 

assembly instructions. 

  The use of power tools to aid in assembly is not recommended. Power tools can damage 

hardware and split wood. 


Summary of Contents for CATALINA 3 IN 1 CRIB

Page 1: ...Date 21 Jul 14 www potterybarnkids com Page 1 of 14 Rev pottery barn kids CATALINA 3 IN 1 CRIB...

Page 2: ...or other plastic film as mattress covers because they can cause suffocation Infants can suffocate in gaps between the crib sides and a mattress that is too small Never place additional padding under...

Page 3: ...eep instructions for future use Use only vendor supplied hardware to assemble Using unauthorized hardware could jeopardize the structural integrity of the item Do not remove warning labels from the cr...

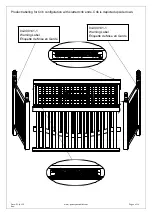
Page 4: ...4 Rev Product labeling for Crib configuration with slatted crib ends Crib is depicted upside down 04 000141 Warning Label 04 000141 Warning Label 04 000141 1 Warning Label tiquette de Mise en Garde 04...

Page 5: ...4 www potterybarnkids com Page 5 of 14 Rev PARTS INCLUDED PART 1 CRIB HEADBOARD 1x PART 2 SPINDLE FOOT 2x PART 3 LEFT CRIB END 1x PART 4 RIGHT CRIB END 1x PART 5 CRIB FRONT 1x PART 6 MATTRESS BASE 1x...

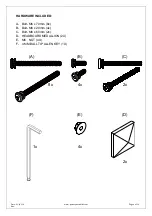
Page 6: ...www potterybarnkids com Page 6 of 14 Rev HARDWARE INCLUDED A Bolt M6 x 70mm 8x B Bolt M6 x 20mm 4x C Bolt M6 x 60mm 2x D HEADBOARD MEDALLION 2X E M6 NUT 4X F 4 MM BALL TIP ALLEN KEY 1X A 1x 2x 2x B 8x...

Page 7: ...Date 21 Jul 14 www potterybarnkids com Page 7 of 14 Rev ASSEMBLY INSTRUCTION STEPS 1 Attach the Spindle Foot PART 2 to the Crib Headboard PART 1 as shown 1 2 2...

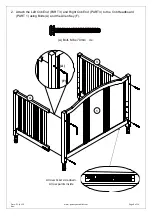
Page 8: ...barnkids com Page 8 of 14 Rev 2 Attach the Left Crib End PART 3 and Right Crib End PART 4 to the Crib Headboard PART 1 using Bolts A and the Allen Key F 1 A 3 4 F A Bolt M6 x 70mm 4x Arrow sticker sid...

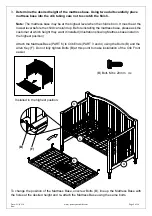
Page 9: ...tress base please ask the customer at which height they want it installed Illustration showing Mattress base install in the highest position Attach the Mattress Base PART 6 to Crib Ends PART 3 and 4 u...

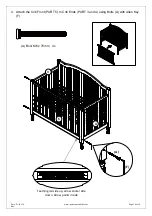
Page 10: ...otterybarnkids com Page 10 of 14 Rev 4 Attach the Crib Front PART 5 to Crib Ends PART 3 and 4 using Bolts A with Allen Key F A Bolt M6 x 70mm 4x Teething rail side up arrow sticker side down Arrow poi...

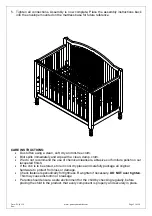
Page 11: ...cloth We do not recommend the use of chemical cleansers abrasives or furniture polish on our lacquered finish If the crib is to be stored store in cool dry place and carefully package all original ha...

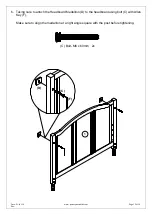
Page 12: ...com Page 12 of 14 Rev 6 Taking care to attach the Headboard Medallion D to the headboard using bolt C with Allen Key F Make sure to align the medallion at a right angle square with the post before tig...

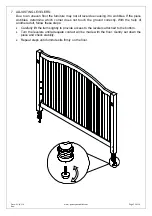
Page 13: ...bbles determine which corner does not touch the ground correctly With the help of another adult follow these steps Carefully lift the item slightly to provide access to the levelers attached to the bo...

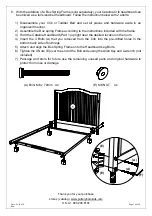
Page 14: ...ner 2 Assemble the Box spring Frame according to the instructions included with the frame 3 Hold the Catalina Headboard Part 1 upright near the desired location in the room 4 Insert the 4 Bolts A that...

Reviews: