Thank you for your purchase
Page
3
of
5
Date: 9-Aug-2012
stores | catalog | www.potterybarnkids.com
USA 1.800.290.8181
2.
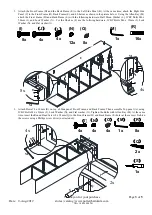
Attach the Front Frame (D) and the Back Frame (E) to the Left Side Panel (B). At the same time, attach the Right Side
Panel (C) to the Front Frame (D), Back Frame (E), and 4 Shelves as shown in the picture below. Using the Allen Key (M),
attach the Front Frame (D) and Back Frame (E) with the following hardware: Half Moon Washer (L), JCBC Bolts M6 x
50mm (J), and Lock Washer (N). For the Shelves (F) use the follwing hardware: JCBC Bolts M6 x 32mm (I), Lock
Washer (N), and Flat washer (O).
3.
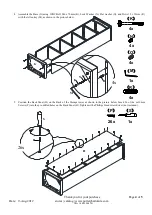
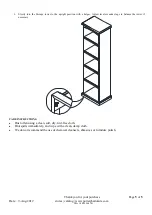
Attach Dowel 8 x 30mm (R) on top of Side panel, Front Frame, and Back Frame. Then assemble Top panel (A), using
JCBC Bolts M6 x 32mm (I), Lock Washer (N), and Flat washer (O). Tighten the Bolts with Allen Key (M). At the same
time, insert the Round Head Screw 8 x 38mm (Q) to the Front Frame (D) and Back Frame (E) hole (at the center). Tighten
the screws using a Phillips screw driver (not included).
(I)
8x
(N)
12x
(O)
8x
(M)
1x
(R)
16x
(
J
)
4x
(
L
)
4x
J
L
N
R
R
N
I
M
O
M
4x
8x
(
I
)
4x
(
N
)
4x
(
O
)
4x
(
M
)
1x
(
R
)
8x
(
Q
)
2x
(
S
)
1x
O
N
I
M
R
Q
S
C
E
D
A
4x
2x

