background image


Date: 8‐Aug‐13 


          www. potterybarnkids.com 


Page 9 of 9


Rev:   


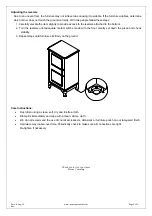
Adjusting the levelers

Due to an uneven floor, the furniture may not sit level due causing it to wobble. If the furniture wobbles, determine 

which corner does not touch the ground correctly. With two people follow these steps: 

1. Carefully elevate the item slightly to provide access to the levelers attached to the bottom. 

2. Turn the levelers until adequate contact will be made with the floor. Gently set down the piece and check 

stability. 

3. Repeat steps until furniture sits firmly on the ground.


Care Instructions: 


Dust often using a clean, soft, dry and lint-free cloth. 


Blot spills immediately and wipe with a clean, damp, cloth. 


We do not recommend the use of chemical cleansers, abrasives or furniture polish on our lacquered finish. 


Hardware may loosen over time. Periodically check to make sure all connections are tight. 

Re-tighten if necessary. 


Thank you for your purchase 

Stores


|


catalog


Summary of Contents for FARMHOUSE KITCHEN FRIDGE

Page 1: ...Date 8 Aug 13 www potterybarnkids com Page 1 of 9 Rev pottery barn kids FARMHOUSE KITCHEN FRIDGE ...

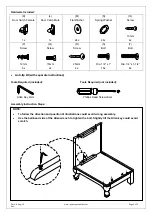
Page 2: ... Remove all parts and hardware from the box and lay out on a clear carpeted or scratch free work surface as this will avoid damaging parts during assembly The shipping box provides an ideal work surface Do not dispose of any packaging or contents of the shipping carton until assembly is completed to avoid accidentally discarding small parts or hardware Use the parts and hardware lists below to ide...

Page 3: ... Bolt Dia 1 4 x 1 T Bolt Dia 1 4 x 1 1 2 8x 6x 2x 4x 16x Anti tip kit with separate instructions Tools Required included Tools Required not included Allen Key 4mm Phillips Head Screwdriver Assembly Instruction Steps NOTE To follow the direction and position of illustrations could avoid wrong assembly Use the ball head side of the Allen wrench to tighten the bolt Slightly tilt the Allen key could a...

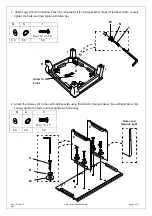
Page 4: ... Loosely tighten the bolts and then tighten with Allen Key M N T Dia 1 4 x 1 1 2 8 X 8 X 8 X 2 Attach the Shelves E to the Left Side Panel B using the Bolt S Spring Washer N and Flat Washer M Loosely tighten the bolts and then tighten with Allen Key M N S Dia 1 4 x 1 4 X 4 X 4 X S N M B E E Holes end towards right Arrow to Front M N T D I I H H ...

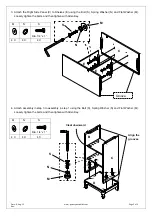
Page 5: ...her M Loosely tighten the bolts and then tighten with Allen Key M N S Dia 1 4 x 1 4 X 4 X 4 X 4 Attach assembly in step 3 to assembly in step 1 using the Bolt S Spring Washer N and Flat Washer M Loosely tighten the bolts and then tighten with Allen Key M N S Dia 1 4 x 1 4 X 4 X 4 X S M N E E C Groove Align the grooves S N M C B D Cleat downward ...

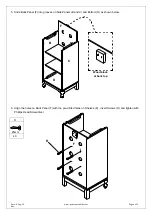
Page 6: ...ide Back Panel F into grooves on Side Panels B and C and Bottom D as shown below 6 Align the holes on Back Panel F with the pre drilled holes on Shelves E insert Screws R and tighten with Phillips Head Screwdriver R 25mm 4 X F R B C D Wood block at back top F ...

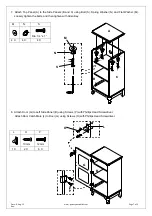
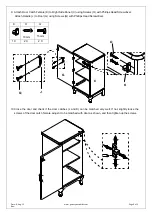
Page 7: ...sher N and Flat Washer M Loosely tighten the bolts and then tighten with Allen Key M N S Dia 1 4 x 1 4 X 4 X 4 X 8 Attach Door G to Left Side Panel B using Screws P with Phillips Head Screwdriver Attach Door Catch Male L to Door G using Screws O with Phillips Head Screwdriver L O P 10mm 12mm 1 X 2 X 6 X M N S A C B G B O L P ...

Page 8: ...d Screwdriver Attach Handle J to Door G using Screws Q with Phillips Head Screwdriver K O Q 10mm 15mm 1 X 2 X 2 X 10 Close the door and check if the door catches L and K can be matched very well If not slightly loose the screws of the door catch female adjust it to be matched with door as shown and then tighten up the screws O K Q J C G ...

Page 9: ...ottom 2 Turn the levelers until adequate contact will be made with the floor Gently set down the piece and check stability 3 Repeat steps until furniture sits firmly on the ground Care Instructions Dust often using a clean soft dry and lint free cloth Blot spills immediately and wipe with a clean damp cloth We do not recommend the use of chemical cleansers abrasives or furniture polish on our lacq...

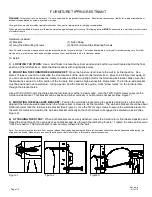
Page 10: ...t Make sure that the bracket is secured to a firm portion of the furniture frame and as high as possible Remember The furniture side bracket must be positioned near a wall stud Using a pencil and the bracket as a guide mark screw marks on the furniture item through the bracket holes Use a 3 32 drill bit to drill pilot holes into the furniture item at the screw marks Use the TWO Short screws to sec...

Reviews: