background image

Date: 2014-Oct-22 
Rev: 2014-Dec.-25                                                               


Page 12 of 12 


18.  Check alignments and fully tighten all connections at this time.   
19.  Insert the Drawer (L) into the crib. 
20.  Adjust the levelers under leg bottom to keep the crib sit level.   


21.  Assembly is now complete. 
22.  Place the assembly instructions back into the envelope mounted on the mattress base for future reference. 


CARE INSTRUCTIONS 

  Dust often using a clean, soft, dry, lint-free cloth. 

  Blot spills immediately, and wipe with a clean, damp cloth. 

  We do not recommend the use of chemical cleansers, abrasives, or furniture polish on our lacquered finish. 

  If the crib is to be stored, store in cool dry place and carefully package all original hardware to protect from loss 

or damage. 

  Check fasteners periodically for tightness. 

DO NOT

 over tighten, as this may cause distortion or breakage. 

  Parents should ensure a safe environment for the child by checking the crib regularly that every component is 

properly and securely in place, before placing the child in the product. 


Thank you for your purchase. 

stores    |    catalog    |    www.potterybarnkids.com 

USA      1.800.290.8181 


Summary of Contents for GEMMA CRIB

Page 1: ...Date 2014 Oct 22 Rev 2014 Dec 25 Page 1 of 12 pottery barn kids GEMMA CRIB www potterybarnkids com...

Page 2: ...suffocate on soft bedding Never add a pillow or comforter Never place additional padding under an infant To reduce the risk of SIDS pediatricians recommend healthy infants be placed on their backs to...

Page 3: ...al integrity of the item Do not remove warning labels from the crib Labels are permanent and not designed to be removed PRE ASSEMBLY Remove all parts and hardware from the box and place them on a carp...

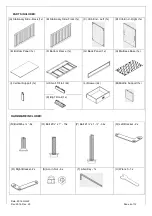
Page 4: ...ight 1x E Bottom Panel 1x F Bottom Frame 1x G Back Panel 1x H Mattress Base 1x I Vertical Support 1x J Small Tilt rail 2x L Drawer 2x M Middle Support 1x K Big Tilt rail 1x HARDWARE INCLUDED N Bolt M6...

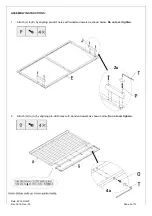
Page 5: ...ge 5 of 12 ASSEMBLY INSTRUCTIONS 1 Attach J to E by aligning pre drill holes with wooden dowels as shown below Do not over tighten 2 Attach G to A by aligning pre drill holes with wooden dowels as sho...

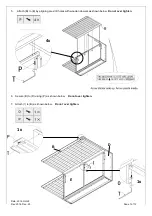
Page 6: ...age 6 of 12 3 Attach E to A by aligning pre drill holes with wooden dowels as shown below Do not over tighten 4 Attach D to assembly Step 3 by aligning pre drill holes with wooden dowels as shown belo...

Page 7: ...age 7 of 12 5 Attach B to E by aligning pre drill holes with wooden dowels as shown below Do not over tighten 6 Secure B to D using P as shown below Do not over tighten 7 Attach I to B as shown below...

Page 8: ...n dowels as shown below Do not over tighten 9 Assemble M to E by aligning pre drill holes with wooden dowels as shown below 10 Attach F to I by aligning pre drill holes with wooden dowels as shown bel...

Page 9: ...Date 2014 Oct 22 Rev 2014 Dec 25 Page 9 of 12 12 Attach C to assembly Step 11 as shown below Do not over tighten 13 Rotate the crib as shown below and secure A to C using P F 1x 1x 1x 6x 7X 2X 1X...

Page 10: ...Dec 25 Page 10 of 12 14 With the help of another adult carefully turn the Crib upright as shown below 15 Attach Q R to H using N Make sure the brackets point outwards as shown below 16 Attach S to N u...

Page 11: ...hich height they want it installed 17 Determine the desired height of the Mattress Base H With the help of an adult place the Mattress Base H into the crib Be careful not to scratch the finish Attach...

Page 12: ...ately and wipe with a clean damp cloth We do not recommend the use of chemical cleansers abrasives or furniture polish on our lacquered finish If the crib is to be stored store in cool dry place and c...

Reviews: