background image

Date: 2014-Sept-16    


    Page 7 of 9 

Rev: 2015-Jan-21 


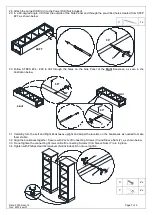
28.  Attach the Large Drill Bit (V) to the Power Drill (Not included). 
29.  In a 90-degree angle, drill from the outside of the Side Panel and through the pre-drilled holes created from STEP 

#27, as shown below. 


30.  Follow STEPS #24 -  #29 to drill through the holes on the Side Panel of the 

Right

  Bookcase, as seen in the 

illustration below. 


31.  Carefully, turn the Left and Right Bookcases upright and adjust the levelers on the bookcases as needed to make 

them stable. 

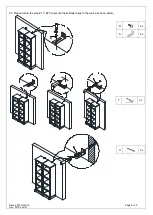
32.  Align the bookcases together. Secure with 2 sets of Connecting Screws (X) and Sleeve Nuts (Y), as shown below. 
33.  Do not tighten the connecting Screws until all Connecting Screws (X) & Sleeve Nuts (Y) are in place. 
34.  Tighten with Phillips Head Screwdriver (Not included). Do not over tighten. 


1x 


2x 


2x 

90° 

LEFT 

RIGHT 

90° 

90° 

RIGHT 

Summary of Contents for Grace Bookcase Tower

Page 1: ...Date 2014 Sept 16 Page 1 of 9 Rev 2015 Jan 21 pottery barn kids GRACE BOOKCASE TOWER www potterybarnkids com...

Page 2: ...s complete Use the parts and hardware lists below to identify and separate each of the pieces included The illustrations provided allow for easier assembly when used in conjunction with the assembly i...

Page 3: ...er L and tighten with Allen Key N Do not over tighten 3 Repeat steps 1 2 to assemble the Right Side Panel C to the Fixed Shelf D as shown below 4 Attach Bottom Panel E to the pre assembled piece by al...

Page 4: ...th Allen Key N Do not over tighten 8 Turn the bookcase upside down as shown below 9 Insert 4 sets of Bolt I Spring Washer K and Half Moon Washer M and tighten with Allen Key N Do not over tighten 10 C...

Page 5: ...support pegs and insert them into the corresponding holes of the new desired position C Place the shelf onto the shelf support peg and make sure each shelf is stable D Insert the original wood screws...

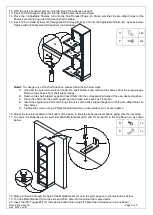
Page 6: ...wall as seen in the illustration below 23 Tighten the ITW Toggle Screw U with a Phillips Head Screwdriver not included Multiple Bookcases can be combined together by following the assembly instruction...

Page 7: ...of the Right Bookcase as seen in the illustration below 31 Carefully turn the Left and Right Bookcases upright and adjust the levelers on the bookcases as needed to make them stable 32 Align the bookc...

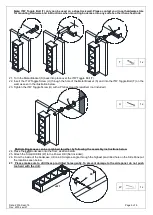
Page 8: ...Date 2014 Sept 16 Page 8 of 9 Rev 2015 Jan 21 T 35 Please follow the step 17 23 to secure these Bookcases to the wall as shown below R 2x S 2x T 2x U 2x R S U...

Page 9: ...and lint free cloth Blot spills immediately and wipe with a clean damp cloth We do not recommend the use of chemical cleansers abrasives or furniture polish on our lacquered finish Hardware may loose...

Reviews: